Roland Weigelt
Born to Code
-
Emaroo 5.0.0 - Support for Adobe CC 2023
Emaroo is a free utility for browsing most recently used (MRU) file lists of programs like Visual Studio, VS Code, Word, Excel, PowerPoint, Photoshop, Illustrator and more. Quickly open files, jump to their folder in Windows Explorer, copy them (and their path) to the clipboard - or run your own tools on files and folders with custom actions!
- Download Emaroo on www.roland-weigelt.de/emaroo
- Get ready-to-use custom actions
- Learn how to write your own custom actions
About this release
- Added: Support for Photoshop/Illustrator/InDesign CC 2022.
- Changed: Start menu folder renamed to just “Emaroo”.
-
A Swiss Army Knife for Developers: DevToys
Recently, I came across a wonderful tool called DevToys. It combines many common developer tasks like converting, encoding/decoding, formatting or escaping/unescaping text in one tool. DevToys can also generate UUIDs, “Lorem ipsum” texts, checksums and hashes. And it offers so much more (e.g., regex tester, text diff, Markdown preview) – here is a complete list.
A nice touch is that DevToys can detect and highlight tools that match the content of your clipboard (the feature can be disabled in the settings if you are not feeling comfortable with this).
Where to get DevToys
You can install DevToys from the Microsoft Store or download it from GitHub. Other deployment options (WinGet, Chocolatey) are also available.
For more information, see the DevToys website: https://devtoys.app.
For source code and issue tracking, visit DevToys on GitHub
-
Anti-Patterns for Software Features: Pony, Unicorn, Baby
Pony
A feature that someone, who is not part of the actual implementation, demands for the wrong reasons. For example, because of a desire to follow some current trend, political maneuvering, an unhealthy fascination with technology, or maybe infatuation with his/her intelligence.
Unicorn
A feature with unrealistic requirements. Low-cost, high-performance, with perfect user experience, bug-free, delivered yesterday.
Baby
A feature that a member of the project team wants to implement – or even worse – has already implemented. The emotional attachment makes it hard to abandon the “baby”, even if it would be better for the overall project.
-
Thinking About the Costs of a Software Feature
(This article was inspired by parts of my talk “Things I wish I had learned earlier as a developer” at the Developer Week 2022 in Nuremberg, Germany)
More than just coding
The total cost of a software feature comprises more than just the time spent on writing the code. When you think about the steps from the first idea to the release of the product, various contributing factors come to mind:
- The work necessary for turning a rough sketch of an idea into a viable concept
- What exactly does the feature do? And what not?
- What is the actual benefit for the users?
- How are users supposed to use it? In what context?
- Time spent on planning the work
- Who is available and has the skill set to implement the feature?
- Does the feature influence / depend on other features? Does this force a certain order?
- Is this a risky feature that better should not be started shortly before the coding freeze prior to a software release?
- Effort that goes into preparing the coding part of the development
- Which technology / framework / library should be used?
- “Buy vs. Build”: What are advantages/disadvantages?
- Are the licenses of all required components known and, most importantly, compatible?
- Time spent on writing the code
- “Known knowns”: Writing the code you know you need for the planned feature.
- “Known unknowns”: Finding the best solution by trying out which of the different imaginable approaches is best.
- “Unknown unknowns”: Dealing with unexpected issues regarding performance, reliability, usability, or user experience – sometimes you only find out when “the real thing” is running under realistic conditions. Also: running into bugs in tools / frameworks / libraries beyond your control.
- Testing the software
- Do you write unit tests? And/or integration tests?
- How do you test the UI?
- What are the economics regarding automatic/manual tests?
- Documentation
- How much external and/or internal documentation do you need?
- Can you get away with not writing documentation?
- Who can write the documentation? In what quality?
Wait, there’s more
A feature can also create costs after the release. Some features more, others less.
- Fixing bugs
- You need to reproduce the bug and preferably write a failing test.
- For critical bugs, you may have to stop your current work immediately for a hotfix.
- For a long-existing bug, fixing the bug may break expected behavior that other people have worked around.
- Worst of all: There is always a chance > 0% that the bug is caused by something beyond your control, and that the bug either may take a long time or may not be possible at all.
- Dealing with feedback
- You need to determine whether you are dealing with valid concerns or the opinion of a loud minority.
- Does the feedback lead to extending or changing the feature?
- Managing change
- Changes need to be communicated to customers – there is a high probability that, no matter how much effort you put into communication in the past, certain people will be surprised by the change.
- Does the change involve some kind of migration? Manual migration may require documentation with step-by-step instructions. An automatic migration, e.g., of configuration data, may have to deal with a variety of different settings as the result of repeated upgrades or manual changes.
- Dealing with roadmap issues
- Users of your software view existing features, including the feature you just added, as “the way things are intended”. For example, in terms of how data is processed or what the user interface looks like. If future features follow a different philosophy, this needs to be communicated. And you may have to deal with habits your users have formed because of your feature.
- A quick decision while developing a feature (e.g., what a single click or a specific hotkey does) may be short-sighted and block future development. This either requires a workaround or managing change (see above).
- Handling end-of-life
- Do you simply remove the feature? Do you add a configuration switch and keep it switched off by default?
- Are existing users still able to perform their specific workflow? If switching to a new workflow is too complicated, or maybe not even possible, customers may remember the other shortcomings of your software and switch to competing products.
- Always remember that no matter how specific and little-known a feature is, there is a probability that somebody uses and relies on this feature. You may never hear any feedback, even after announcing the removal (who reads release notes, after all). But once the feature is removed, chances are that somebody is upset and lets you know.
Where to go from here: The great filter
The cheapest feature is the one that is not implemented without anybody missing it. If you feel a feature is important enough to start work on it, you should first answer one simple question:
What’s the real-life scenario?
When being asked to explain the purpose of a proposed feature, are you able to go beyond “one can do X with it”? Are you able to tell a believable story with a realistic protagonist in a certain context, who encounters a problem that can be solved by using the feature? And does this story make sense when telling it to other people?
If not, that feature may be a candidate for not spending budget on it.
Want more?
If you liked this non-technical article, you may like the other articles of the “Thoughts” category, e.g.,
-
Save and Restore Webcam Properties with CamProps 1.2.0
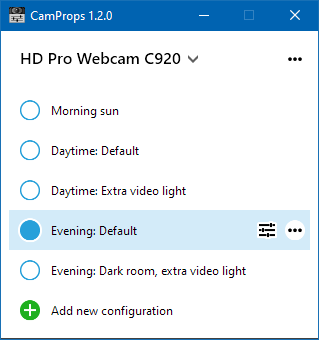
CamProps is a free utility for quickly adjusting and managing the properties of webcams and other video capture devices. I wrote it when I struggled with my Logitech C920 that required some manual tweaking to achieve a good picture quality. CamProps enables you to store and quickly recall settings which comes in handy if you have different lighting situations in your room – or when the webcam once again simply “forgets” its settings.
About this version
I recently I received feedback from CamProps user José M. Alarcón (who also helped me with the Spanish translation). He has created a large number of presets to deal with the ever-changing lighting conditions in his office. It turned out that the auto-sizing of the main window did not work well, cutting off the list after an arbitrary number of items instead of showing a scroll bar.
Version 1.2.0 fixes this. As previously, the window sizes to its content at startup, but can now be resized and shows a scrollbar if necessary. When you add a new configuration, the window resizes to fit its content.
Where can I get it?
You can download CamProps at https://www.roland-weigelt.de/camprops/
Which devices can I use?
CamProps works with all webcams and video capture devices that support opening the webcam driver property dialog (either the default provided by Windows or a specific dialog by the manufacturer's driver).
For instance, when you press the “
 ” button for a Logitech C920 without the Logitech software installed, this will open the following dialog:
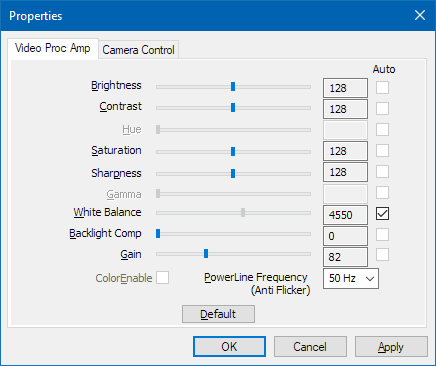
(This dialog may look different for other devices)
-
The Search for a Proportional Font for Developers (Revisited for VS Code)
Back in 2016, in my article “The Search for a Proportional Font for Developers”, I wrote about trying out various fonts as a replacement for Segoe UI, a sans-serif font which once had, but then lost serifs for the uppercase “i”. In the end I settled on Ebrima, which (according to Wikipedia) “is an OpenType font designed to support African writing systems.” And: “Its Latin alphabet is based on the Segoe font.” The design of the Latin alphabet is based on the Segoe UI font from before Windows 8, i.e., it still has the serifs for the uppercase “i”.
There is an issue, though: The backtick character in Ebrima has a special behavior that most likely has its roots in the original purpose of the font but does not work well for displaying source code. Which turned out to be a problem when I started to work more with TypeScript/JavaScript in addition to my usual C# development.
Look at this example, first shown using the Consolas font:

(The font size is larger than usual for demonstration purposes)
And now in Ebrima:

Note that the backticks are barely visible.
Here is the example in Segoe UI:

The backticks are now visible, but uppercase “i” and lowercase “L” are hard to distinguish (even more so at my usual font size).
Stylistic sets to the rescue
When Segoe UI was updated for Windows 8, the original designs of the modified glyphs were moved to the SS01 OpenType stylistic set instead of removing them altogether. Which means that they can be brought back – if you know how.
The “regular” Visual Studio does not let you activate stylistic sets (not exactly a surprise, we cannot even have italics in the editor out-of-the-box). But Visual Studio Code does.
In the font settings UI, under “Font Ligatures”, press the “Edit in settings.json” link:
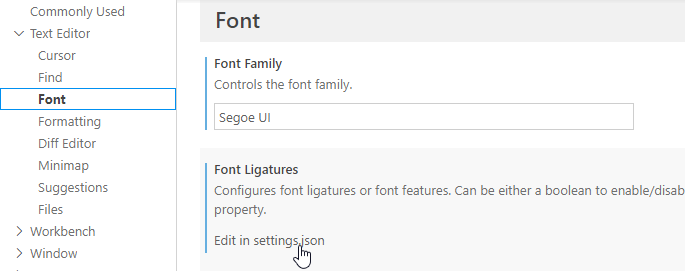
Next, add the following setting for
editor.fontLigatures(note the double and single quotes):{ ...
"editor.fontLigatures": "'ss01'", ... }This is the result:

Nice!
Now if only the WPF-based, “big” Visual Studio (which I use for my C# development) would be a bit more flexible when it comes to fonts…
-
Using PowerPoint as a WYSIWIG Editor for HTML Templates (Proof of Concept in C#, Update)
In my previous blog post I described a proof-of-concept for creating an HTML template from a PowerPoint slide. After using this in a digital signage software for the local basketball club for a while, it has turned out that there is room for improvement. I have updated the demo project on GitHub accordingly.
Fixed: Do not close an already running PowerPoint application
The cleanup steps in the original code were a bit overeager, affecting an already running PowerPoint instance. In the worst case, unsaved documents were closed without a warning.
How to create just one HTML file per slide
The initial proof-of-concept created two files for each slide (HTML and PNG), with the HTML file using the PNG as the background image. By encoding the PNG as base64 and using a data URL, it is possible to have just one HTML file for each slide. The code in the demo project now creates a second HTML file (
HTMLPage2.html) to demonstrate this. The downside is a larger file size, but the ease-of-use in file operations outweighs this in many scenarios.Links
-
Using PowerPoint as a WYSIWIG Editor for HTML Templates (Proof of Concept in C#)
The digital signage software that I develop for the local basketball club now supports HTML templates. I use this feature, e.g., for the introduction of the players on the video screens in the arena. For each player, I just enter the player’s data like name, jersey number, position, weight and height – which is then inserted dynamically into the template.
The software also supports importing PowerPoint slides as static images. PowerPoint plays an important role for many screens used at the home game, not least as it is one of the easiest ways for non-technical people without a design background to create content. And even though I feel very comfortable using Photoshop or Illustrator – if I quickly need to create a screen during the most stressful phase of home game, PowerPoint is my tool of choice.
One day, when I hand-coded a particularly simple HTML template for announcing the number of spectators, I spent a lot of time positioning the number next to a sponsor’s logo. That got me thinking: What if I could create templates like this in PowerPoint? All it would take would be some kind of marker text (e.g.
{{Number}}) and a way to translate a PowerPoint slide to HTML.What about PowerPoint?
Unfortunately, Microsoft removed the feature to export slides as HTML years ago. Third-party solutions do exist, but for my purposes, the libraries are prohibitively expensive. So, I had to find my own solution.
As a single developer, on a limited (time) budget, the first thing to do in such a case is to decide which problems not to solve:
- I do not need to take care of different screen sizes; the width and height of the target display is fixed.
- The HTML is not intended to be edited later, i.e., it does not have to be “pretty”. This means that
divtags with absolute positions are fine.
In fact, I do not even need a full-blown PowerPoint to HTML conversion. I can “fake” the HTML conversion by
- creating a PNG image of everything on the slide except the dynamic parts, and
- translate the shapes containing dynamic texts into div tags that are styled to match the shape style on the slide.
For reading and analyzing the PowerPoint file, I use the (COM-based) Office automation API instead of the more modern Open XML SDK, because the API also allows me to create PNG files from the slides.
The code
I have published some proof-of-concept code on https://github.com/RWeigelt/PowerPointSlideHtmlLayoutDemo, written in C#/.NET 6.
The project includes the PowerPoint file
Example.pptxthat contains various markers for insertion points inside- normal shapes,
- grouped shapes,
- placeholder shapes (i.e., the editable shapes placed on the slide master), and
- table cells.
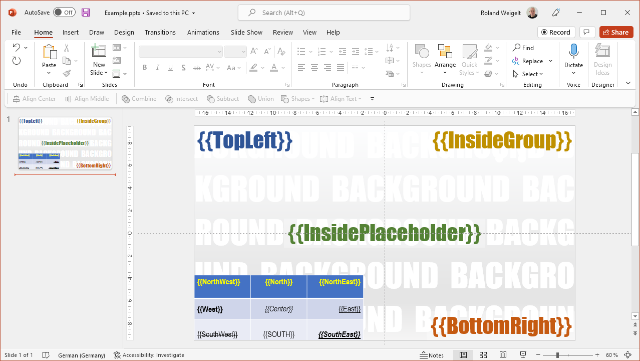
When you run the project, it creates two files in your “Pictures” folder,
HtmlPage.htmlandBackground.png.HTMLPage.html
The HTML file contains the insertion point shapes, translated to
divtags: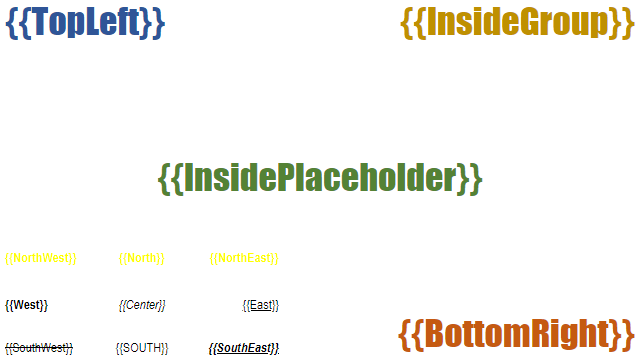
(shown without background image, border added for illustration only)
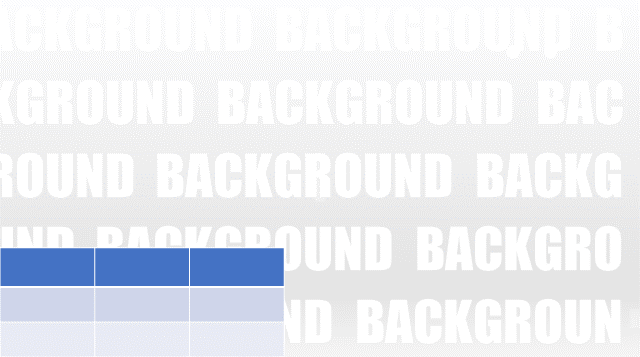
Background.png
The background image contains all content that is not an insertion point (e.g., images, static texts).
Combined
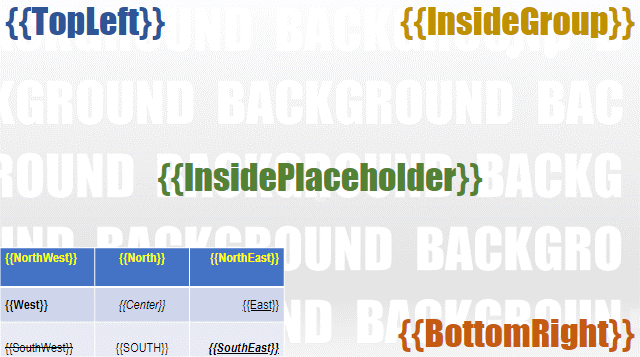
When you open
HtmlPage.htmlin a web browser, its CSS loadsBackground.pngas a background image.The result looks like this:
Where to go from here
This demo code is obviously just a start. While it does consider fonts, texts sizes and styles as well as alignment, it does not cover all design and layout capabilities.
Depending on your requirements, you may want to look into supporting text effects (e.g., shadow or glow should be possible in CSS) and transformations like shape rotation. You also may choose a different syntax for the insertion points.
The code is licensed under the “BSD Zero Clause License”, so you can use it without limitations and do not even have to credit me. I do not have plans to develop this into a general-purpose library; further development will be very specific to the needs of my digital signage software. If you take this idea and create something from it that may be of interest to others, drop me a line and I will link to your website or GitHub repository.
-
Emaroo 4.9.0 - Support for Visual Studio Code 1.64
Emaroo is a free utility for browsing most recently used (MRU) file lists of programs like Visual Studio, VS Code, Word, Excel, PowerPoint, Photoshop, Illustrator and more. Quickly open files, jump to their folder in Windows Explorer, copy them (and their path) to the clipboard - or run your own tools on files and folders with custom actions!
- Download Emaroo on www.roland-weigelt.de/emaroo
About this Release
- Updated: Support for Visual Studio Code 1.64 (changes regarding most recently used folders/workspaces). Previous versions of Visual Studio Code are still supported.
-
How to Create a PNG File from a Web Page in C#
Both Google Chrome and Microsoft Edge provide a feature for creating a PNG file from the currently visible viewport. For this, you start the browser executable in “headless mode”, i.e., without the UI (command line argument
--headless), and provide the path of the output file (—screenshot=<path>).Using this from C# code is straightforward:
void HtmlToPng(string source, string outputFilePath)
{
    var arguments = $"--headless --disable-gpu --default-background-color=00000000 --window-size=1920,1080 --hide-scrollbars --screenshot=\"{outputFilePath}\" \"{source}\"";

    var process = new System.Diagnostics.Process();
    process.StartInfo.FileName = "msedge"; // or "chrome"
    process.StartInfo.Arguments = arguments;
    process.StartInfo.UseShellExecute = true;
    process.Start();
}
Examples:
HtmlToPng("https://www.example.com", @"C:\example\output.png");HtmlToPng(@"C:\example\input.html", @"C:\example\output.png");
(For complete code, download the demo project on GitHub)
Details
- By starting the process with
UseShellExcute = true, we do not have to care about the exact location of the Edge (or Chrome) executable – specifyingmsedgeorchromeis sufficient. --disable-gpuis taken from the Google docs (we don’t need a GPU for what is basically one frame).--default-background-colorspecifies the background color to use if the page itself has no background set. The color is a hex value in the format AARRGGBB (AA = alpha).00000000means transparent;0also works, but could be confused with “black” when reading the code later.--window-sizespecifies the size of the area available for the webpage to render. The created PNG file will only show this area.- The
--hide-scrollbarstakes care of scrollbars that may appear if the page needs more space than available.
- By starting the process with