jQuery, SharePoint Picture Libraries, and automatic thumbnails
Picture Libraries are an interesting beast in SharePoint. When you upload a picture to a picture library you get not one but three images! Whenever you upload an image to a Picture Library, SharePoint automatically creates two additional images for you. A small thumbnail it uses in views and a preview image it uses when you’re viewing the picture properties. Leveraging this “feature” we can build a pretty cool client side gallery using the auto-generated thumbnails and some JavaScript to produce this:
No C# or custom web parts needed. Just a few simple things to get this effect:
- jQuery installed on your site (there are many ways to do this like Jan Tielens solution here)
- A document library to store the JavaScript we’re going to write
- The jQuery Thumbnail Hover Popup for Greasemonkey plugin
- A SharePoint Picture Library
Creating the Picture Library
Create a picture library. I named mine “Pictures” but your can be whatever you want it to be. You must create a Picture Library as we’re going to be using the automatic thumbnails and only the Picture Library template will do this for us. In the demo I just grabbed half a dozen images from the Windows 7 wallpapers on my hard drive (C:\Windows\Web\Wallpaper) and uploaded them.
The Script
Here’s the complete source code to the JavaScript we’ll use. Copy this and upload it to a document library. I use the Site Assets library that’s available on any SharePoint site where the Wiki Home Page feature is activated (like the Team Site template) or you can just use or create any document library for it.
Let’s break down some of the parts to this.
First we have a div tag with an id of “pictureMicroGallery”. This is where we’ll load our pictures into. The text “Loading…” is just a placeholder. You can put an animated image here or whatever you want while the images are fetched.
Next we start our own script.
The first line is this:
Here we’re using a built-in function in SharePoint to tell it to call our own method, “loadSharePointPictures” after the sp.js file is loaded. This is similar to the typical jQuery document load technique you might see:
However instead of waiting for the document to load, we’re waiting for a script to load. If you try to execute client side functions before sp.js is loaded, you’ll run into problems. So we let the system launch our function when it’s ready. Next is the loadSharePointPictures function. This is our call to the client side object model to load content dynamically.
All the lines are commented so pretty self explanatory. In a nutshell we’re loading a list called “Pictures” (line 7), creating a query to fetch all the items (line 9), selecting two columns (line 13), and then executing the call asynchronously (line 15-17).
When this call is successful, we call this function:
Here we get the enumerator of items from our “pictures” variable (this was set in the previous function). Then we iterate through each item, fetching it and the data from each item in the list in lines 6-10.
The FileLeafRef column contains the name of the image file we uploaded (test.jpg, etc.). The FileDirRef column contains the folder where the list lives.
Line 11 is where the magic happens. Remember when you upload a file to a picture library I said there are three images. Your original + two additional images that are automatically generated for you.
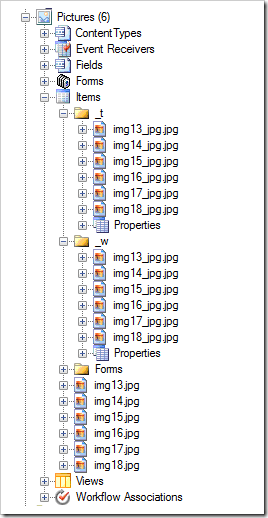
Here’s the picture library in SharePoint Manager:
See how we have img13.jpg (which is the original image file uploaded) but then in a “_w” folder there’s “img13_jpg.jpg” and the same in a folder called “_t”.
The _t folder contains the small thumbnail image (set to 160 pixels wide). It’s the image used when you view the “All Pictures” view of your picture library. The other _w folder is the large thumbnail (set to 640 pixels wide). This is the image used when you view the picture properties.
The great thing about these images (apart from being created for you) is that they’re set to a known size (width wise) and the do some magic in setting the height, getting it as close to the original aspect ratio as possible. That means you can use these images yourself to produce a gallery (like we’re doing here) and get pretty consistent results even if your images are totally off.
In any case, in this example I deliberately uploaded very large images (1920 x 1200) to show you that you can use these thumbnails as your gallery rather than trying to resize the originals.
Back to the code. In lines 7-11 we take the filename and directory and build our path to the small thumbnail version of the image (in our _t folder). So img13.jpg becomes:
The thumbnail itself is a .jpg file (regardless of what the original source file is) so the original extension is embedded in the filename if you need it. Just decompose the thumbnail file, drop the extension, and replace the “_” with a “.” to find your original file. Lines 8 and 9 turn our original filename into our thumbnail version.
Lines 15-19 we take the array of pictures we previously built (which is a url to the thumbnail image) and build up a HTML string of IMG tags with the SRC pointing at where the thumbnail is.
Finally in line 21 we use jQuery to replace the contents of our DIV tag with our new HTML containing the IMG tags.
Note: You can separate these out and just have an include file with the .js content and manually add to the <div> tag to your page. Your choice. I just find that SharePoint often mangles the HTML I write and litters it with it’s own styles and tags so I just include the whole thing from a library. That way none of my markup is messed with. Take that Microsoft!
Adding It To The Page
With our script ready, add a Content Editor web part to the page and point the content at our JavaScript include file we uploaded to the Site Assets library (or wherever you have the script living).
Save the page and it should look something like this (I just replaced the Documents web part on the Team Site home page with my Content Editor):
Thumbnail Hover Popup Plugin
I mentioned this up front but why? As it happens, I stumbled over this jQuery plugin awhile ago and filed it away for something to look at some day. Turns out it’s a cool plugin which mirrors how the automatic thumbnails in SharePoint are generated. The author created it for Greasemonkey so he could preview larger images on sites without having to click through to a page. It works where the thumbnails and larger images have similar filenames (except for a change or two).
This works great for SharePoint because the _t or _w directories hold different size images and the filenames are built from the filename of the original image. Once you know one, you can get the image for the other.
We’ll do this on our gallery (which uses the thumbnails) so when we hover over the image, we present the preview image.
First upload the plugin (a single file, jquery.thumbhover.js) to your Site Assets library (or wherever your other script is).
Next add the following line to your own script to include the thumbhover one:
We’ll add a call to the plugin for all our images. Remember the IMG tag we added a class named “pictureGallery” to it (line 16 above). Now we can use a jQuery selector to attach the plugin to every IMG file. We need to do this after we rewrite the HTML for the IMG tags so find this line:
And add this after it:
This attaches the thumbPopup to every IMG tag with the class “pictureGallery”. The imgSmallFlag is the folder for the small images and the imgLargeFlag is for the medium thumbnails (the _w folder).
When it comes time to render the popup, the plugin will grab the SRC of the image then change the imgSmallFlag to the imgLargeFlag (so changing the IMG from the 160 pixel wide thumbnail to the 640 pixel one).
Now when you hover your mouse over the image thumbnails on your page, the plugin will fetch the large thumbnail and use it in the popup. The final effect will look something like this:
Enhance it!
That’s it. Now you have a simple script you can drop onto a page and get a cool looking gallery display out of it, leveraging the automatic thumbnails SharePoint generates for you. Of course, that’s only the beginning.
Some ideas on enhancements you can do to the script:
- Add in the ability to fade the popups in when you hover over the thumbnail. This will create a nicer effect for the user
- Display additional text on the popup in an overlay (use the description field from SharePoint for the text!)
- Change how you display the thumbnail, perhaps link each thumbnail to the original image or SharePoint list item (you’ll need to add more fields to your JavaScript if you want to read them in the success function)
- Add paging to the list of images so you display them in batches of 20 or 30
- Do some better formatting on the gallery and jazz it up a bit
Have fun and don’t be afraid to experiment!
Last Note: We don’t really *need* jQuery for this to work (except for the hover effect). Most of the code is just plain old JavaScript. The line to replace the contents of the DIV tag can be done with regular JavaScript so if you don’t want the hover effect (which is a jQuery plugin so requires it) and don’t want to use jQuery… then don’t. You’ll still have a simple and free client side photo gallery from the automatic thumbnails SharePoint gives you.
Enjoy.
7 Comments
Comments have been disabled for this content.


