Electronics for developers with Netduino Go
![]() Wouldn’t it be great if you could build your own stuff? Microcontrollers let you do that, but they usually require dealing with a lot of complexity and unknowns. If you’re a software developer, chances are you don’t really know how to use a capacitor, or how a transistor works, even though it is at the heart of all computers.
Wouldn’t it be great if you could build your own stuff? Microcontrollers let you do that, but they usually require dealing with a lot of complexity and unknowns. If you’re a software developer, chances are you don’t really know how to use a capacitor, or how a transistor works, even though it is at the heart of all computers.
Well there is a way now to develop awesome hardware projects without knowledge of electronics, just by connecting modules together. Netduino Go is a platform that allows for that without constraining the types of projects you can build. Today the number of available modules is still limited (the platform was released only this month), but it is expected to grow fast.
In this post, I’ll introduce you to the platform, with the assumption that you know programming but not electronics.
So let’s get started. What you need to follow along this post is the following:
- A Netduino Go
- A potentiometer module
- A RGB LED module
- A version of Visual Studio (C# Express is enough)
- The .NET Micro Framework 4.2
- The Netduino SDK for 64-bit or 32-bit depending on your version of Windows
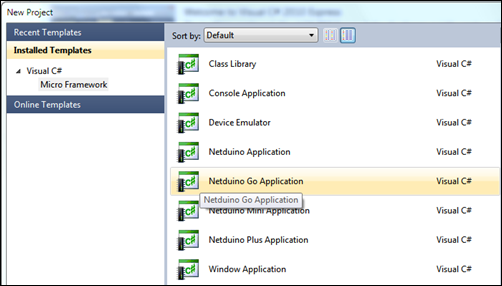
First we’ll create a new project, selecting the Netduino Go Application project type:
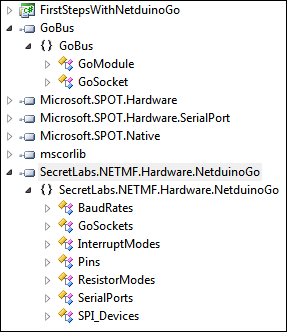
This creates a new project with references to assemblies managing the .NET Micro Framework, the Go Bus and the Netduino’s ports:
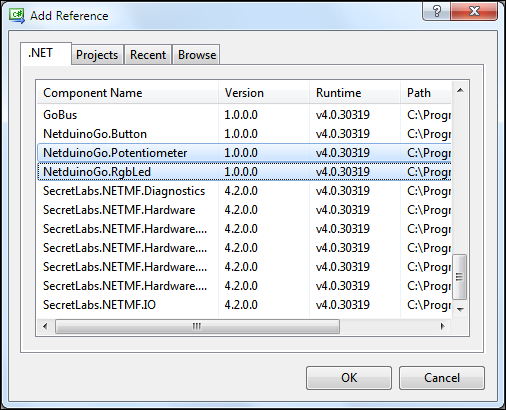
We still need to add specific support for the two modules we’re going to use, the RGB LED and the Potentiometer. For that, let’s right-click on References and add the two assemblies we need:
Once that is done, we can start creating objects representing our modules:
using System;
using NetduinoGo;

namespace FirstStepsWithNetduinoGo {
    public class Program {
        public static void Main() {
            var led = new RgbLed();
            var pot = new Potentiometer();
        }
    }
}
This code works without specifying a port because Netduino Go knows to take the first module it finds that identifies as the right module type. Each constructor has an overload that takes a GoSockets enumeration so we could have written:
using System;
using SecretLabs.NETMF.Hardware.NetduinoGo;
using NetduinoGo;

namespace FirstStepsWithNetduinoGo {
    public class Program {
        public static void Main() {
            var led = new RgbLed(GoSockets.Socket2);
            var pot = new Potentiometer(GoSockets.Socket1);
        }
    }
}
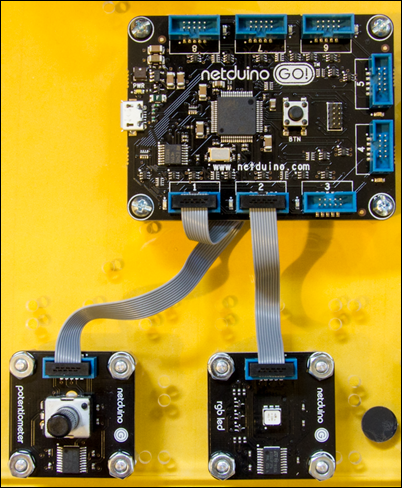
We now have objects representing our module, but we still need to do something with them. Let’s start by turning on that LED. But before we do, let’s review our hardware setup:
The potentiometer is connected to socket #1 on the Netduino, and the RGB LED is on socket #2. Now we need to connect a micro-USB cable between the computer and the Go. This will both power the whole thing and give us the channel we need to deploy and debug our code. The first time you do that, it will also install the driver for the Go on your computer.
Let’s code:
led.SetColor(255, 212, 42);
In order to deploy that code, we need first to make sure that the project properties are set to deploy on USB:
Once this is done, we can hit F5 and see that LED turn on…
And… You should have gone blind by now. That LED is incredibly bright. Our next step is going to add some code so that the potentiometer can control the intensity of that light:
var led = new RgbLed();
var pot = new Potentiometer();
int red = 255, green = 212, blue = 42;
while (true) {
    var intensity = pot.GetValue();
    led.SetColor(
        (byte)(red * intensity),
        (byte)(green * intensity),
        (byte)(blue * intensity));
}
Deploying this code gives the following result:
And of course, this is visual Studio, so we have full debugging support, as can be seen in the video.
And that’s it for today. This should get you started with Netduino Go. And we didn’t have to solder anything… Next time, we’ll play with a touch screen.