Setting up a continuous integration server for a CodePlex project using TeamCity and Mercurial
 Continuous integration enables developers to have an automated way of validating the quality of their check-ins. A CI server will monitor your version control repository and on every check-in will build the project and at the very least run unit tests. If anything goes wrong (compilation error, failing test, etc.), the server will send e-mail to the team so the developer responsible for the faulty check-in can investigate and fix the problem.
It’s an automated finger pointer if you will. It’s one of those things that seem obviously necessary for any project above a certain size but that is too often neglected. After all, you always run unit tests before you check-in, right? Right?
One of the nice things about CI servers is that they are relatively easy to set-up and they can run on any machine: you only need the server to be publicly available if you want anybody to be able to check out the state of the build. Otherwise, one of your own dev machines or an old unused server will do just fine.
For this post, we’ll use TeamCity (alternatives include CruiseControl and of course Team Foundation, which my Evil Overlords tell me I need to mention here). I will show how to set it up against a random CodePlex project that uses the new (and super rock & roll) Mercurial option. I’ll assume a clean machine with just Windows installed.
Prerequisites
You will need the version control software (Mercurial here) installed on the server before you get started. I used TortoiseHg so that I can use all its tools in case I need to diagnose something.
You will also need the .NET Framework installed on the machine as well as any dependency of the application that isn’t going to come down from version control with the application itself. In our case, SQL Server Express (our default database today is SQLite but we support SQL Server as well and have tests checking it).
Installation
The TeamCity continuous integration server is what we use on the Orchard project. It can be downloaded from the following URL:
http://www.jetbrains.com/teamcity/download/index.html
The default settings can be mostly kept, but you might want to change the configuration directory from \Users to a location that doesn't depend on the current user, such as \BuildServer.
You may also want to change the port for the web access to the team server from 80 if the same server is also being used for other web serving. If you use a different port, don’t forget to set-up the Windows firewall to let it go through, otherwise you won’t be able to reach the server from other machines.
To do that, click “Windows Firewall” from the bottom-left of the “Network and Sharing Center” control panel, then click “change settings” and go to the “Exceptions” tab. From there, “add port”. You can give it any name you want (may I suggest “TeamCity”?) and the port you chose. Keep “TCP” checked.
Once the Windows set-up is done, you will be directed to the web interface where there are some setup steps left.
Configuration
The first step is to create the administrator account. Once this is done, you can create your first project by clicking "Create project" and entering a name for it. You can then create a build configuration. Name it "Continuous Builder", describe it as "Runs on checkins" and keep the other default settings, except for the build number format, which you can change to "1.0.{build.vcs.number.1}" so that it picks up the source tree's change number and appends it after "1.0.".
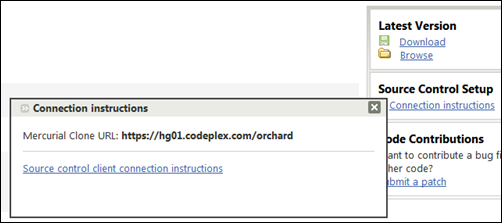
Click "VCS Settings". Add a new VCS root, name it with the name of your project, choose the type of source control you use (Mercurial) and enter the access data, which you can find under the “Source Code” when you click “Connection instructions” under source control setup:
 You need to give TeamCity credentials to access the code repository. We recommend creating a special user that you use only for TeamCity (we use OrchardTC on CodePlex). Test the connection and hit save once you've verified it works.
In the next screen, you'll need to enter the path to the checkout directory (we use "C:\Orchard" on our server). Check "Clean all files before build". Click "Choose build runner".
Choose MSBuild as the build runner. In "build file path" enter the relative path to your project file, relative to the checkout directory you configured before (for us, this is "trunk\src\kona.msbuild"). Choose 3.5 as the MSBuild version to use if like us you’re using 3.5. Click "Save".
You can now go to the fourth step, "Build Triggering". Check "Enable triggering when files are checked into VCS" and save.
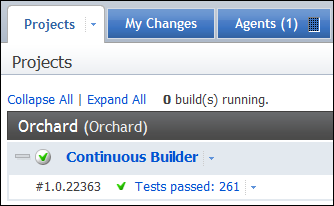
Once this is done, you should be able to hit the "Run" button. If all went well, you should see a report on the "Projects" hone page that tells you everything passed:  By default, the TeamCity agent runs under the system account. It is desirable to run your tests under a less privileged account.
To do that, start by creating a local user account that will be used to run the agent. Go to the services management of the server and find the "TeamCity Build Agent" service. Right-click on it and select "Properties". Under the "log on" tab, switch to "This account" and enter the credentials (we use ".\orchardtc"). Click OK and restart the service.
If you observe the activity from TeamCity's web interface, you may see the number of agents drop to zero. Don't panic, TeamCity should pick-up the change after a few seconds. You may queue a run of the build to check that everything is back to normal.
Next, you’ll want to set-up e-mail notifications. To do that, go to "My settings and tools" and click "edit" next to "email notifier". Click "add new rule" and check "send notification when the build fails" and "when the build is successful". Also make sure the rule applies to "watch build from the project: all projects".
For the e-mail to be properly sent, you may need to configure the general e-mail settings in TeamCity. To do that, go to "Administration" and click on "edit server configuration". Then go to the "email notifier tab" and configure it to point to your mail server if you already have one. The form has a convenient "test connection" button that you can use to, well, test your connection.
If you don’t have an existing SMTP server on which you have rights, you may want to install the local one that comes with Windows Server. Don’t forget that the admin console for the built-in SMTP server is under the old IIS 6 console.
Once this is done, you’re pretty much set-up and ready to go. Of course, there are many other tasks you might want to add to CI. For example, we’re working on getting it to generate release packages automatically so that each and every build is ready to be released. You can also run functional tests, analysis tools, etc.
I hope this helps.
- TeamCity:
http://www.jetbrains.com/teamcity - TortoiseHg:
http://tortoisehg.bitbucket.org - Rob’s post and screencast on TeamCity:
http://blog.wekeroad.com/blog/source-control-and-continuous-integration-on-the-cheap
http://blog.wekeroad.com/mvc-storefront/kona-2