Archives
-
SPA Series: Turn our ShowTitle app into a Progressive Web App
In this post we turn our great web app into a Progressive Web App (PWA). "A progressive web app provides an app-like user experience that is low friction and is built using modern web capabilities and hosted on the web and can become an app on the user's system over time." To learn more about the great promises of Progressive Web Apps read Addy Osmani's great overview article Getting started with Progressive Web Apps. Google also has a great entry point to the required information at https://developers.google.com/web/progressive-web-apps/.
Getting up to speed with Progressive Web Apps
Progressive Web Apps are cool, and in my opinion the future of a whole category of mobile apps. An inspiring introduction to this vision is this presentation by Bruce Lawson. See also https://dev.opera.com/blog/pwa-taipei/. For a great overview of other material available on Progressive Web Apps have a look at https://github.com/hemanth/awesome-pwa.
What do I want to achieve in this blog post
In this article we explore how to get the following functionality working in our PWA:
- Hosting in a SharePoint document library - for authentication, access to data within your company, and freedom of distribution
- Add to homescreen - so we get an icon between the other apps on your mobile device or between the apps in your browser
- Splash screen - for direct visual feedback on start of our application
- Offline support - so we can use our app even if we are not connected to the network
The code for our sample Progressive Web App can be found at https://github.com/svdoever/sharepoint-progressive-web-apps/tree/master/ShowTitleProgressiveWebApp.
Generating artifacts
For the PWA we need things like a favicon, icons for the different (mobile) platforms, html code to include these icons, and configuration directives for platforms to provide us with PWA functionality. The site http://realfavicongenerator.net/ can help us out with some of these steps. It generates a zip file with icons and other artifacts based on a single uploaded icon. Because we are creating the amazing "Show Title" app that shows the title of SharePoint site hosting our app, I downloaded an icon of the letter T and used that for the generation. The generator created a zip file with artifacts and the following HTML lines for inclusion in the head of our app page:
<link rel="apple-touch-icon" sizes="60x60" href="/apple-touch-icon-60x60.png"><link rel="apple-touch-icon" sizes="76x76" href="/apple-touch-icon-76x76.png"><link rel="apple-touch-icon" sizes="120x120" href="/apple-touch-icon-120x120.png"><link rel="apple-touch-icon" sizes="152x152" href="/apple-touch-icon-152x152.png"><link rel="apple-touch-icon" sizes="180x180" href="/apple-touch-icon-180x180.png"><link rel="icon" type="image/png" href="/favicon-32x32.png" sizes="32x32"><link rel="icon" type="image/png" href="/favicon-16x16.png" sizes="16x16"><link rel="manifest" href="/manifest.json"><link rel="mask-icon" href="/safari-pinned-tab.svg" color="#5bbad5"><meta name="theme-color" content="#ffffff">Because we are hosting in a subfolder of a SharePoint document library and not in the root of a website we need to remove the leading slashes as in:
<link rel="apple-touch-icon" sizes="60x60" href="apple-touch-icon-60x60.png"><link rel="apple-touch-icon" sizes="76x76" href="apple-touch-icon-76x76.png"><link rel="apple-touch-icon" sizes="120x120" href="apple-touch-icon-120x120.png"><link rel="apple-touch-icon" sizes="152x152" href="apple-touch-icon-152x152.png"><link rel="apple-touch-icon" sizes="180x180" href="apple-touch-icon-180x180.png"><link rel="icon" type="image/png" href="favicon-32x32.png" sizes="32x32"><link rel="icon" type="image/png" href="favicon-16x16.png" sizes="16x16"><link rel="manifest" href="manifest.json"><link rel="mask-icon" href="safari-pinned-tab.svg" color="#5bbad5"><meta name="theme-color" content="#ffffff">Besides a set of icons it generated a browserconfig.xml file for Internet Explorer with the following contents (leading slashes removed):
<?xml version="1.0" encoding="utf-8"?><browserconfig><msapplication><tile><square70x70logo src="mstile-70x70.png"/><square150x150logo src="mstile-150x150.png"/><square310x310logo src="mstile-310x310.png"/><wide310x150logo src="mstile-310x150.png"/><TileColor>#da532c</TileColor></tile></msapplication></browserconfig>The web manifest file
Now we need to add a manifest file that drives our Progressive Web App. The specifications for the app manifest can be found at https://www.w3.org/TR/appmanifest/, but a better readable reference can be found at https://developer.mozilla.org/en-US/docs/Web/Manifest. In most examples, and in the generated zip file by the generator, the manifest file is named manifest.json. When hosting in SharePoint files ending in .json are not allowed. We will rename the file to manifest.webmanifest.
I made some small changes to the generated manifest, like adding a short_name and description and background_color (used as background color for the splash screen), and I added 128x128 and 144x144 version of the icon (I resized the 256x256 icon using a paint program) as that seems to be required by Firefox (128x128) and for the splash screen support (144x144). The start_url we set to index.html?home=true so that when we add the app to homescreen we can identify that it is an app lounched from the homescreen.
The manifest file manifest.webmanifest:
End of file manifest.webmanifest.
If we look into the descriptions about add to homescreen requirements (https://developers.google.com/web/fundamentals/engage-and-retain/app-install-banners/) we find that the site:
- Has a web app manifest file with:
- a
short_name(used on the home screen) - a
name(used in the banner when showing the splash screen) - a 144x144 png icon used on the splash screen, (the icon declarations must include a mime type of
image/png) - a
start_urlthat loads
- a
- Has a service worker registered on your site (service worker may be empty)
- Is served over HTTPS (a requirement for using service worker).
- Is visited at least twice, with at least five minutes between visits.
The app page index.html
In the index.html file we see the registration of the service worker. Besides the service worker registration there is one really important thing: the link to the web manifest. When specifying the link to the manifest file as found in all examples as
<link rel="manifest" href="manifest.webmanifest">it works perfectly locally, but does not work when deployed to SharePoint because authentication headers are not passed through on requesting the manifest. I tried everything. Providing the manifest content from a page manifest.aspx so I could set the correct content type (made no difference). Embedding the manifest as base64 in the href on the link (seems not supported on Chrome, see https://github.com/w3c/manifest/issues/534). The answer came on a question I posted on https://github.com/w3c/manifest/issues/535: we need to use the attribute crossOrigin="use-credentials", now the authentication headers are passed as required. So the manifest should be referenced as:<link rel="manifest" href="manifest.webmanifest" crossOrigin="use-credentials">. I think this is a bug, because on access of resources on the same origin the security context should be inherited (https://developer.mozilla.org/en-US/docs/Web/Security/Same-origin_policy).The file index.html:
End of file index.html.
Testing the app from a browser and from a device
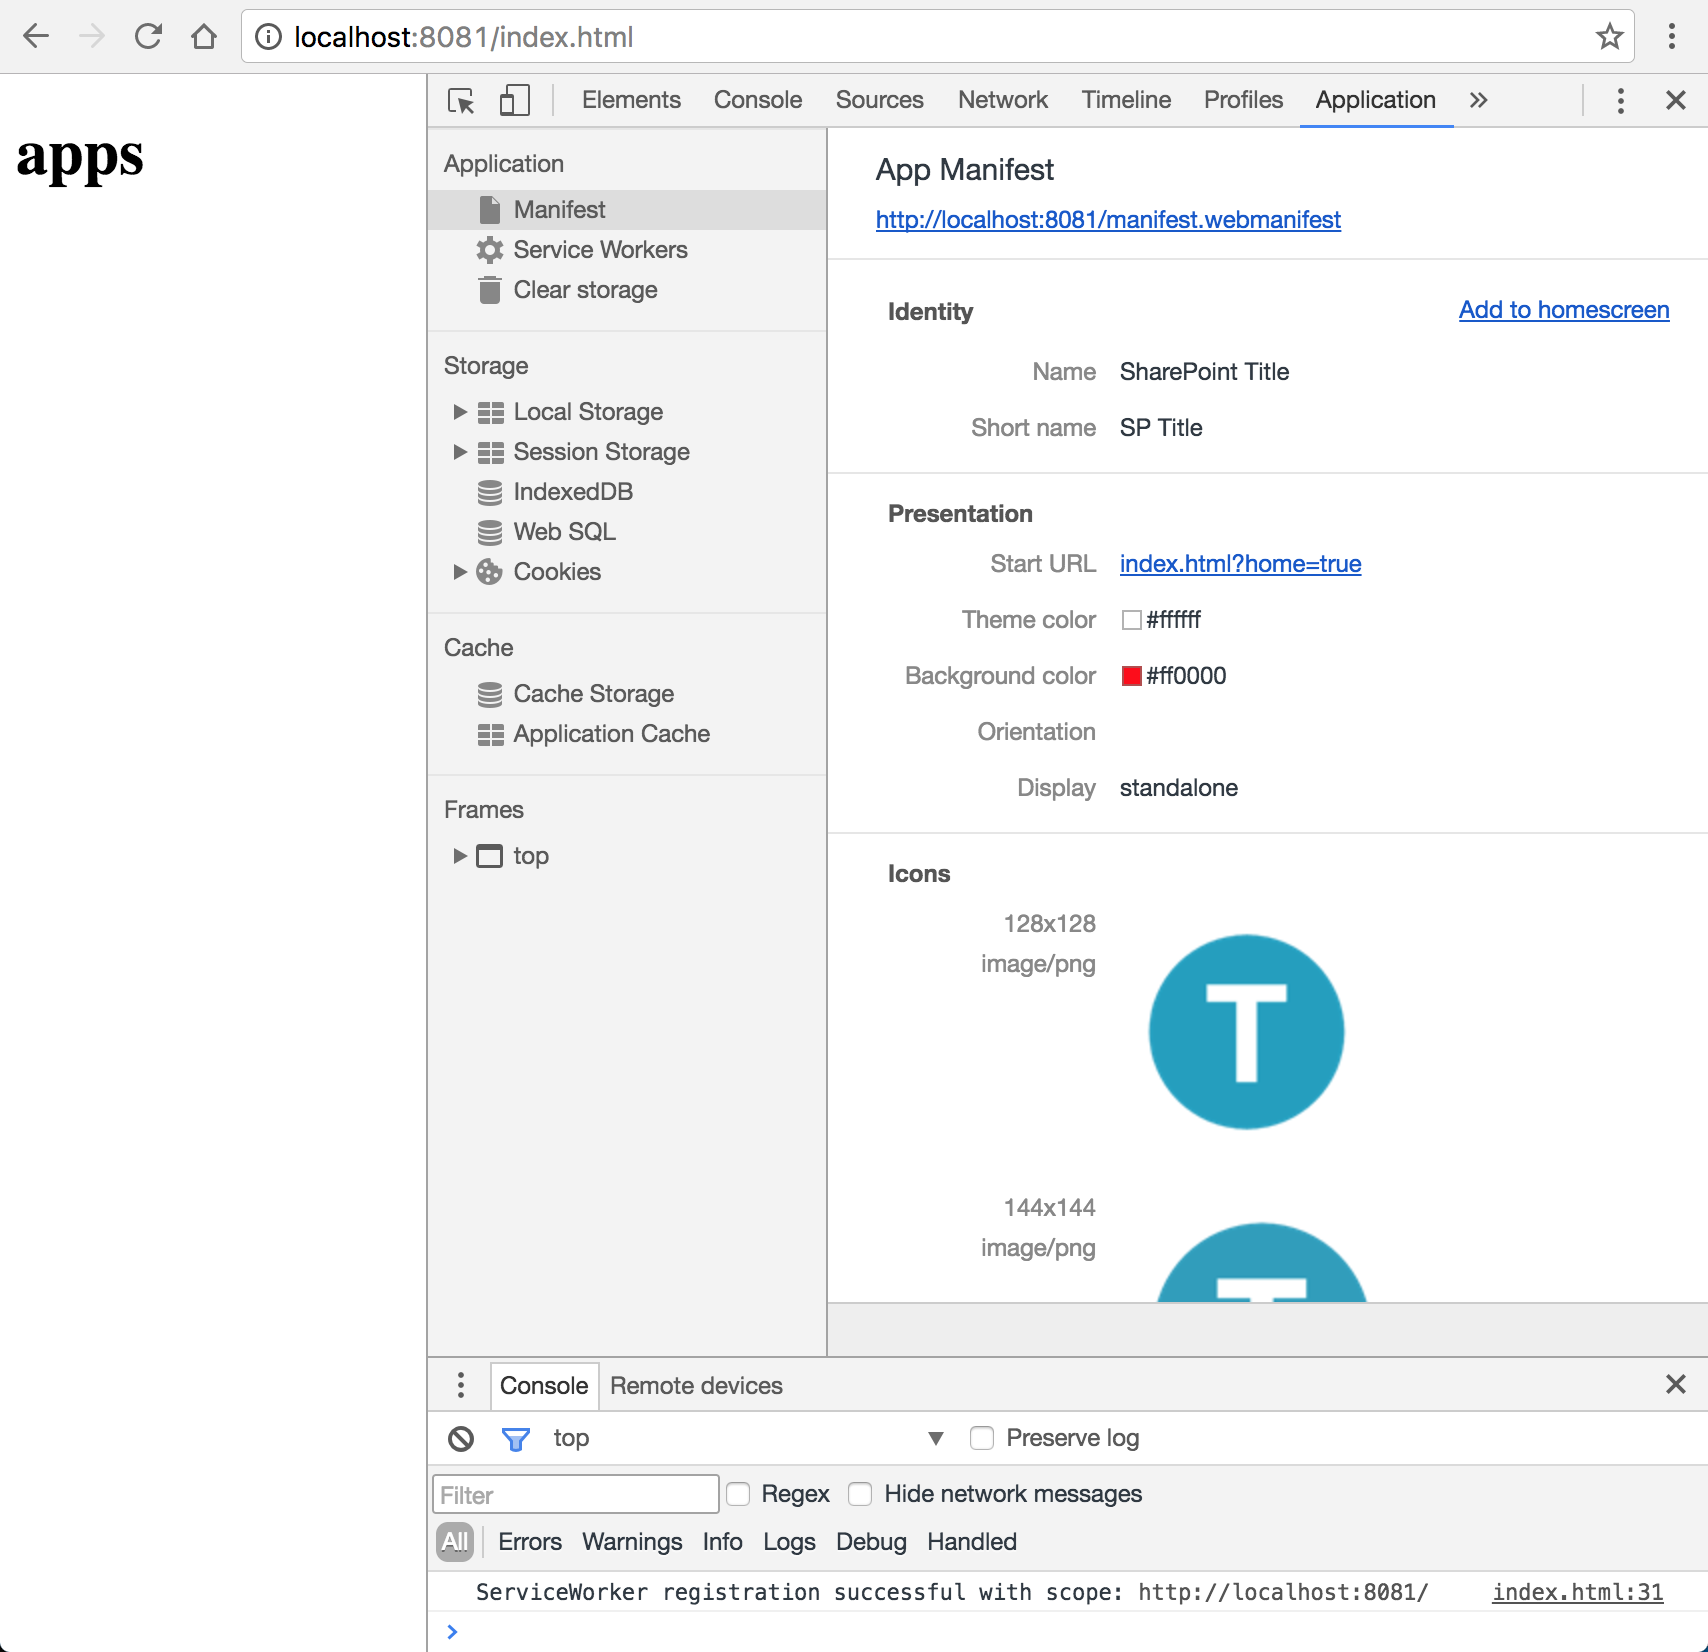
During development we use the sp-rest-proxy and can access the site on http://localhost:8081. We can now test the app from for example Chrome. Testing the app in Chrome is interesting because Chrome has support for web app manifests in the developer tools on the application tab. From this tab it is possible to see if the manifest is correctly parsed and we can test the Add to homescreen functionality:
But what if we want to test the app on another device like a mobile phone while developing on http://localhost:8081? Ngrok to the rescue! Install ngrok on you system and run
ngrok http 8081.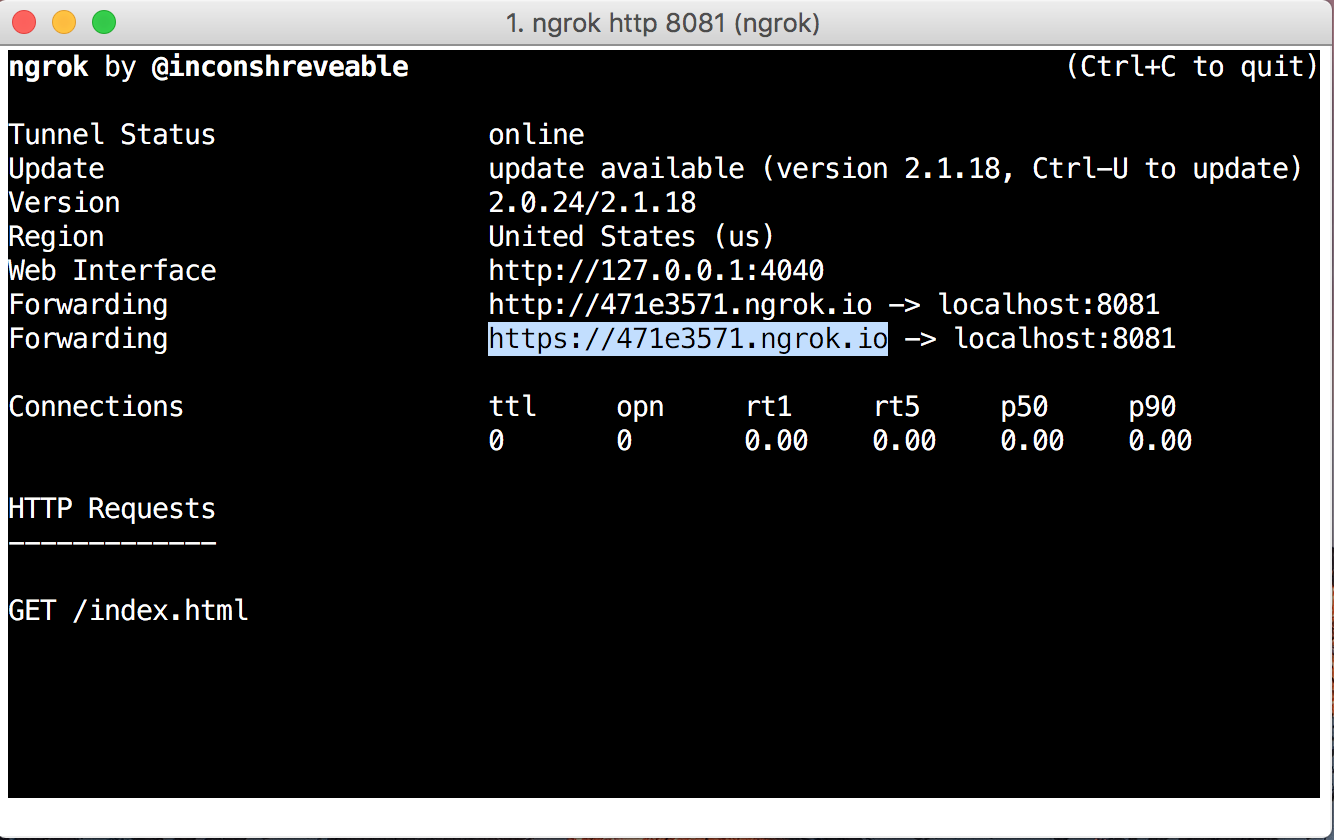
We now have an outside https endpoint to access our app. Now open https://471e3571.ngrok.io/index.html to open the app from another device like your mobile.
Deploying to SharePoint
Building on the SharePoint configuration described in the previous blog posts we can now deploy our app to SharePoint. The custom deployment script deploy.js will work for our current situation.
The file deploy.js:
End of file deploy.js.
On deployment we rename the index.html page to index.aspx. But we also need to do rewrites on the index.html and manifest.webmanifest files.
Because we need to deploy more artifacta to SharePoint, the deploy.js command got an optional parameter. If you give no parameter only the index.html and manifest.webmanifest files are deployed. If the parameter assets is given, also all other artifacts are deployed.
For deployment we no support the following npm commands:
- npm start codedeploy - only deploy the index.html and manifest.webmanifest files
- npm start deploy - deploy all files (makes the call node deploy.js assets)
When no offline support is required we can get away with an empty service-worker.js file. When we want offline support we need to implement caching functionality like the first approach below. In this first approach I don't remove old caches, and when cached I don't load newer versions. Not even of /_api/ calls. When creating a new version of the app we can increase the version number of the cache to cache the latest versions again. For api call we need another strategy. For more information on caching strategies see Jake Archibalds blog post https://jakearchibald.com/2016/caching-best-practices/. There is also agreat service workers cookbook at https://serviceworke.rs/ describing different caching strategies. In an upcoming blog post I will describe what I think would be the optimal caching strategy for SharePoint hosted apps and /_api service calls.
The file service-worker.js:
End of file service-worker.js.
Easy access to your SharePoint hosted PWA
The links into SharePoint for your Progressive Web App can become quite large, and not easy to share with others. For easy access on devices I registered a short link https://bit.ly/sptitle to my app using the https://bit.ly shortening service.
SharePoint SPA Series blog posts
-
SPA Series: Using sp-rest-proxy for local web development against real SharePoint data
A very interesting tool called sp-rest-proxy enables us to do local web development against real SharePoint data. All REST api requests are proxied to the real SharePoint in the context of a configured site under the credentials of a configured username and password.
Install sp-rest-proxy using:
npm install sp-rest-proxy --save-dev. See sp-rest-proxy for the documentation.As described in the documentation create a file server.js with the following contents:
Note that instead of using port 8080 as described in the documentation we used port 8081... with a reason: the sp-rest-proxy tool contains a UI to test our api REST requests, and that tool runs under port 8080.
The app under development lives in static/index.html:
End code of file static/index.html.
The code is written in a way that it will work for local development and for hosting within a document library in SharePoint as described in SPA Series: Building full screen single page web applications on SharePoint.
We also added a new and improved deploy.js script:
End code of file deploy.js.
Note that the deploy script loads a configuration file from config/_private.conf.json which contains the site to deploy to and the credentials to use for deployment. This file is excluded from sourcecontrol (through .gitignore) because it contains personal settings, but the file (which is generated through a set of questions when starting the local website) contains something like:
{"siteUrl":"https://macaw-my.sharepoint.com/personal/serge_macaw_nl/apps","username":"serge@macaw.nl","password":"<my password>"}The password is encrypted on creation of the site, but a plain password works as well.
During the deployment two things are done:
- the contents of the file static/index.html is loaded and all occurences of http://localhost:8081 are replaced with the url of the SharePoint site we will deploy to.
- the contents of the file is uploaded in the document library apppages in the folder showtitlerest with the name index.aspx.
We extend the npm package.json script with some commands:
End of file package.json.
We can now execute the following commands:
npm run serve- start a local website with our app on http://localhost:8081/index.html. On first run it asks for the url to the SharePoint site sp-rest-proxy makes a proxy for, a domain (leave empty for SharePoint Online), a username (in the format name@mycompany.com for SharePoiint Online) and a password. Persist the configuration so the settings can be used by the deploy script as well.npm run api- start a test site at http://localhost:8080 that is part of sp-rest-proxy to test api requests.npm run deploy- deploy our app to the apppages document library in a folder showtitlerest. The app is available under the url https://<yoursharepointsite>/apppages/showtitlerest/index.aspx. For me this url is https://macaw-my.sharepoint.com/personal/serge_macaw_nl/apps/apppages/showtitlerest/index.aspx.
Conclusion
this concludes this blog post. What did we accomplish:
- We can do local web development against the content of a live SharePoint site. Api calls can be made through the url http://localhost:8081/_api/... On deployment this url is replaced by the correct site url we deploy to.
- We can test api calls in a test page available on http://localhost:8080.
- We can deploy our resulting app page to the SharePoint site.
The sample code can be found in the GitHub repository https://github.com/svdoever/sharepoint-progressive-web-apps in the folder ShowTitleRestWithProxy.
SharePoint SPA Series blog posts
-
SPA Series: SharePoint REST versus SharePoint CSOM
Using REST to access data within SharePoint has advantages over using CSOM, the Client-side SharePoint Object Model. One important reason for me is a way smaller footprint in required libraries. For CSOM we need to use a bulky set of proprietary libraries provided by SharePoint. With REST we can use any library to do http requests. A good must read blog post on SharePoint CSOM versus REST is written by Andrew Connell, and he has a lot of good reasons in favor of REST. Another reason is that with REST we can use sp-rest-proxy, but that will be the topic of the next blog post.
In the first post of our SPA Series we described a simple web app that displayed the title of the hosting SharePoint site using CSOM.
The file index.aspx using CSOM has the following content:
End code of file index.aspx using CSOM.
We can also use REST to display the title of the hosting SharePoint site. When using SharePoint REST almost all examples use the jQuery Ajax functions. I prefer to use the new web standards like fetch() in combination with ES6 promises. Because not all browsers support fetch() and promises yet I included polyfills for these web standards. In the future we do not even have to include these polyfills anymore.
The file index.aspx using REST has the following content:
End code of file index.aspx using REST.
There are a few interesting things to notice in the above REST example:
- The code is hard-coding the API on path http://localhost:8081. This is the url I configured for sp-rest-proxy, a proxy tool I use for local development while accessing real SharePoint data. more on this in the next blog post.
- We need to configure a header Accept with the value application/json; odata=verbose. This was the only json output format that gave (almost) the same results through sp-rest-proxy and on the real SharePoint.
- In the point above I said "almost" the same value... the proxy returns a json containing an extra level body. See the issue I posted on the sp-rest-proxy repository.
- I included a helper function sp_api_get_json() that return the correct json content in a promise.
- In the fetch call we need to configure to include credentials, otherwise we get an authentication error on real SharePoint. It works without it on the sp-rest-proxy, because sp-rest-proxy handles the proxy and authentication.
SharePoint SPA Series blog posts
-
SPA Series: Building full screen single page web applications on SharePoint
Introduction
I have the intention to write a series of blog posts on how to write full screen single page web applications that are hosted on SharePoint and have access to Sharepoint data. There are a few good reasons why hosting a web app on SharePoint is handy:
- When you access the url of the web app page hosted in SharePoint, the default SharePoint login page will be shown. There is nothing that you have to do to handle authentication in your app.
- The SharePoint rights system is taken into account for authentication and authorization. You can specify who has access to the web app and to the content the web app is displaying.
- It is easy to access SharePoint data.
- You don't need a separate hosting platform for your web app like a web server when working on premise, or an Azure website if your are working in the cloud. Just upload the artifacts that are part of your web app in a SharePoint document library and you are done. SharePoint can serve your web app to the desktop or mobile web browser.
In this first blog post I will show how to get the most simple web app possible up and running on SharePoint: a web app that displays the title of the SharePoint site it resides in.
Front-end toolbelt
In the world of front-end development Node.js is your friend. If you don't have it running on your machine yet, head over to https://nodejs.org and install the LTS version.
There is no need for big Visual Studio projects, any editor will be sufficient. But if you have to choose one that is free and cool, have a look at Visual Studio Code. Works on Windows and OSX (I develop on OSX), is fast and has great support for front-end development.
Getting started
To get started first create a project folder, I called mine SPOnlinePWA, and run
npm initon it to initialize a new project:~/projects/serge▶ mkdir SPOnlinePWA~/projects/serge▶ cd SPOnlinePWAprojects/serge/SPOnlinePWA▶ npm initThis utility will walk you through creating a package.json file.It only covers the most common items, and tries to guess sensible defaults.See `npm help json` for definitive documentation on these fieldsand exactly what they do.Use `npm install <pkg> --save` afterwards to install a package andsave it as a dependency in the package.json file.Press ^C at any time to quit.name: (SPOnlinePWA) sponlinepwaversion: (1.0.0)description: A progressive web app on SharePoint Onlineentry point: (index.js)test command:git repository:keywords: pwa sponlineauthor: Serge van den Oeverlicense: (ISC) MITAbout to write to /Users/Serge/projects/serge/SPOnlinePWA/package.json:{"name": "sponlinepwa","version": "1.0.0","description": "A progressive web app on SharePoint Online","main": "index.js","scripts": {"test": "echo \"Error: no test specified\" && exit 1"},"keywords": ["pwa","sponline"],"author": "Serge van den Oever","license": "MIT"}Is this ok? (yes) yesWe now have a simple project to get us started. First thing to do is install tooling that we need. And we need tooling.... to get our page into SharePoint. We do this using the great tool spsave - advertised as "Save files in SharePoint using node.js easily".
projects/serge/SPOnlinePWA▶ npm install spsave --save-devConfigure SharePoint Online
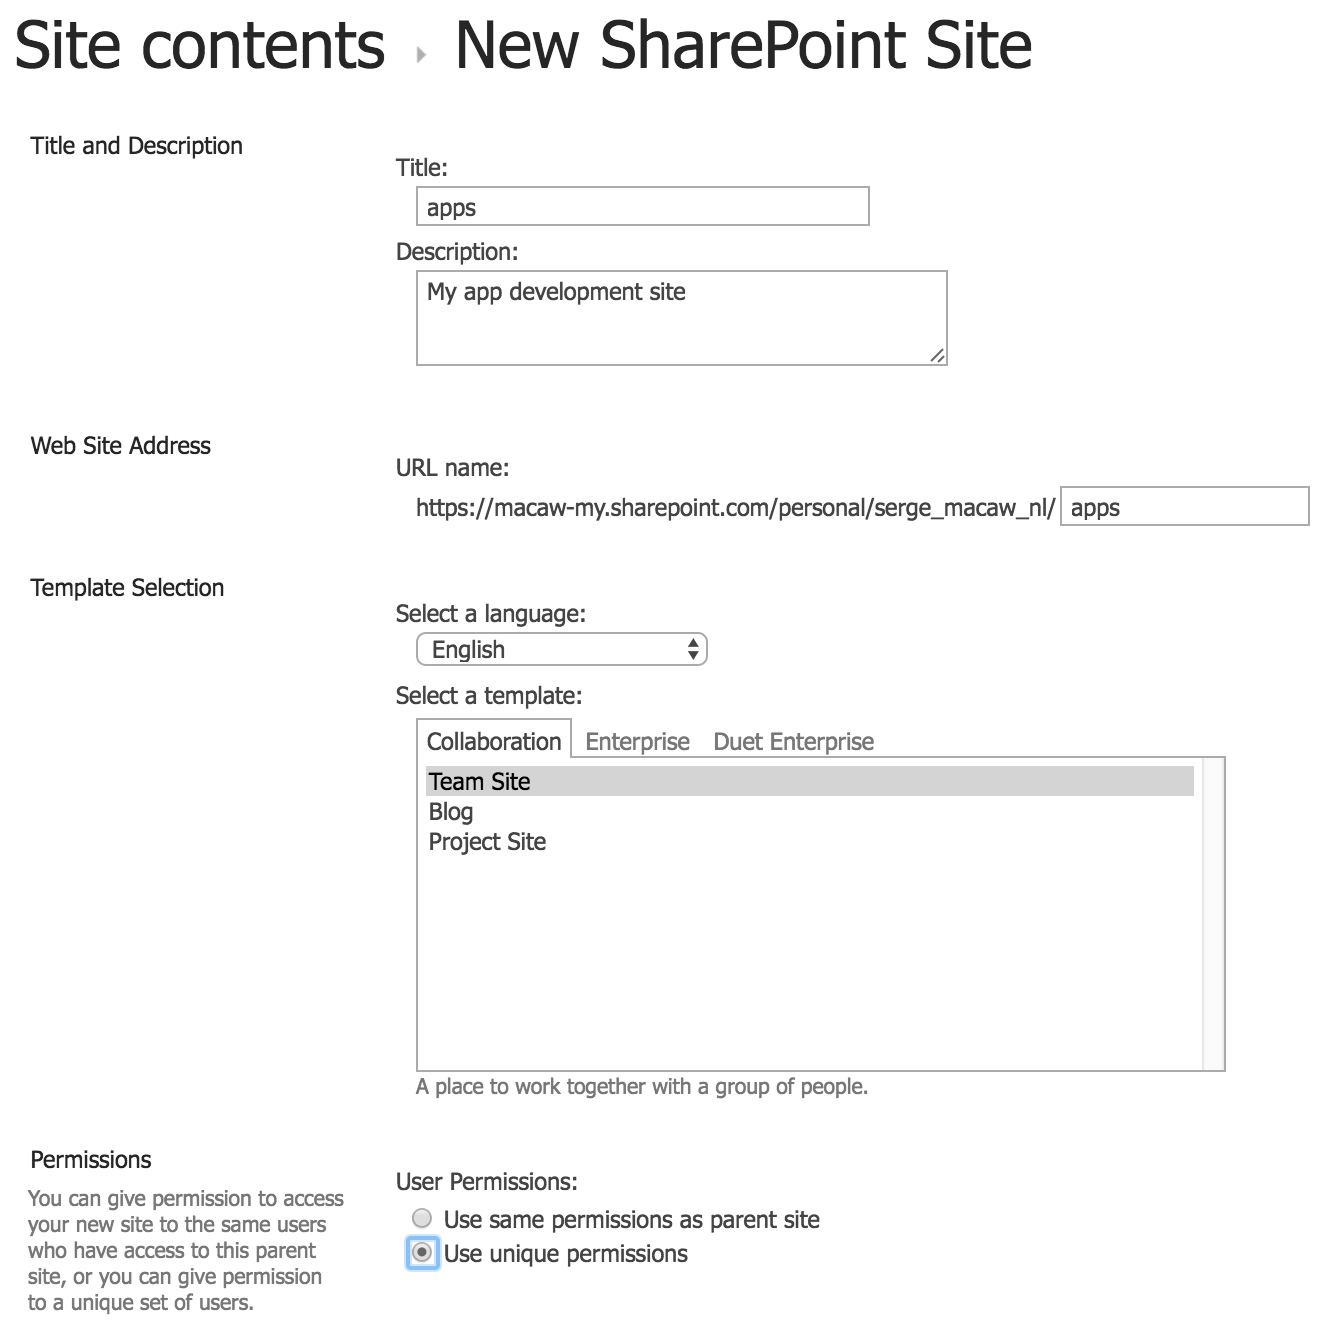
Another thing that we need is a SharePoint site with a document library where we have write access. In this blog post we assume the use of On SharePoint Online where you can go to the url https://tenant-my.sharepoint.com, where tenant is the name of your company. After authentication you will end up in OneDrive with the url https://tenant-my.sharepoint.com/personal/serge_macaw_nl/_layouts/15/onedrive.aspx, if you replace the onedrive into viewlsts like this https://tenant-my.sharepoint.com/personal/serge_macaw_nl/_layouts/15/viewlsts.aspx, you will get to the content living on your personal site. With the new link you can add a subsite:
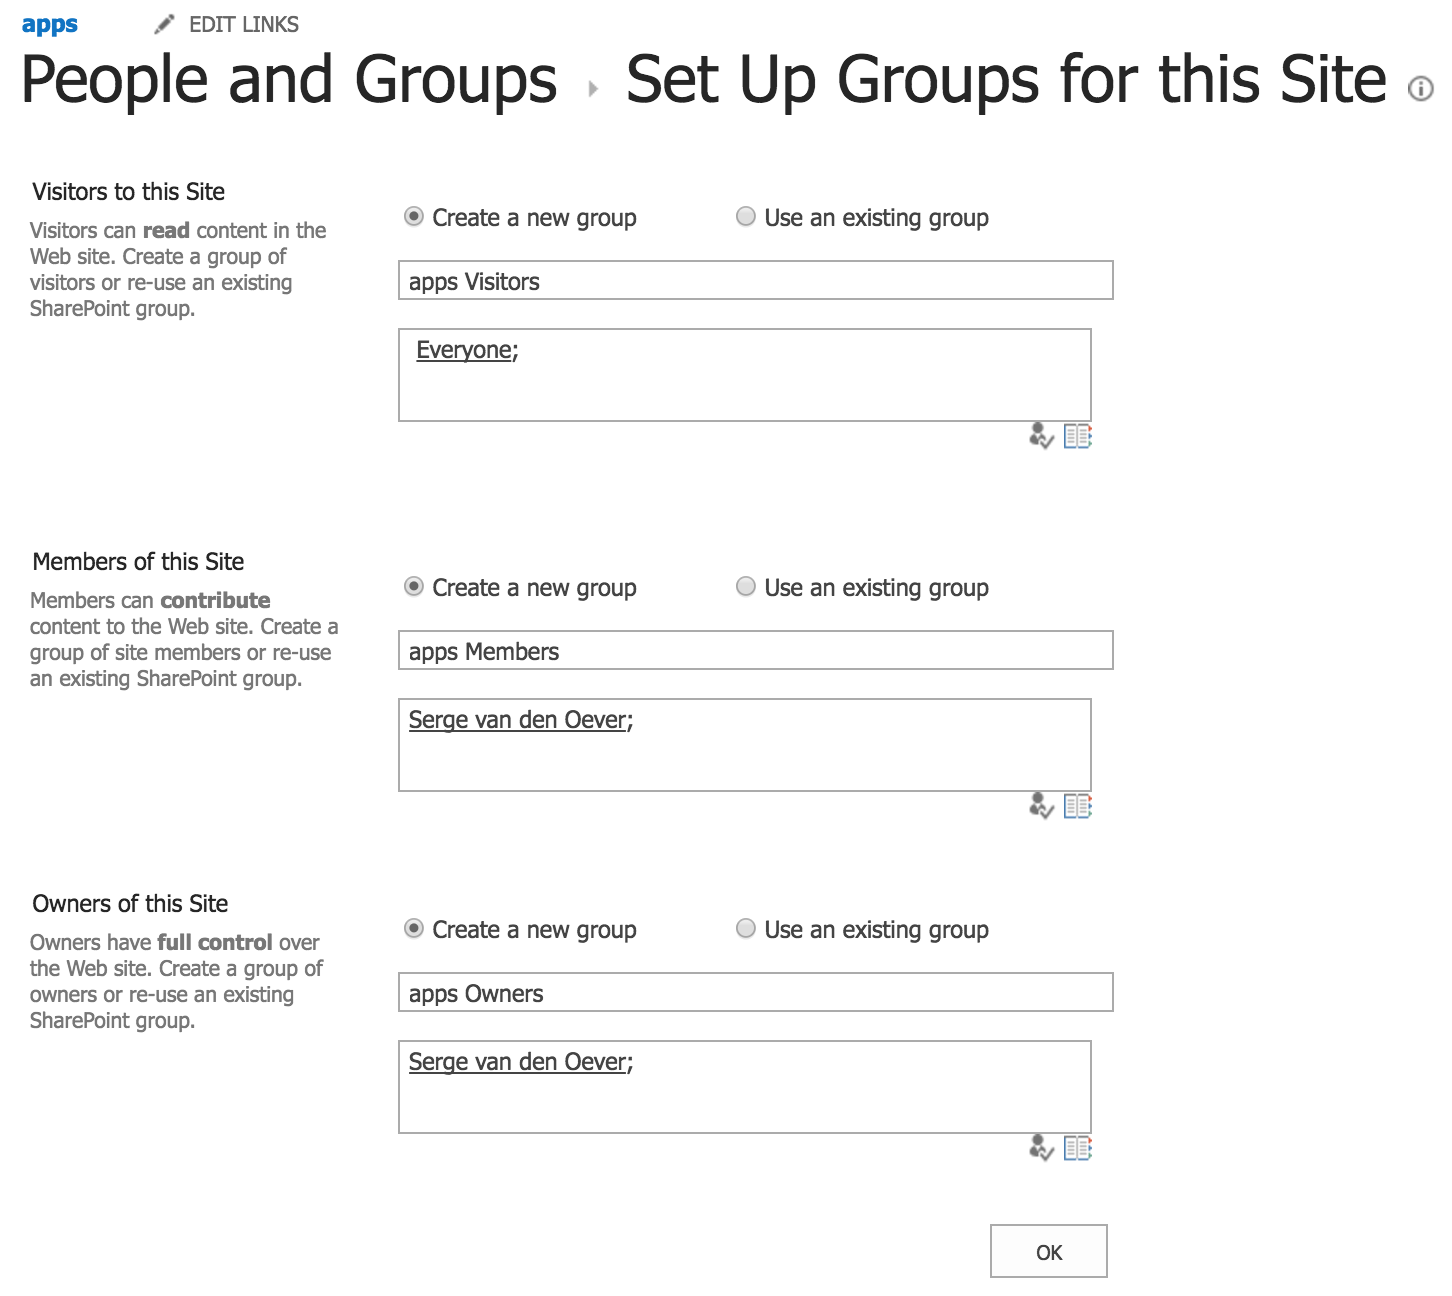
Because we selected "Use unique permissions" we can now give everyone read access to our new site so we can share our web apps hosted on this site within our company:
In our newly created "apps" site create a document library called "apppages". In this document library we will host our apps. For each app we will create a sub-folder, so we can host multiple apps in this document library. In my case this document library has the url: https://macaw-my.sharepoint.com/personal/serge_macaw_nl/apps/apppages.
Note that you can take a similar approach with a SharePoint site on-premise.
The simplest app
We now create our simplest app, showing the title of the SharePoint site the app resides in using CSOM, the Client-side SharePoint Object Model.
Create a file index.aspx with the following content:
End code of file index.aspx.
Configuration for deployment
To deploy to SharePoint Online we need the following environment variables (I saved this in my .zshrc file on OSX because I use zsh, add to .bshrc if you use bash):
# For SharePoint Online App Development we need the following environment variablesexport SPONLINE_SITE_APPS="https://macaw-my.sharepoint.com/personal/serge_macaw_nl/apps"export SPONLINE_USERNAME="<my username>"export SPONLINE_PASSWORD="<my password>"On Windows set the environment variables with the method as described here.
Deploy to SharePoint
To deploy to SharePoint we use the spsave npm package as already installed above.
Create a file deploy.js with the following content:
End code of file deploy.js.
We can now run the command
node deploy.jsto deploy the file index.aspx to the document library apppages. In my case the url of the uploaded app is https://macaw-my.sharepoint.com/personal/serge_macaw_nl/apps/apppages/showtitlecsom/index.aspx.If you open this url in a browser you would see a blank page with the SharePoint site title apps. If you open this url from an anonymous browser or your phone you would get the SharePoint login screen, and after authentication you will see the interesting app content.
Conclusion
Although very simple, these are the first steps to get a web app hosted on SharePoint with access to SharePoint content. In following blog posts we build on the above knowledge to improve our development process for building SharePoint hosted full screen single page applications.
The sample code can be found in the GitHub repository https://github.com/svdoever/sharepoint-progressive-web-apps in the folder ShowTitleCsom.
SharePoint SPA Series blog posts
-
Working example of MassTransit 3 request/response conversation
Chapter 3.5 of the MassTransit documentation contains a non-complete example of a request/response conversation using MassTransit. After some fiddling I got an example working using an in-memory MassTransit queue with multple request types. See the code below, implemented as an xunit test.
-
Consuming Javascript libraries from TypeScript without type definition files
There are cases where you need to consume Javascript libraries or, for example, ReactJS components written in Javascript from your TypeScript code. Possible reasons:- You find a great library or component "out in the wild" written in Javascript
- One of your team-members does not know/does not want to write TypeScript
- You want to consume components from an existing library or component set writen in Javascript
Assume the situation where a ReactJS component MyComponent.jsx written in Javascript must be consumed from a component Home.tsx:The file MyComponent.jsx:import * as React from 'react';
export class MyComponent extends React.Component {
constructor(props) { super(props); }
render() { return (<h1>Hello from MyComponent</h1>); }
}We could import this component in different ways:import {MyComponent} from './MyComponent'; // ERROR: Cannot find module './MyComponent'
const MyComponent = require('./MyComponent'); // Warning if used as <MyComponent/>
// see https://codereviewvideos.com/blog/warning-react-createelement/
const X = require('./MyComponent'); // OK if used as <X.MyComponent/>
const MyComponent = require('./MyComponent').MyComponent; // OK
const MyComponent = require('./MyComponent').default;// OK if defined as export default class MyComponent
const {MyComponent} = require('./MyComponent'); // OK, it's possible to destructure multiple componentsFor details on how to specify types for desctructured object parameters see destructured object parameters in TypeScript.So if we want to consume the above JavaScript component from TypeScript in the component Home.tsx:import * as React from 'react';
const MyComponent = require('./MyComponent').MyComponent;
export class Home extends React.Component<any, any> {
render() { return (<div><MyComponent /></div>); }
}