Windows Azure July Updates: SQL Database, Traffic Manager, AutoScale, Virtual Machines
This morning we released some great updates to Windows Azure. These new enhancements include:
- SQL Databases: Support for Automated SQL Export and a New Premium Tier SQL Database option
- Traffic Manager: New support for managing Windows Azure Traffic Manager in the HTML Portal
- AutoScale: Support for Windows Azure Mobile Services, AutoScale rules for Service Bus Queue Depth, Alerts on AutoScale actions
- Virtual Machines: Updates to the IaaS management experiences in the Management Portal
All of these improvements are now available to use immediately (note: some are still in preview). Below are more details about them.
SQL Databases: Support for Automated SQL Database Exports
One commonly requested feature we’ve heard has been the ability for customers to perform recurring, fully automated, exports of a SQL Database to a Storage account. Starting today this is now a built-in feature of Windows Azure. You can now export transactional-consistent copies of your SQL Databases, in an automated recurring way, to a .bacpac file in a Storage account using any schedule you wish to define.
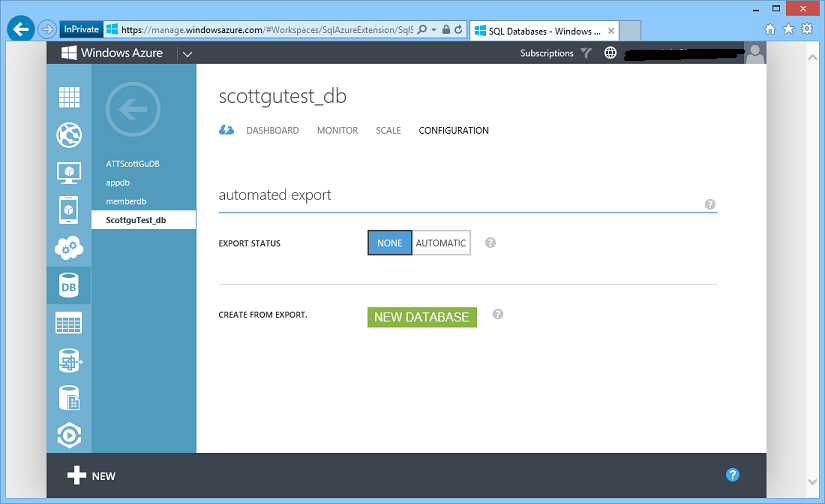
To take advantage of this feature, click on the “Configuration” tab of any SQL Database you would like to set up an automated export rule on:
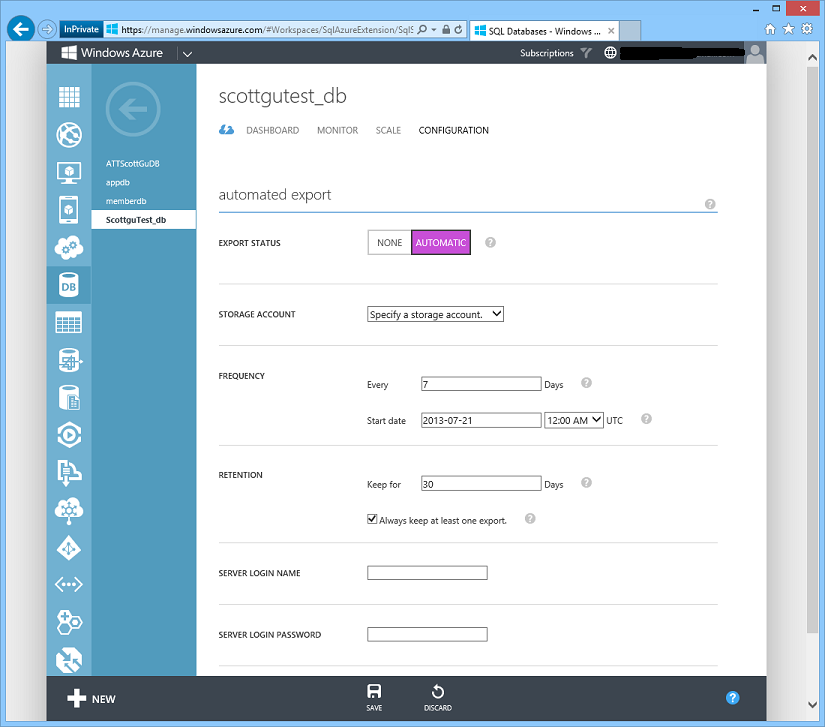
Clicking the “Automatic” setting on “export status” will expand the page to include several additional configuration options that allow you to configure the database to be automatically exported to a transactionally consistent .bacpac file in a storage account of your choosing:
You can fully automate and control the time and schedule of the exports. By default, it’s set to once per week, but you may set it up to be as frequent as once per day. The start date and time allows you to define when the first export will happen. The time is in UTC, so if you want backups to happen each day at midnight US Eastern time, put 5:00 AM UTC. Keep in mind that exports can take several hours depending on the size of the database, so the start time is not a guarantee about when exports will be completed.
Next, specify the number of days to keep each export file. You can retain multiple export files. Use the “Always keep at least one export” option to ensure that you always have at least one export file to use as a backup. This overrides the retention period, so even if you stop backups for 30 days, you’ll still have an export.
Lastly, you’ll need to specify the server login and password for Automated Export to use. After providing the required information for your automated export, click Save, and your first automated export will be kicked off once the Start Date + Time is reached. You can check the status of your database exports (and see the date/time of the last one) in the quick glance list on the “Dashboard” tab view of your SQL Database.
Creating a new Database from an Exported One
If you want to create a new SQL Database instance from an exported copy, simply choose the New->Data Services->Sql Database->Import option within the Windows Azure Management Portal:
This will then launch a dialog that allows you to select the .bacpac file for your SQL Database export from your storage account, and easily recreate the database (and name it anything you want).
Cost Impact
When an automated export is performed, Windows Azure will first do a full copy of your database to a temporary database prior to creating the .bacpac file. This is the only way to ensure that your export is transactionally consistent (this database copy is then automatically removed once the export has completed). As a result, you will be charged for this database copy on the day that you run the export. Since databases are charged by the day, if you were to export every day, you could in theory double your database costs. If you run every week then it would be much less.
If your storage account is in a different region from the SQL Database, you will be charged for network bandwidth. If your storage account is in the same region there are no bandwidth charges. You’ll then be charged the standard Windows Azure Storage rate (which is priced in GB saved) for any .bacpac files you retain in your storage account.
Conditions to set up Automated Export
Note that in order to set up automated export, Windows Azure has to be allowed to access your database (using the server login name/password you configured in the automated export rule in the screen-shot above) . To enable this, go to the “Configure” tab for your database server and make sure the switch is set to “Yes”:
SQL Databases: Announcing New Premium Tier for Windows Azure SQL Databases
Today, we’re excited to announce the preview of a new Premium Tier for Windows Azure SQL Databases that delivers more predictable performance for business-critical applications. The Premium Tier helps deliver more powerful and predictable performance for cloud applications by dedicating a fixed amount of reserved capacity for a database including its built-in secondary replicas. This capability will help you scale databases even better and with more isolation.
Reserved capacity is ideal for cloud-based applications with the following requirements:
- High Peak Load – An application that requires a lot of CPU, Memory, or IO to complete its operations. For example, if a database operation is known to consume several CPU cores for an extended period of time, it is a candidate for using a Premium database.
- Many Concurrent Requests – Some database applications service many concurrent requests. The normal Web and Business Editions in SQL Database have a limit of 180 concurrent requests. Applications requiring more connections should use a Premium database with an appropriate reservation size to handle the maximum number of needed requests.
- Predictable Latency – Some applications need to guarantee a response from the database in minimal time. If a given stored procedure is called as part of a broader customer operation, there might be a requirement to return from that call in no more than 20 milliseconds 99% of the time. This kind of application will benefit from a Premium database to make sure that dedicated computing power is available.
To help you best assess the performance needs of your application and determine if your application might need reserved capacity, our Customer Advisory Team has put together detailed guidance. Read the Guidance for Windows Azure SQL Database premium whitepaper for tips on how to continually tune your application for optimal performance and how to know if your application might need reserved capacity. Additionally, our engineers have put together a whitepaper, Managing Premium Databases, on how to setup, use and manage your new premium database once you are accepted into the Premium preview and quota is approved.
Requesting an invitation to the reserved capacity preview requires two steps:
- Visit the Preview Features page to request access to the Premium preview program. Initial acceptance requires customers with active, paid Windows Azure subscriptions and account administrator responsibility.
- Once your subscription has been activated for the preview program, request a Premium database quota from either the server dashboard or server quickstart in the SQL Databases extension of the Windows Azure Management Portal.
For a closer look at signing up for the Premium preview, please review the short tutorial page, Sign up for Premium preview for Windows Azure SQL Database. For more details on Premium for SQL Database pricing, please visit the Windows Azure SQL Database pricing page.
Traffic Manager: Integrated within the Windows Azure Management Portal
The Windows Azure Traffic Manager is the newest service we’ve added to the Windows Azure Management Portal. Windows Azure Traffic Manager allows you to control the distribution of network traffic to your Cloud Services and VMs hosted within Windows Azure. It does this by allowing you to group multiple deployments of your Cloud Services under a single public endpoint, and allows you to manage the traffic load rules to them.
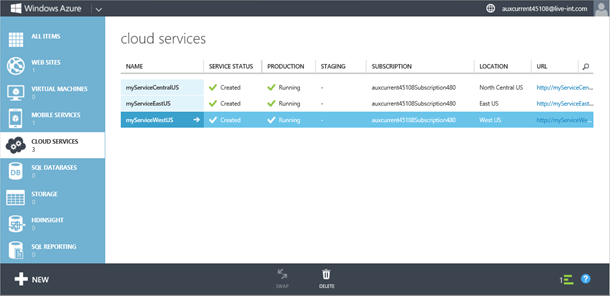
As an example of how to use this, let’s consider a scenario in which a Traffic Manager would help a Cloud Service be highly reliable and available. Let’s say that we have a Cloud Service that has been deployed across three regions: East US, West US and North Central US (using three different cloud service instances: myServiceEastUS, myServiceWestUS and myServiceCentralUS):
If we now wanted to make our Cloud Service efficient and minimize the response time for any request that is made to it, we might want to direct our network requests so that a request originating from an IP range or location goes to the deployed server with the lowest response time for that particular range or location. With Windows Azure Traffic Manager we can now easily do this.
Windows Azure Traffic Manager creates a routing table by pinging your cloud service from various locations around the world and calculates the response times. It then uses this table to redirect requests to your cloud service so that they are served with the lowest possible response times.
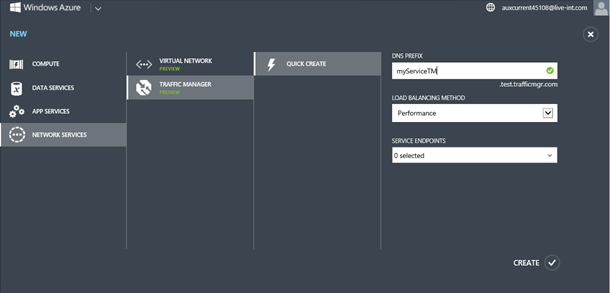
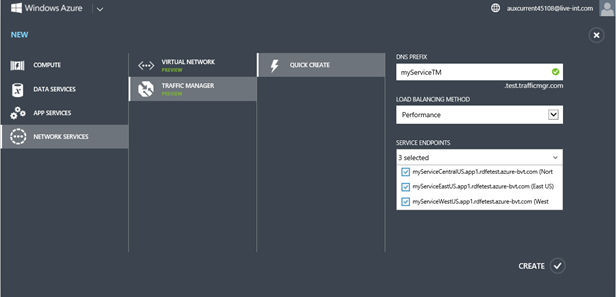
Here is how we could set this up: Create a Traffic Manager profile via NEW -> Network Services -> Traffic Manager -> Quick Create:
We’ll choose the Performance option from the “Load Balancing Method” drop down. We’ll select the three instance deployment endpoints we wish to put within the Traffic Manager (in this case our separate deployments within East US, West US and North Central US) and click the Create button:
Once we have created our Traffic Manager Profile, we can update our public facing domain www.myservice.com to resolve to our Traffic Manager DNS (in this case myservicetm.test.trafficmgr.com).
By clicking on the traffic manager profile we just created within the Windows Azure Management Portal, we can also later add additional cloud service endpoints to our traffic manager profile, change monitoring and health settings, and change other configuration settings such as DNS TTL and the Load Balancing Method.
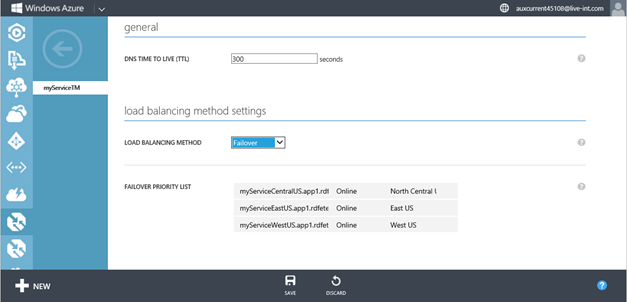
For example, let’s assume we want to later change our Load Balancing Method so that instead of being about performance it is instead optimized for failover scenarios and high availability. Lets say we want all our requests to be served by West US, and in the event the West US instance fails, we want the East US deployment to take point, followed by the deployment in North Central US if that fails too. We can enable this by going to the Configure tab of our Traffic Manager Profile and changing the Load Balancing Method to Failover:
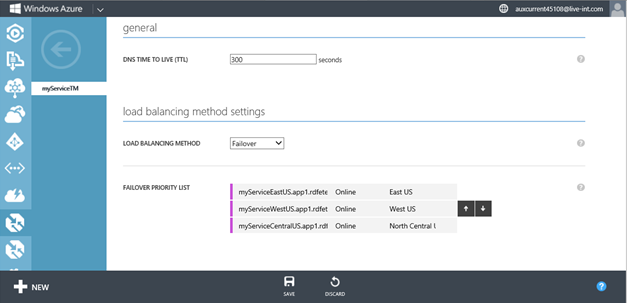
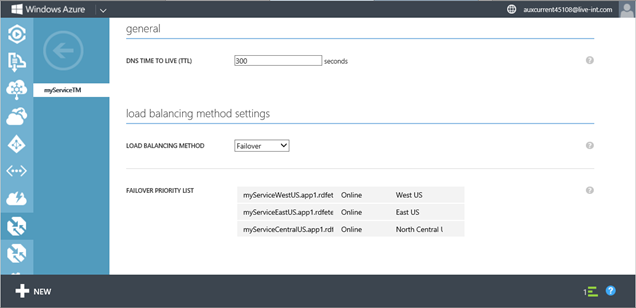
Next, we’ll change the Failover Priority List so that the deployment in West US, myServiceWestUS, is first in the list followed by myServiceEastUS and myServiceCentralUS.
Then we’ll click on Save to finalize the changes:
By changing these settings we’ve now enabled automatic failover rules for our cloud service instances and enabled multi-region reliability. The new integrated Traffic Manager experience within today’s Windows Azure Management Portal update makes configuring all of this super easy to setup.
AutoScale: Mobile Services, Service Bus, Trends and Alerts
Three weeks ago we added new automatic scaling support for Web Sites, Cloud Services and Virtual Machines.
AutoScale enables you to configure Windows Azure to automatically scale your application dynamically on your behalf (without any manual intervention required) so that you can achieve the ideal performance and cost balance. Once configured, AutoScale will regularly adjust the number of instances running in response to the load in your application. We’ve seen a huge adoption of AutoScale in the three weeks that it has been available. Today I’m excited to announce that even more AutoScale features are now available for you to use:
Windows Azure Mobile Services Support
AutoScale now supports automatically scaling Mobile Service backends (in addition to Web Sites, VMs and Cloud Services). This feature is available in both the Standard and Premium tiers of Mobile Services.
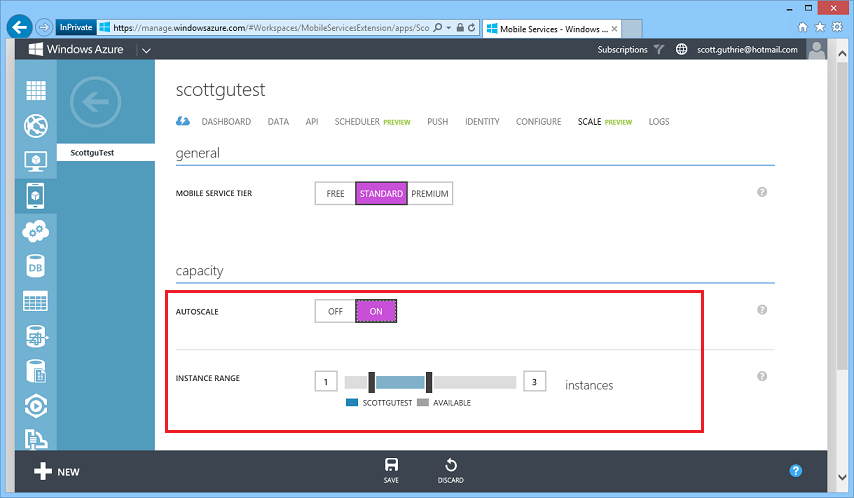
To enable AutoScale for your Mobile Service, simply navigate to the “Scale” tab of your Mobile Service and set AutoScale to “On”, and the configure the minimum and maximum range of scale units you wish to use:
When this feature is enabled, Windows Azure will periodically check the daily number of API calls to and from your Mobile Service and will scale up by an additional unit if you are above 90% of your API quota (until reaching the set maximum number of instances you wish to enable).
At the beginning of each day (UTC), Windows Azure will then scale back down to the configured minimum. This enables you to minimize the number of Mobile Service instances you run – and save money.
Service Bus Queue Depth Rules
The initial preview of AutoScale supported the ability to dynamically scale Worker Roles and VMs based on two different load metrics:
- CPU percentage of the Worker/VM machine
- Storage queue depth (number of messages waiting to be processed in a queue)
With today’s update, you can also now scale your VMs and Cloud Services based on the queue depth of a Service Bus Queue as well. This is ideal for scenarios where you want to dynamically increase or decrease the number of backend systems you are running based on the backlog of messages waiting to be processed in a queue.
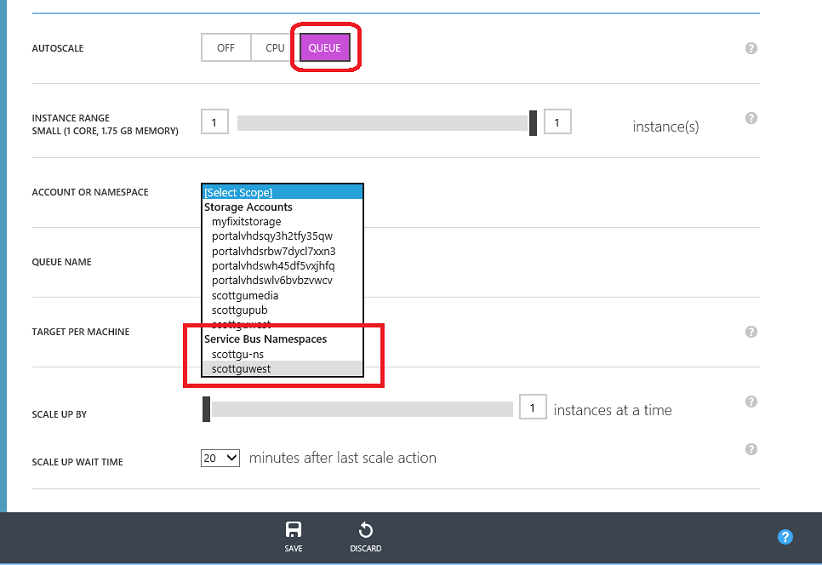
To enable this, choose the “Queue” AutoScale option within the “Scale” tab of a VM or Cloud Service. When you select 'Queue' in the AutoScale section, click on the ' Account / Namespace ' dropdown. You will now see a list of both your Storage Accounts and Service Bus Namespaces:
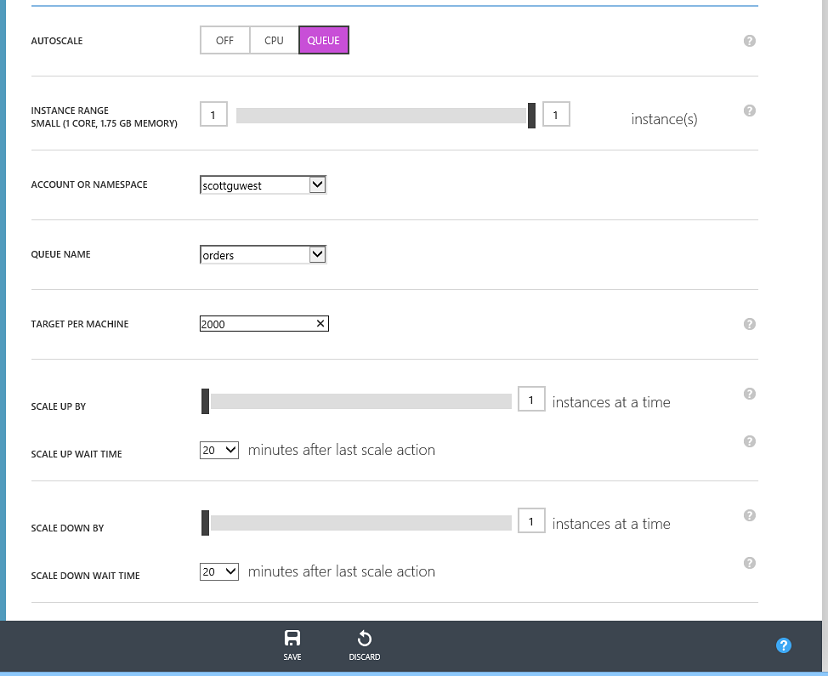
Once you select a Service Bus namespace, the list of queues in that namespace will appear in the ‘Queue Name’ section. Choose the individual queue that you want AutoScale to monitor:
As with Storage Queues, scaling by Service Bus Queue depth allows you to define a 'Target Per Machine'. This target should represent the amount of messages that you believe each worker role can handle at a time. For example, if you have a target of 200, and 2000 messages are in the queue, AutoScale will scale until you have 10 machines. It will then dynamically scale up/down as your application load changes.
Historical Trend Monitoring
When you AutoScale by CPU, we also now show a miniature graph of your role’s CPU utilization over the past week. This can help you set appropriate targets when first configuring AutoScale, and see how AutoScale has affected CPU once it’s turned on.
Alerts
In certain rare scenarios, something may cause the AutoScale engine to fail to execute a rule. We will now inform you in the Windows Azure Management Portal if an AutoScale failure is ongoing:
If you ever see this in the Portal, we recommend monitoring the responsiveness and capacity of your service to make sure that there are currently enough compute instances deployed to meet your goals.
In addition, if the AutoScale engine fails to get metrics, such as CPU percentage, from your virtual machines or website (this can be caused by intermittent network failures or diagnostics failure on the machine), the engine may possibly take a special one-time scale-up action, if your capacity was previously determined to be too low. After this, no further scale actions will be taken until the AutoScale engine can receive metrics again.
Virtual Machines:
Today’s Windows Azure update also includes several nice enhancements to how you create and manage Virtual Machines using the Windows Azure Management Portal.
Richer Custom Create Wizard
We now expose more Virtual Machine options when you create a new Virtual Machine using the “From Gallery” option in the management portal:
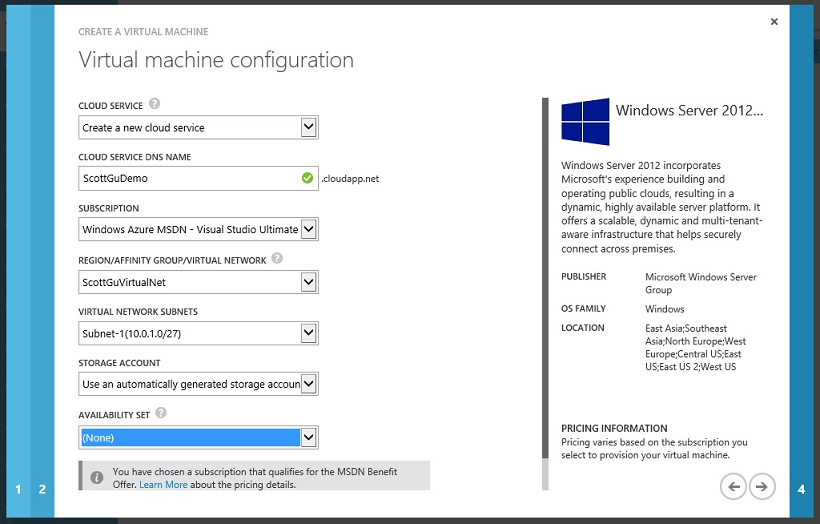
When you select a VM image from the gallery there are now two updates screens that you can use to configure additional options with it – including the ability to place it within a Cloud Service and create/manage availability sets and virtual network subnet settings:
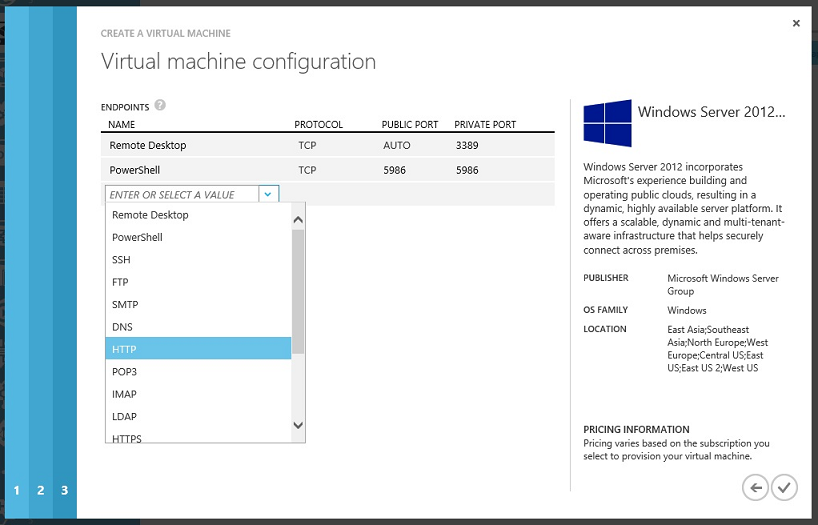
There is also a new screen that allows you to configure and manage network endpoints as part of VM creation within the wizard:
We now enable remote PowerShell by default, and make it really easy for users to configure other well-known protocol endpoints. You can select from well known protocols from a drop-down list (the screen-shot above shows how this is done) or you can manually enter your own port mapping settings.
Exposing the Cloud Services that are Behind a Virtual Machine
Starting this month you may have noticed that we also now expose the underlying Cloud Service used to host one or more Virtual Machines grouped within a single deployment. Previously we didn’t surface the fact that there was a Cloud Service behind VMs directly in the management portal – now you’ll always be able to access the underlying cloud service if you want (which allows you to control/configure more advanced settings).
Some additional notes:
- You can now use the VM gallery to deploy a VM into an existing – empty - Cloud Service. This enables the scenario where you want to customize the DNS name for the deployment before deploying any VMs into it.
- You can now more easily add multiple VMs to a cloud service container using changes we’ve made to the Create VM wizard.
- You can now use the new Traffic Manager support to enable network load traffic distribution to VMs hosted within Cloud Services.
- There are no additional charges for VMs now that the Cloud Services are exposed. They were always created; we’re simply un-hiding them going forward to enable more advanced configuration options to be surfaced.
Summary
Today’s release includes a bunch of great features that enable you to build even better cloud solutions. If you don’t already have a Windows Azure account, you can sign-up for a free trial and start using all of the above features today. Then visit the Windows Azure Developer Center to learn more about how to build apps with it.
Hope this helps,
Scott
P.S. In addition to blogging, I am also now using Twitter for quick updates and to share links. Follow me at: twitter.com/scottgu
