Using EF “Code First” with an Existing Database
Last month I blogged about the new Entity Framework 4 “code first” development option. EF “code-first” enables a pretty sweet code-centric development workflow for working with data. It enables you to:
- Work with data without ever having to open a designer or define an XML mapping file
- Define model objects by simply writing “plain old classes” with no base classes required
- Use a “convention over configuration” approach that enables database persistence without explicitly configuring anything
In my initial blog post I introduced EF “code-first” and demonstrated how to use the default EF4 mapping conventions to create a new database. These default conventions work very well for new applications, and enable you to avoid having to explicitly configure anything in order to map classes to/from a database. I then did a second custom database schema mapping blog post that discussed how you can override the default persistence mapping rules, and enable custom database schemas.
In today’s blog post I’m going to cover a question that several people asked me recently, which is: “how do I use EF code-first with an existing database?”
Using EF Code-First with an Existing Database
EF “Code First” works great with existing databases, and enables a very nice code-centric development approach with them. In particular, it enables you to use clean “plain old classes” (aka POCO) for your model objects, and cleanly map them to/from the database using either the default mapping conventions or by overriding them with custom schema mapping rules.
Below are step by step instructions on how you can use EF “Code First” with an existing database.
Step 1: Create a new ASP.NET Web Application Project
Let’s begin by creating a new ASP.NET Web Application Project. My previous two EF “code first” blog posts used ASP.NET MVC – for this blog post I’ll use ASP.NET Web Forms. Note that all of the EF concepts are identical regardless of whichever type of ASP.NET application you use.
We’ll use “File->New Project” within VS 2010 (or the free Visual Web Developer 2010 Express) and choose the “ASP.NET Web application” project template to create the new application.
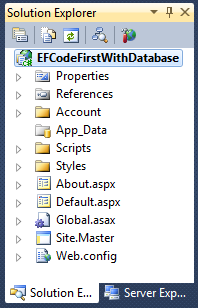
The new “ASP.NET Web Application” project in VS 2010 is a nice starter template that provides a default master-page layout with CSS design (I blogged about this new starter project template in a previous blog post). When it is created you’ll find it contains a few default files within it:
We don’t need these default files (we could instead just use the “Empty ASP.NET Web Application” project template) – but they’ll make our simple app look a little prettier by default so we’ll use them.
Step 2: Reference the EF Code First Assembly
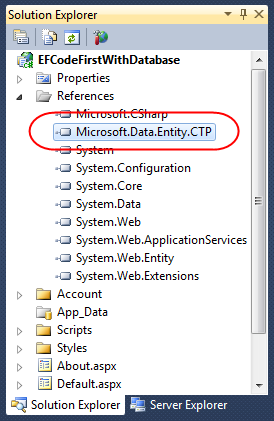
Our next step will be to add a reference to the EF Code First library to our project. Right click on the “references” node within the Solution Explorer and choose “Add Reference”.
You’ll reference the “Microsoft.Data.Entity.Ctp.dll” assembly that is installed within the “\Program Files\Microsoft ADO.NET Entity Framework Feature CTP4\Binaries\” directory when you download and install the EF Code First library. After adding this reference you’ll see it show up in your project’s references window like below:
Step 3: Northwind Database
You can skip this step if you have a SQL Server database with Northwind (or another database) installed.
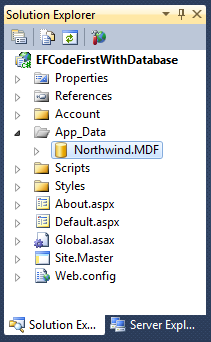
If you don’t have Northwind already installed then you can download it here. You can either use the .SQL files it includes to install it into a SQL database, or copy the Northwind.mdf SQL Express file into the \App_Data directory of your application:
Step 4: Create our Model Layer
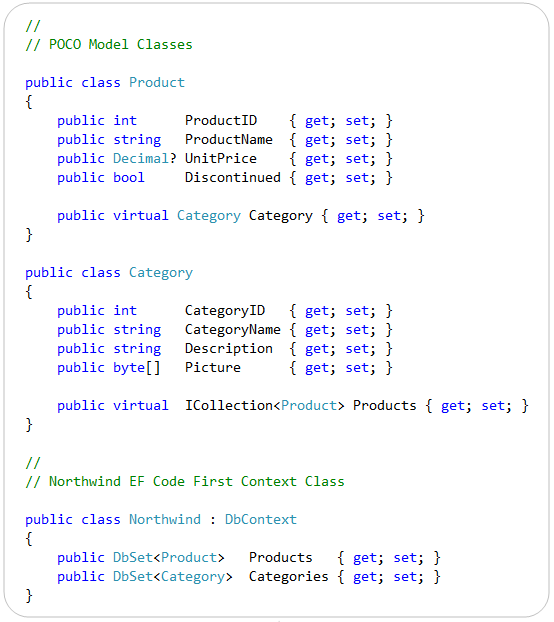
Now we’ll write our model classes and use EF “code first” to map them to our Northwind database. Below is all of the code we need to write to enable this – no other code is required:
Below are some details about what all this code does and how it works:
POCO Model Classes
EF “code first” enables us to use “plain old CLR objects” (aka POCO) to represent entities within a database. This means that we do not have to derive our model classes from a base class, nor implement any interfaces or attributes on them. This enables us to keep our model classes clean and “persistence ignorant”.
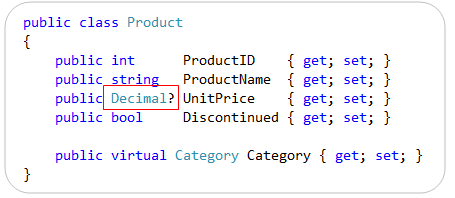
Above we’ve defined two POCO classes - “Product” and “Category” – that we’ll use to represent the “Products” and “Categories” tables within our Northwind database. The properties on these two classes map to columns within the tables. Each instance of a Product or Category class represents a row within the respective database tables.
Nullable Columns
Notice that some of the properties within the “Product” class are defined as nullable (this is what Decimal? means – that indicates it is a nullable type). Nullable columns within a database table should be represented within the model class as Nullable properties if they are value types:
You can also optionally omit specifying nullable columns entirely from a model class if you don’t need to access it. For example, the Product table within Northwind has a “QuantityPerUnit” column that is a nullable nvarchar, and a “UnitsOnOrder” column that is a nullable smallint. I’ve omitted both of these properties from the “Product” class I defined above. Because they are nullable within the database I can still retrieve, insert, update and delete Products without problems.
Association Properties and Lazy Loading
EF “code-first” makes it easy to take advantage of primary-key/foreign-key relationships within the database, and expose properties on our model classes that enable us to traverse between model classes using them.
Above we exposed a “Category” property on our Product class, and a “Products” property on our Category class. Accessing these properties enables us to use the PK/FK relationship between the two tables to retrieve back model instances. Notice how the properties themselves are still “POCO” properties and do not require us to use any EF-specific collection type to define them.
Association properties that are marked as “virtual” will by default be lazy-loaded. What this means is that if you retrieve a Product entity, its Category information will not be retrieved from the database until you access its Category property (or unless you explicitly indicate that the Category data should be retrieved when you write your LINQ query to retrieve the Product object).
EF Context Class
Once we’ve created our “Product” and “Category” POCO classes, we used EF “code first” to create a “context” class that we can use to map our POCO model classes to/from tables within the database:
The “Northwind” class above is the context class we are using to map our Product and Category classes to/from the database. It derives from the DbContext base class provided by EF “code-first”, and exposes two properties that correspond to tables within our database. For this sample we are using the default “convention over configuration” based mapping rules to define how the classes should map to/from the database.
We could alternatively override the “OnModelCreating” method and specify custom mapping rules if we wanted the object model of our model classes to look differently than our database schema. My previous blog EF “code first” post covers how to do this.
Step 5: Configuring our Database Connection String
We’ve written all of the code we need to write to define our model layer. Our last step before we use it will be to setup a connection-string that connects it with our database.
In my initial EF “code first” blog post I discussed a cool option that EF “code first” provides that allows you to have it auto-create/recreate your database schema for you. This is a option that can be particularly useful for green-field development scenarios – since it allows you to focus on your model layer early in the project without having to spend time on updating your database schema after each model change.
Importantly, though, the auto-create database option is just an option – it is definitely not required. If you point your connection-string at an existing database then EF “code first” will not try and create one automatically. The auto-recreate option also won’t be enabled unless you explicitly want EF to do this – so you don’t need to worry about it dropping and recreating your database unless you’ve explicitly indicated you want it to do so.
For this blog post we will not auto-create the database. Instead, we’ll point at the existing Northwind database we already have. To do this we’ll add a “Northwind” connection-string to our web.config file like so:
  <connectionStrings>

    <add name="Northwind"
         connectionString="data source=.\SQLEXPRESS;Integrated Security=SSPI;AttachDBFilename=|DataDirectory|\northwind.mdf;User Instance=true"
         providerName="System.Data.SqlClient" />

  </connectionStrings>
EF “code first” uses a convention where context classes by default look for a connection-string that has the same name as the context class. Because our context class is called “Northwind” it by default looks for a “Northwind” connection-string to use. Above our Northwind connection-string is configured to use a local SQL Express database. You can alternatively point it at a remote SQL Server.
Step 6: Using our Model Classes
Let’s now write a (very) simple page that uses our Northwind model classes to display some data from our database.
We’ll begin by adding a new page to our ASP.NET project. Right-click on the web project and choose Add->New Item, then select the “Web Form using Master Page” item template. We’ll name the page “Products.aspx” and have it use the “Site.master” master-page that is included by default with the ASP.NET Web Project starter template.
We’ll add a <asp:GridView> control to our new Products.aspx page. We’ll configure it to show just the name and price of our Products:
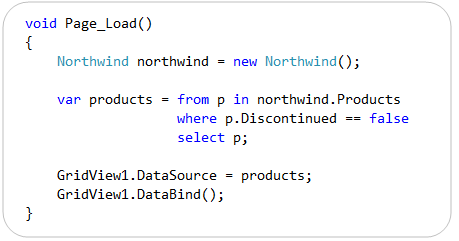
Within our code-behind file we can then write the following LINQ query against our model classes to retrieve all active products from our database, and bind them to the above GridView control:
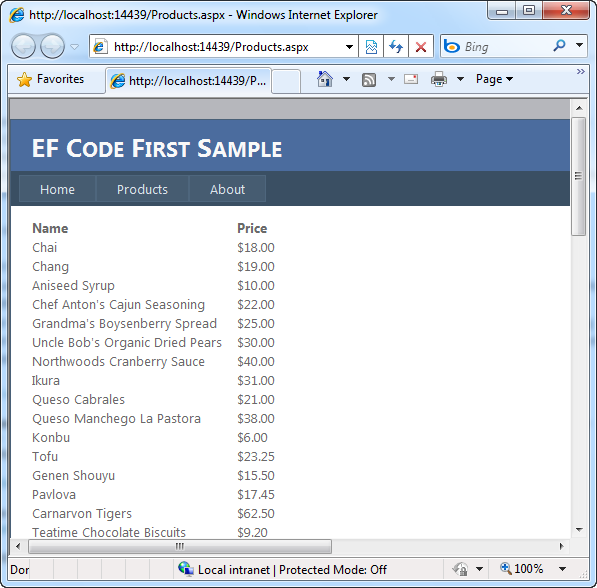
And now when we run the project and navigate to the Products.aspx page we’ll get a listing of our Products like so:
We now have a simple application that uses EF “code first” against an existing database.
Download Sample
You can download a completed version of the above sample here. It assumes you have EF “code first” CTP4 and SQL Express installed.
Additional Code Examples
Below are some additional code examples that demonstrate how we could use our Northwind model for other common scenarios.
Query Across Relations
The LINQ query below demonstrates retrieve a sequence of Product objects based on the name of the Category they belong to. Notice below how we can write LINQ queries that span both the Product and a sub-property of its associated Category object. The actual filter is all done in the database engine itself – so only Product objects get returned to the middle tier (making it efficient):
Use the Find method to retrieve a single Product
In addition to allowing you to write LINQ queries, EF “Code First” also supports a “Find()” method on DbSet<T> collections that allows you to write code like below to retrieve a single instance based on its ID:
Inserting a New Category
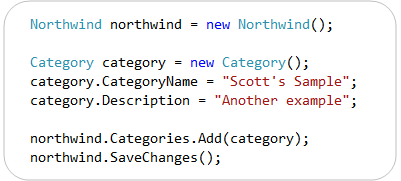
The code below demonstrates how to add a new Category to the Database:
Notice how we create the Category object, assign properties to it, then add it to the Context’s Categories collection. We then call SaveChanges() on the context to persist updates to the database.
Inserting a New Category and Product (and associating them)
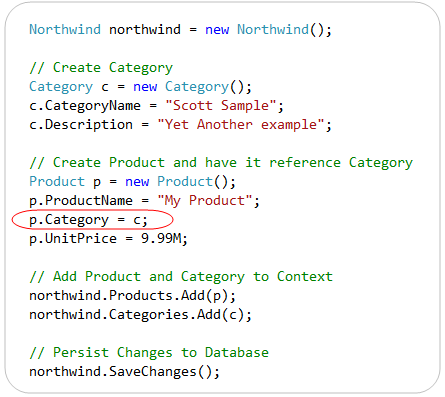
The code below demonstrates how to create a new Category and a new Product, associate the Product so that it belongs to the new Category, and then save both to the Database:
Notice above how we are able to have the new Product reference the newly created Category by assigning its “Category” property to point to the Category instance. We do not need to explicitly set the CategoryID foreign key property – this will be done automatically for us when we persist the changes to the database.
EF uses an pattern called “unit of work” – which means that it can track multiple changes to a context, and then when “SaveChanges()” is called it can persist all of them together in a single atomic transaction (which means all the changes succeed or none of them do). This makes it easier to ensure that your database can’t be left in an inconsistent state – where some changes are applied and others aren’t.
In the code snippet above both the Category and the Product will both be persisted, or neither of them will (and an exception will be raised).
Update a Product and Save it Back
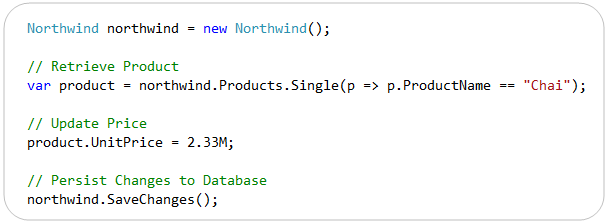
The code below demonstrates how to retrieve and update a Product, and then save it back to the database. Earlier I demonstrated how to use the Find() method to retrieve a product based on its ProductID. Below we are using a LINQ query to retrieve a specific product based on its ProductName.
We could make any number of changes (to any existing objects, as well as add new ones). When we call SaveChanges() they will all be persisted in a single transaction back to the database.
Default Conventions vs. Custom Mapping Rules
When we created the Product and Category classes earlier, we used the default conventions in EF “Code-First” to map the classes to/from the database. This avoided the need for us to specify any custom mapping rules, and kept our code really concise.
There will definitely be times when you don’t like the shape of the database your are mapping, though, and want to have your model’s object model be different. Refer back to my Custom Database Schema Mapping blog post for examples of how to use EF to specify custom mapping rules. These all work equally well when mapping existing databases.
Summary
I’m pretty excited about the EF "Code-First” functionality and think it provides a pretty nice code-centric way to work with data. It brings with it a lot of productivity, as well as a lot of power. In particular I like it because it helps keep code really clean, maintainable, and allows you to do a lot concisely. Hopefully these last three blog posts about it provides a glimpse of some of the possibilities it provides – both for new and existing databases.
You can download the CTP4 release of EF Code-First here. To learn even more about “EF Code-First” check out these blog posts by the ADO.NET team:
- EF CTP4 Announcement Blog Post
- EF CTP4 Productivity Enhancements Blog Post
- EF CTP4 Code First Walkthrough Blog Post
- DataAnnotations and Code First
- Default conventions with Code First
- Scott Hanselman’s Walkthrough Post about CTP4
Hope this helps,
Scott
P.S. In addition to blogging, I am also now using Twitter for quick updates and to share links. Follow me at: twitter.com/scottgu
