Tip/Trick: Fix Common SEO Problems Using the URL Rewrite Extension
Search engine optimization (SEO) is important for any publically facing web-site. A large % of traffic to sites now comes directly from search engines, and improving your site’s search relevancy will lead to more users visiting your site from search engine queries. This can directly or indirectly increase the money you make through your site.
This blog post covers how you can use the free Microsoft URL Rewrite Extension to fix a bunch of common SEO problems that your site might have. It takes less than 15 minutes (and no code changes) to apply 4 simple URL Rewrite rules to your site, and in doing so cause search engines to drive more visitors and traffic to your site. The techniques below work equally well with both ASP.NET Web Forms and ASP.NET MVC based sites. They also works with all versions of ASP.NET (and even work with non-ASP.NET content).
[In addition to blogging, I am also now using Twitter for quick updates and to share links. Follow me at: twitter.com/scottgu]
Measuring the SEO of your website with the Microsoft SEO Toolkit
A few months ago I blogged about the free SEO Toolkit that we’ve shipped. This useful tool enables you to automatically crawl/scan your site for SEO correctness, and it then flags any SEO issues it finds. I highly recommend downloading and using the tool against any public site you work on. It makes it easy to spot SEO issues you might have in your site, and pinpoint ways to optimize it further.
Below is a simple example of a report I ran against one of my sites (www.scottgu.com) prior to applying the URL Rewrite rules I’ll cover later in this blog post:
Search Relevancy and URL Splitting
Two of the important things that search engines evaluate when assessing your site’s “search relevancy” are:
- How many other sites link to your content. Search engines assume that if a lot of people around the web are linking to your content, then it is likely useful and so weight it higher in relevancy.
- The uniqueness of the content it finds on your site. If search engines find that the content is duplicated in multiple places around the Internet (or on multiple URLs on your site) then it is likely to drop the relevancy of the content.
One of the things you want to be very careful to avoid when building public facing sites is to not allow different URLs to retrieve the same content within your site. Doing so will hurt with both of the situations above.
In particular, allowing external sites to link to the same content with multiple URLs will cause your link-count and page-ranking to be split up across those different URLs (and so give you a smaller page rank than what it would otherwise be if it was just one URL). Not allowing external sites to link to you in different ways sounds easy in theory – but you might wonder what exactly this means in practice and how you avoid it.
4 Really Common SEO Problems Your Sites Might Have
Below are 4 really common scenarios that can cause your site to inadvertently expose multiple URLs for the same content. When this happens external sites linking to yours will end up splitting their page links across multiple URLs - and as a result cause you to have a lower page ranking with search engines than you deserve.
SEO Problem #1: Default Document
IIS (and other web servers) supports the concept of a “default document”. This allows you to avoid having to explicitly specify the page you want to serve at either the root of the web-site/application, or within a sub-directory. This is convenient – but means that by default this content is available via two different publically exposed URLs (which is bad). For example:
SEO Problem #2: Different URL Casings
Web developers often don’t realize URLs are case sensitive to search engines on the web. This means that search engines will treat the following links as two completely different URLs:
SEO Problem #3: Trailing Slashes
Consider the below two URLs – they might look the same at first, but they are subtly different. The trailing slash creates yet another situation that causes search engines to treat the URLs as different and so split search rankings:
SEO Problem #4: Canonical Host Names
Sometimes sites support scenarios where they support a web-site with both a leading “www” hostname prefix as well as just the hostname itself. This causes search engines to treat the URLs as different and split search rankling:
How to Easily Fix these SEO Problems in 10 minutes (or less) using IIS Rewrite
If you haven’t been careful when coding your sites, chances are you are suffering from one (or more) of the above SEO problems. Addressing these issues will improve your search engine relevancy ranking and drive more traffic to your site.
The “good news” is that fixing the above 4 issues is really easy using the URL Rewrite Extension. This is a completely free Microsoft extension available for IIS 7.x (on Windows Server 2008, Windows Server 2008 R2, Windows 7 and Windows Vista). The great thing about using the IIS Rewrite extension is that it allows you to fix the above problems *without* having to change any code within your applications.
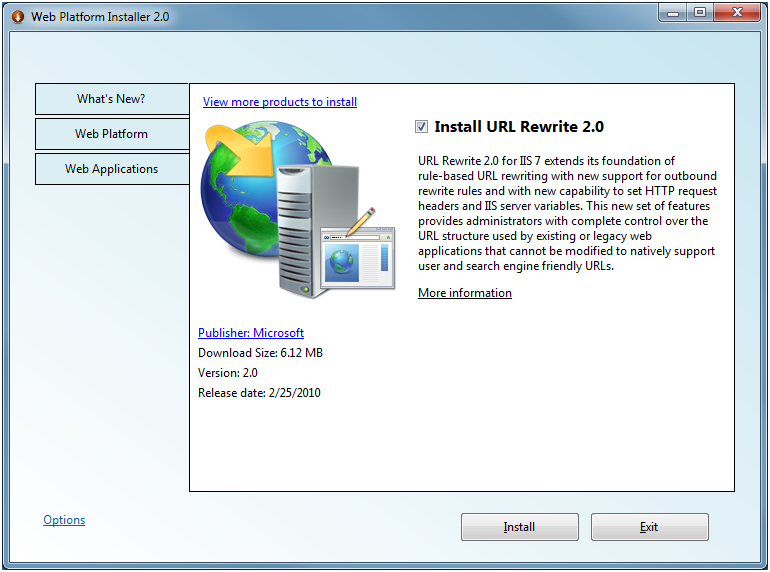
You can easily install the URL Rewrite Extension in under 3 minutes using the Microsoft Web Platform Installer (a free tool we ship that automates setting up web servers and development machines). Just click the green “Install Now” button on the URL Rewrite Spotlight page to install it on your Windows Server 2008, Windows 7 or Windows Vista machine:
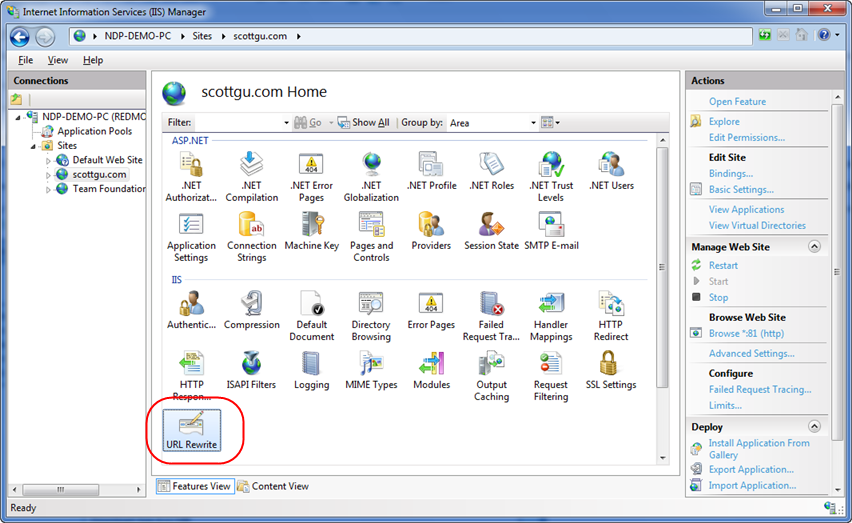
Once installed you’ll find that a new “URL Rewrite” icon is available within the IIS 7 Admin Tool:
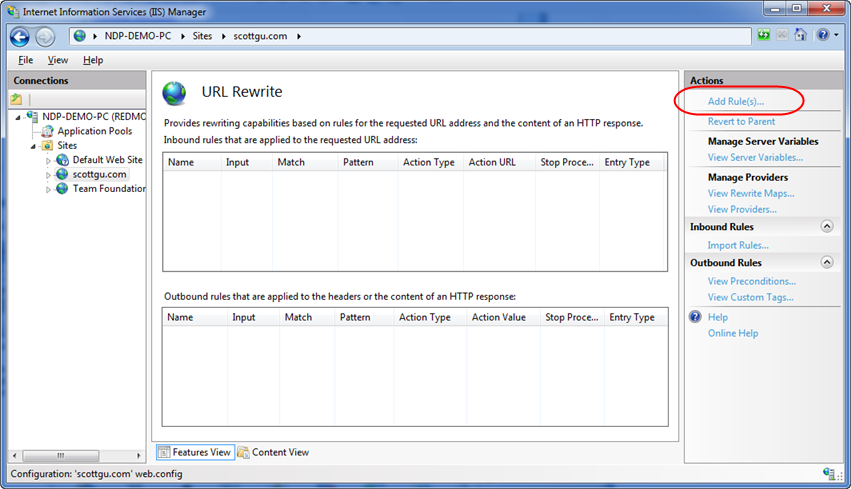
Double-clicking the icon will open up the URL Rewrite admin panel – which will display the list of URL Rewrite rules configured for a particular application or site:
Notice that our rewrite rule list above is currently empty (which is the default when you first install the extension). We can click the “Add Rule…” link button in the top-right of the panel to add and enable new URL Rewriting logic for our site.
Scenario 1: Handling Default Document Scenarios
One of the SEO problems I discussed earlier in this post was the scenario where the “default document” feature of IIS causes you to inadvertently expose two URLs for the same content on your site. For example:
http://scottgu.com/
http://scottgu.com/default.aspx
We can fix this by adding a new IIS Rewrite rule that automatically redirects anyone who navigates to the second URL to instead go to the first one. We will setup the HTTP redirect to be a “permanent redirect” – which will indicate to search engines that they should follow the redirect and use the new URL they are redirected to as the identifier of the content they retrieve.
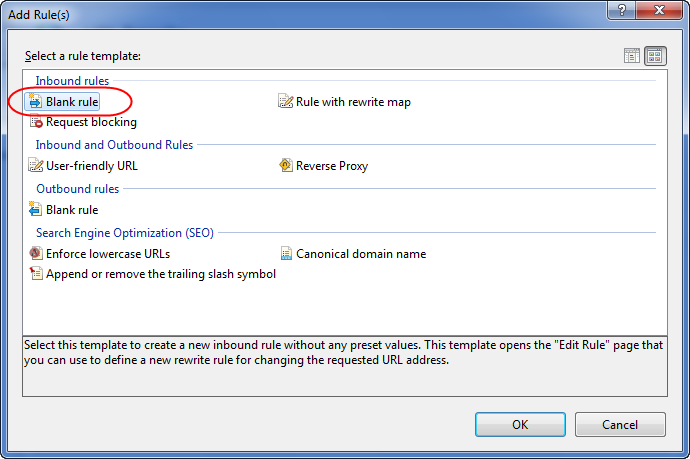
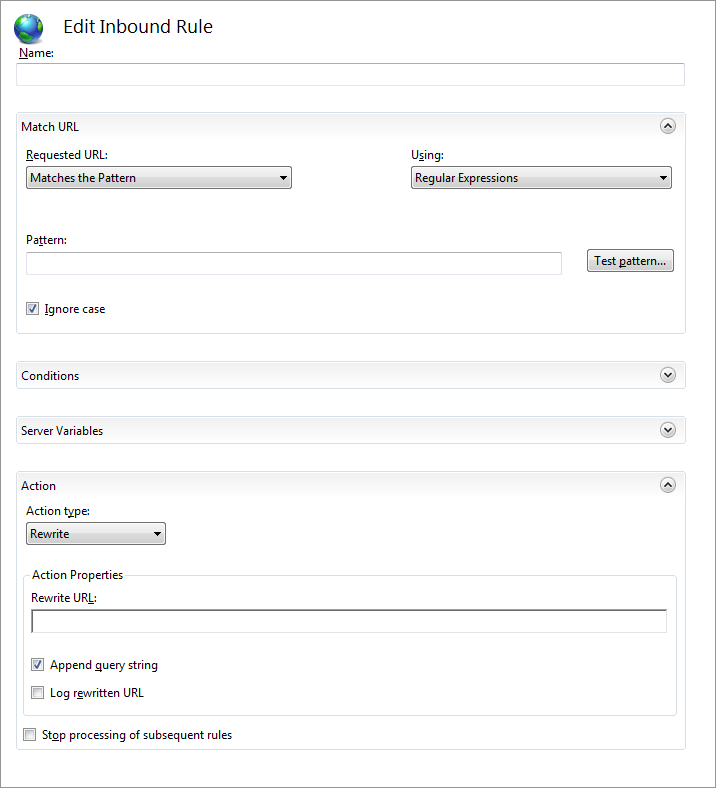
Let’s look at how we can create such a rule. We’ll begin by clicking the “Add Rule” link in the screenshot above. This will cause the below dialog to display:
We’ll select the “Blank Rule” template within the “Inbound rules” section to create a new custom URL Rewriting rule. This will display an empty pane like below:
Don’t worry – setting up the above rule is easy. The following 4 steps explain how to do so:
Step 1: Name the Rule
Our first step will be to name the rule we are creating. Naming it with a descriptive name will make it easier to find and understand later. Let’s name this rule our “Default Document URL Rewrite” rule:
Step 2: Setup the Regular Expression that Matches this Rule
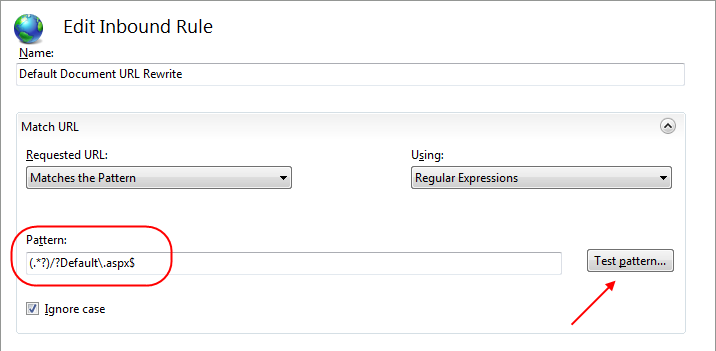
Our second step will be to specify a regular expression filter that will cause this rule to execute when an incoming URL matches the regex pattern. Don’t worry if you aren’t good with regular expressions - I suck at them too. The trick is to know someone who is good at them or copy/paste them from a web-site.
Below we are going to specify the following regular expression as our pattern rule:
(.*?)/?Default\.aspx$
This pattern will match any URL string that ends with Default.aspx. The "(.*?)" matches any preceding character zero or more times. The "/?" part says to match the slash symbol zero or one times. The "$" symbol at the end will ensure that the pattern will only match strings that end with Default.aspx.
Combining all these regex elements allows this rule to work not only for the root of your web site (e.g. http://scottgu.com/default.aspx) but also for any application or subdirectory within the site (e.g. http://scottgu.com/photos/default.aspx. Because the “ignore case” checkbox is selected it will match both “Default.aspx” as well as “default.aspx” within the URL.
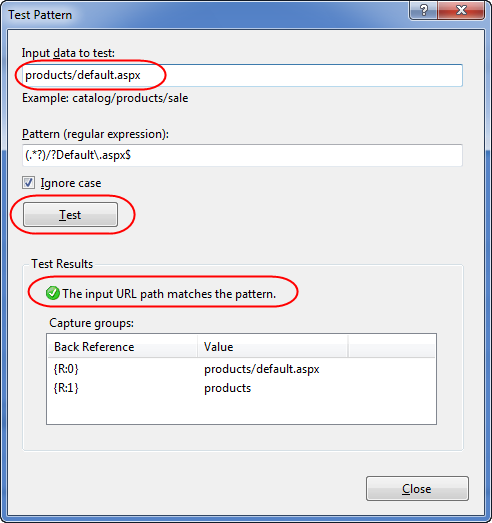
One nice feature built-into the rule editor is a “Test pattern” button that you can click to bring up a dialog that allows you to test out a few URLs with the rule you are configuring:
Above I've added a “products/default.aspx” URL and clicked the “Test” button. This will give me immediate feedback on whether the rule will execute for it.
Step 3: Setup a Permanent Redirect Action
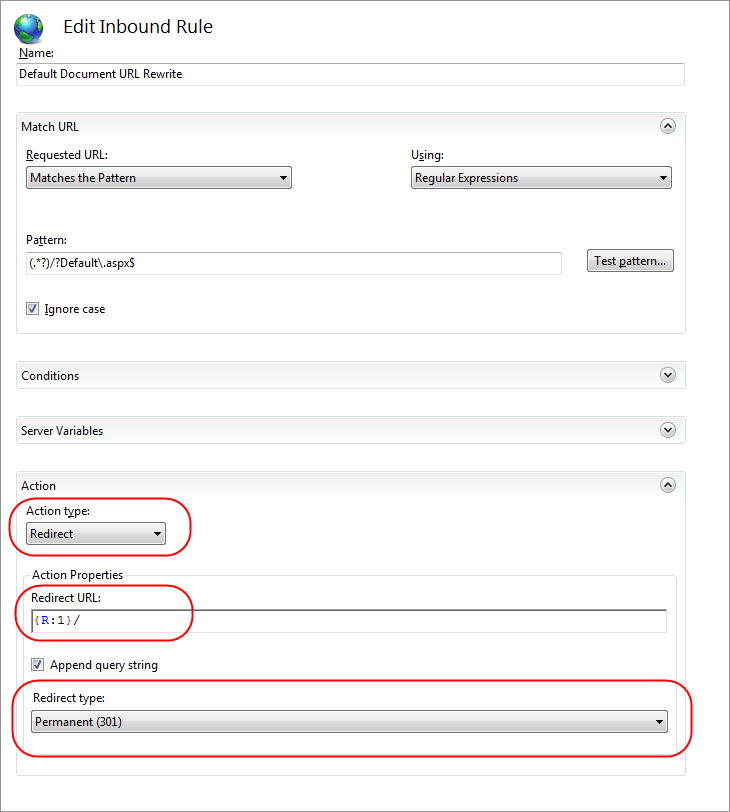
We’ll then setup an action to occur when our regular expression pattern matches the incoming URL:
In the dialog above I’ve changed the “Action Type” drop down to be a “Redirect” action. The “Redirect Type” will be a HTTP 301 Permanent redirect – which means search engines will follow it.
I’ve also set the “Redirect URL” property to be:
{R:1}/
This indicates that we want to redirect the web client requesting the original URL to a new URL that has the originally requested URL path - minus the "Default.aspx" in it. For example, requests for http://scottgu.com/default.aspx will be redirected to http://scottgu.com/, and requests for http://scottgu.com/photos/default.aspx will be redirected to http://scottgu.com/photos/
The "{R:N}" regex construct, where N >= 0, is called a regular expression back-reference and N is the back-reference index. In the case of our pattern "(.*?)/?Default\.aspx$", if the input URL is "products/Default.aspx" then {R:0} will contain "products/Default.aspx" and {R:1} will contain "products". We are going to use this {R:1}/ value to be the URL we redirect users to.
Step 4: Apply and Save the Rule
Our final step is to click the “Apply” button in the top right hand of the IIS admin tool – which will cause the tool to persist the URL Rewrite rule into our application’s root web.config file (under a <system.webServer/rewrite> configuration section):
<configuration>
<system.webServer>
<rewrite>
<rules>
<rule name="Default Document" stopProcessing="true">
<match url="(.*?)/?Default\.aspx$" />
<action type="Redirect" url="{R:1}/" />
</rule>
</rules>
</rewrite>
</system.webServer>
</configuration>
Because IIS 7.x and ASP.NET share the same web.config files, you can actually just copy/paste the above code into your web.config files using Visual Studio and skip the need to run the admin tool entirely. This also makes adding/deploying URL Rewrite rules with your ASP.NET applications really easy.
Step 5: Try the Rule Out
Now that we’ve saved the rule, let’s try it out on our site. Try the following two URLs on my site:
Notice that the second URL automatically redirects to the first one. Because it is a permanent redirect, search engines will follow the URL and should update the page ranking of http://scottgu.com to include links to http://scottgu.com/default.aspx as well.
Scenario 2: Different URL Casing
Another common SEO problem I discussed earlier in this post is that URLs are case sensitive to search engines on the web. This means that search engines will treat the following links as two completely different URLs:
We can fix this by adding a new IIS Rewrite rule that automatically redirects anyone who navigates to the first URL to instead go to the second (all lower-case) one. Like before, we will setup the HTTP redirect to be a “permanent redirect” – which will indicate to search engines that they should follow the redirect and use the new URL they are redirected to as the identifier of the content they retrieve.
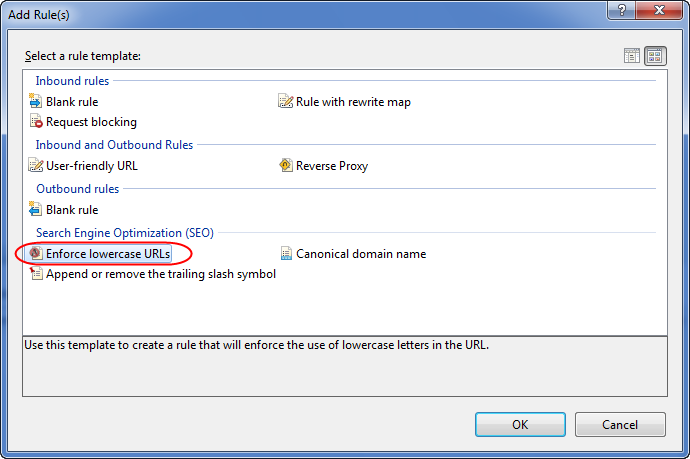
To create such a rule we’ll click the “Add Rule” link in the URL Rewrite admin tool again. This will cause the “Add Rule” dialog to appear again:
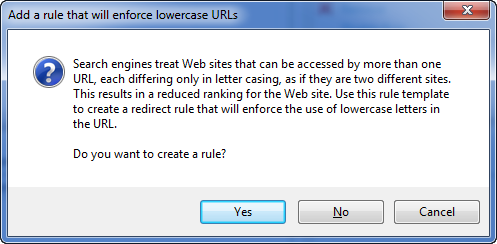
Unlike the previous scenario (where we created a “Blank Rule”), with this scenario we can take advantage of a built-in “Enforce lowercase URLs” rule template. When we click the “ok” button we’ll see the following dialog which asks us if we want to create a rule that enforces the use of lowercase letters in URLs:
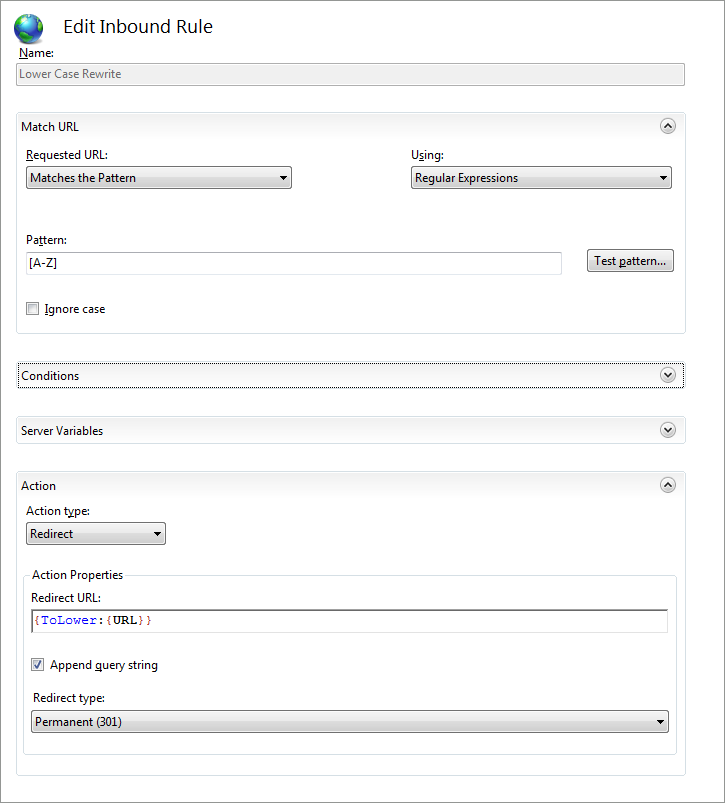
When we click the “Yes” button we’ll get a pre-written rule that automatically performs a permanent redirect if an incoming URL has upper-case characters in it – and automatically send users to a lower-case version of the URL:
We can click the “Apply” button to use this rule “as-is” and have it apply to all incoming URLs to our site.
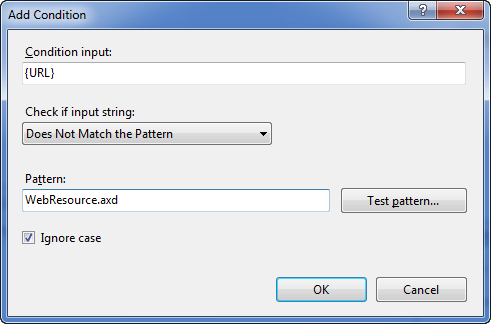
Because my www.scottgu.com site uses ASP.NET Web Forms, I’m going to make one small change to the rule we generated above – which is to add a condition that will ensure that URLs to ASP.NET’s built-in “WebResource.axd” handler are excluded from our case-sensitivity URL Rewrite logic. URLs to the WebResource.axd handler will only come from server-controls emitted from my pages – and will never be linked to from external sites. While my site will continue to function fine if we redirect these URLs to automatically be lower-case – doing so isn’t necessary and will add an extra HTTP redirect to many of my pages.
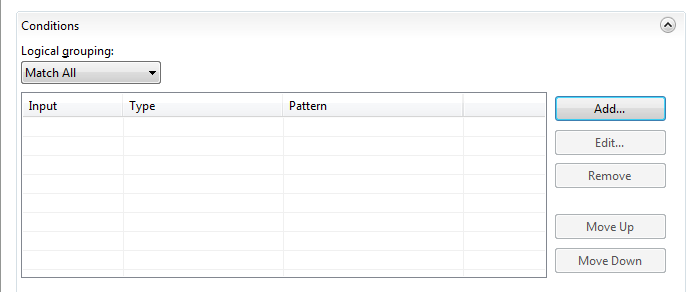
The good news is that adding a condition that prevents my URL Rewriting rule from happening with certain URLs is easy. We simply need to expand the “Conditions” section of the form above
We can then click the “Add” button to add a condition clause. This will bring up the “Add Condition” dialog:
Above I’ve entered {URL} as the Condition input – and said that this rule should only execute if the URL does not match a regex pattern which contains the string “WebResource.axd”. This will ensure that WebResource.axd URLs to my site will be allowed to execute just fine without having the URL be re-written to be all lower-case.
Note: If you have static resources (like references to .jpg, .css, and .js files) within your site that currently use upper-case characters you’ll probably want to add additional condition filter clauses so that URLs to them also don’t get redirected to be lower-case (just add rules for patterns like .jpg, .gif, .js, etc). Your site will continue to work fine if these URLs get redirected to be lower case (meaning the site won’t break) – but it will cause an extra HTTP redirect to happen on your site for URLs that don’t need to be redirected for SEO reasons. So setting up a condition clause makes sense to add.
When I click the “ok” button above and apply our lower-case rewriting rule the admin tool will save the following additional rule to our web.config file:
<configuration>
<system.webServer>
<rewrite>
<rules><rule name="Default Document" stopProcessing="true">
<match url="(.*?)/?Default\.aspx$" />
<action type="Redirect" url="{R:1}/" />
</rule><rule name="Lower Case URLs" stopProcessing="true">
<match url="[A-Z]" ignoreCase="false" />
<conditions logicalGrouping="MatchAll" trackAllCaptures="false">
<add input="{URL}" pattern="WebResource.axd" negate="true" />
</conditions>
<action type="Redirect" url="{ToLower:{URL}}" />
</rule></rules>
</rewrite>
</system.webServer>
</configuration>
Try the Rule Out
Now that we’ve saved the rule, let’s try it out on our site. Try the following two URLs on my site:
Notice that the first URL (which has a capital “A”) automatically does a redirect to a lower-case version of the URL.
Scenario 3: Trailing Slashes
Another common SEO problem I discussed earlier in this post is the scenario of trailing slashes within URLs. The trailing slash creates yet another situation that causes search engines to treat the URLs as different and so split search rankings:
We can fix this by adding a new IIS Rewrite rule that automatically redirects anyone who navigates to the first URL (that does not have a trailing slash) to instead go to the second one that does. Like before, we will setup the HTTP redirect to be a “permanent redirect” – which will indicate to search engines that they should follow the redirect and use the new URL they are redirected to as the identifier of the content they retrieve.
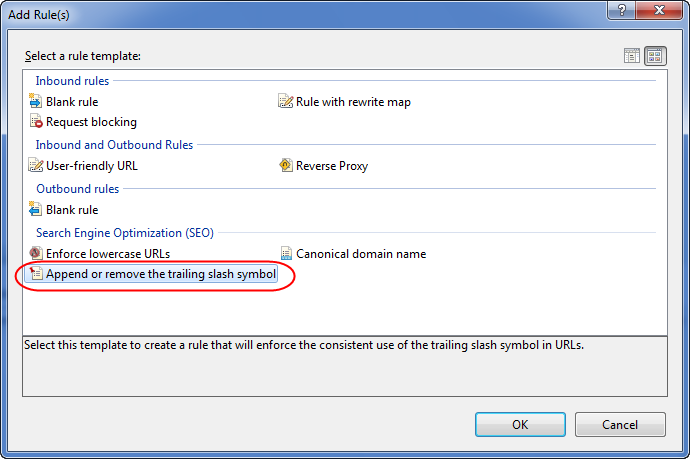
To create such a rule we’ll click the “Add Rule” link in the URL Rewrite admin tool again. This will cause the “Add Rule” dialog to appear again:
The URL Rewrite admin tool has a built-in “Append or remove the trailing slash symbol” rule template.
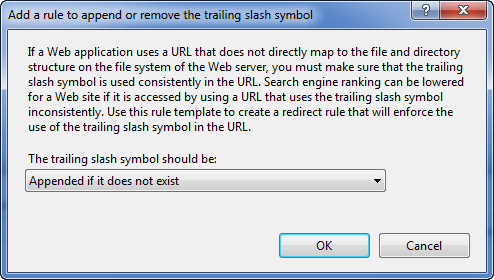
When we select it and click the “ok” button we’ll see the following dialog which asks us if we want to create a rule that automatically redirects users to a URL with a trailing slash if one isn’t present:
When we click the “OK” button we’ll get a pre-written rule that automatically performs a permanent redirect if the URL doesn’t have a trailing slash – and if the URL is not processed by either a directory or a file.
Like within our previous lower-casing rewrite rule we’ll add one additional condition clause that will exclude WebResource.axd URLs from being processed by this rule. This will avoid an unnecessary redirect for happening for those URLs.
This will save the following additional rule to our web.config file:
<configuration>
<system.webServer>
<rewrite>
<rules><rule name="Default Document" stopProcessing="true">
<match url="(.*?)/?Default\.aspx$" />
<action type="Redirect" url="{R:1}/" />
</rule><rule name="Lower Case URLs" stopProcessing="true">
<match url="[A-Z]" ignoreCase="false" />
<conditions logicalGrouping="MatchAll" trackAllCaptures="false">
<add input="{URL}" pattern="WebResource.axd" negate="true" />
</conditions>
<action type="Redirect" url="{ToLower:{URL}}" />
</rule><rule name="Trailing Slash" stopProcessing="true">
<match url="(.*[^/])$" />
<conditions logicalGrouping="MatchAll" trackAllCaptures="false">
<add input="{REQUEST_FILENAME}" matchType="IsDirectory" negate="true" />
<add input="{REQUEST_FILENAME}" matchType="IsFile" negate="true" />
<add input="{URL}" pattern="WebResource.axd" negate="true" />
</conditions>
<action type="Redirect" url="{R:1}/" />
</rule></rules>
</rewrite>
</system.webServer>
</configuration>
Try the Rule Out
Now that we’ve saved the rule, let’s try it out on our site. Try the following two URLs on my site:
Notice that the first URL (which has no trailing slash) automatically does a redirect to a URL with the trailing slash. Because it is a permanent redirect, search engines will follow the URL and update the page ranking.
Scenario 4: Canonical Host Names
The final SEO problem I discussed earlier are scenarios where a site works with both a leading “www” hostname prefix as well as just the hostname itself. This causes search engines to treat the URLs as different and split search rankling:
We can fix this by adding a new IIS Rewrite rule that automatically redirects anyone who navigates to the first URL (that has a www prefix) to instead go to the second URL. Like before, we will setup the HTTP redirect to be a “permanent redirect” – which will indicate to search engines that they should follow the redirect and use the new URL they are redirected to as the identifier of the content they retrieve.
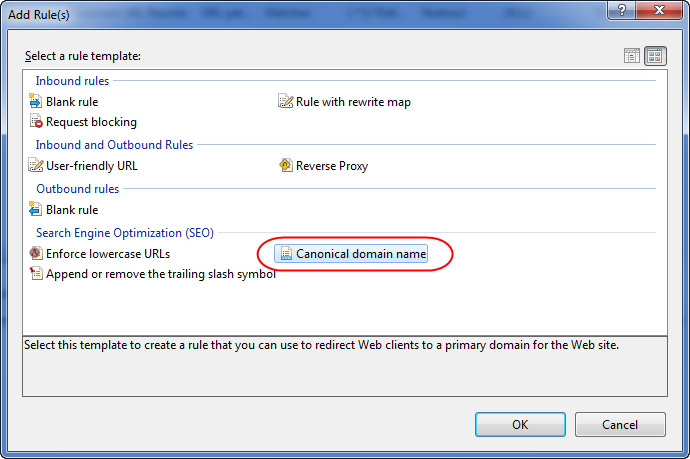
To create such a rule we’ll click the “Add Rule” link in the URL Rewrite admin tool again. This will cause the “Add Rule” dialog to appear again:
The URL Rewrite admin tool has a built-in “Canonical domain name” rule template.
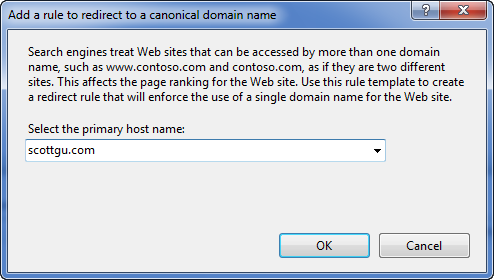
When we select it and click the “ok” button we’ll see the following dialog which asks us if we want to create a redirect rule that automatically redirects users to a primary host name URL:
Above I’m entering the primary URL address I want to expose to the web: scottgu.com. When we click the “OK” button we’ll get a pre-written rule that automatically performs a permanent redirect if the URL has another leading domain name prefix.
This will save the following additional rule to our web.config file:
<configuration>
<system.webServer>
<rewrite>
<rules><rule name="Cannonical Hostname">
<match url="(.*)" />
<conditions logicalGrouping="MatchAll" trackAllCaptures="false">
<add input="{HTTP_HOST}" pattern="^scottgu\.com$" negate="true" />
</conditions>
<action type="Redirect" url="http://scottgu.com/{R:1}" />
</rule><rule name="Default Document" stopProcessing="true">
<match url="(.*?)/?Default\.aspx$" />
<action type="Redirect" url="{R:1}/" />
</rule><rule name="Lower Case URLs" stopProcessing="true">
<match url="[A-Z]" ignoreCase="false" />
<conditions logicalGrouping="MatchAll" trackAllCaptures="false">
<add input="{URL}" pattern="WebResource.axd" negate="true" />
</conditions>
<action type="Redirect" url="{ToLower:{URL}}" />
</rule><rule name="Trailing Slash" stopProcessing="true">
<match url="(.*[^/])$" />
<conditions logicalGrouping="MatchAll" trackAllCaptures="false">
<add input="{REQUEST_FILENAME}" matchType="IsDirectory" negate="true" />
<add input="{REQUEST_FILENAME}" matchType="IsFile" negate="true" />
<add input="{URL}" pattern="WebResource.axd" negate="true" />
</conditions>
<action type="Redirect" url="{R:1}/" />
</rule></rules>
</rewrite>
</system.webServer>
</configuration>
Try the Rule Out
Now that we’ve saved the rule, let’s try it out on our site. Try the following two URLs on my site:
Notice that the first URL (which has the “www” prefix) now automatically does a redirect to the second URL which does not have the www prefix. Because it is a permanent redirect, search engines will follow the URL and update the page ranking.
4 Simple Rules for Improved SEO
The above 4 rules are pretty easy to setup and should take less than 15 minutes to configure on existing sites you already have.
The beauty of using a solution like the URL Rewrite Extension is that you can take advantage of it without having to change code within your web-site – and without having to break any existing links already pointing at your site. Users who follow existing links will be automatically redirected to the new URLs you wish to publish. And search engines will start to give your site a higher search relevancy ranking – which will list your site higher in search results and drive more traffic to it.
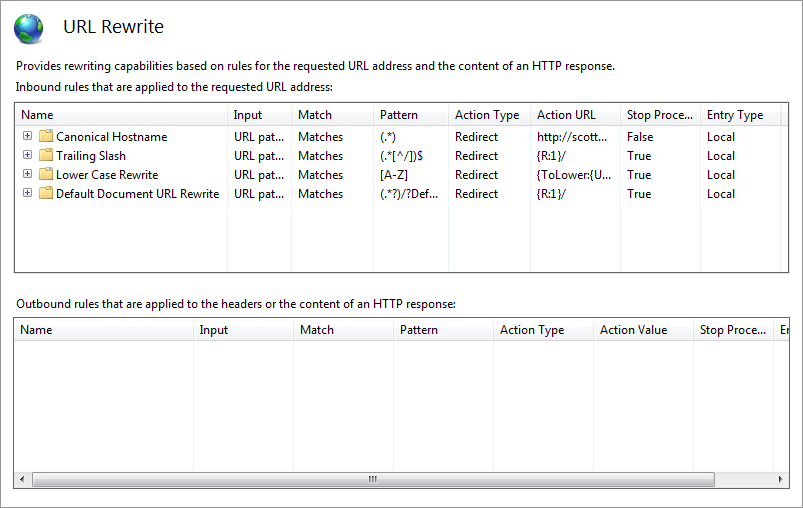
Customizing your URL Rewriting rules further is easy to-do either by editing the web.config file directly, or alternatively, just double click the URL Rewrite icon within the IIS 7.x admin tool and it will list all the active rules for your web-site or application:
Clicking any of the rules above will open the rules editor back up and allow you to tweak/customize/save them further.
Summary
Measuring and improving SEO is something every developer building a public-facing web-site needs to think about and focus on. If you haven’t already, download and use the SEO Toolkit to analyze the SEO of your sites today.
New URL Routing features in ASP.NET MVC and ASP.NET Web Forms 4 make it much easier to build applications that have more control over the URLs that are published. Tools like the URL Rewrite Extension that I’ve talked about in this blog post make it much easier to improve the URLs that are published from sites you already have built today – without requiring you to change a lot of code.
The URL Rewrite Extension provides a bunch of additional great capabilities – far beyond just SEO - as well. I’ll be covering these additional capabilities more in future blog posts.
Hope this helps,
Scott
![seo9_thumb_28660B78[1] seo9_thumb_28660B78[1]](https://aspblogs.blob.core.windows.net/media/scottgu/Media/seo9_thumb_28660B781_thumb_4601E342.png)
