Introducing the Microsoft Web Farm Framework
Last month we released a beta of the Microsoft Web Farm Framework. The Microsoft Web Farm Framework is a free product we are shipping that enables you to easily provision and mange a farm of web servers. It enables you to automate the installation and configuration of platform components across the server farm, and enables you to automatically synchronize and deploy ASP.NET applications across them. It also supports integration with load balancers - and enables you to automate updates across your servers so that your site/application is never down or unavailable to customers (it can automatically pull servers one-at-a-time out of the load balancer rotation, update them, and then inject them back into rotation).
The Microsoft Web Farm Framework is a 1 MB download, and can be installed on IIS 7 and above. It is available for free. You can download the first preview of this beta here: x86 / x64.
Why Is the Web Farm Framework Useful?
Running a web farm requires you to provision and manage multiple servers. Running a web farm involves (among other things):
- Installing IIS, ASP.NET and all of the core platform components on the servers
- Installing and configuring custom IIS modules (UrlRewite, Media Services, etc)
- Configuring IIS Application Pools and Sites
- Setting up SSL certificates for things like HTTPs endpoints
- Copying and synchronizing the appropriate sites/applications/content across the various boxes
- Coordinating the various web servers with a HTTP load balancer to distribute load
Administrators and developers managing a web farm today often perform a lot of manual steps to do the above (which is error prone and dangerous), or write a lot of custom scripts to automate it (which is time consuming and hard). Adding new servers or making configuring or application changes can often be painful and time-consuming.
The Microsoft Web Farm Framework makes this process much easier, and enables you to manage web farms in a completely automated way. Best of all, it is really easy to setup and use.
Using Web Farm Framework to Provision and Scale a Web Farm
The Microsoft Web Farm Framework enables you to easily define a “Server Farm” that you can add any number of servers into. Servers participating in the “Server Farm” will then be automatically updated, provisioned and managed by the Web Farm Framework.
What this means is that you can install IIS (including modules like UrlRewrite, Media Services, etc), ASP.NET, and custom SSL certificates once on a primary server – and then the Web Farm Framework will automatically replicate and provision the exact same configuration across all of the other web servers in the farm (no manual or additional steps required).
You can then create and configure an IIS Application Pool and a new Site and Application once on a primary server – and the Web Farm Framework will automatically replicate and provision the settings to all of the other web servers in the farm. You can then copy/deploy an ASP.NET application once on the primary server – and the Web Farm Framework will automatically replicate and provision the changes to all of the web servers in the farm (no manual or additional steps required).
The Web Farm Framework eliminates the need to manually install/manage things across a cluster of machines. It handles all of the provisioning and deployment for you in a completely automated way.
Load Balancer Integration
In addition to making it easy to provision/deploy servers and applications, the Web Farm Framework also includes load balancer integration. Specifically, the Web Farm Framework can integrate with an HTTP load balancer so that as web servers in the farm are updated with changes, they can be automatically pulled out of a load balancer rotation, updated, and then added back in. The Web Farm Framework can also optionally update the machines one at a time – so that you always have servers available to handle heavily load. This enables you to keep your site always available during updates – without you having to write any manual scripts to control or manage the update roll-out.
The current beta of the Web Farm Framework includes built-in support for the IIS Application Request Routing (ARR) service (which supports automatic load balancing of HTTP requests across multiple machines in a web-farm). The Web Farm Framework makes it really easy to integrate your web farm of servers with ARR for load-balancing, and includes the support to automatically pull a server out of rotation as it is being updated, and then have it added back into rotation once the update is done.
The final Web Farm Framework release will enable extensibility with other load-balancing technologies as well – enabling the same ability to automatically pull/inject servers from a load balancing rotation as they are updated.
Scenario Walkthrough: Setting up and Provisioning a Web Farm
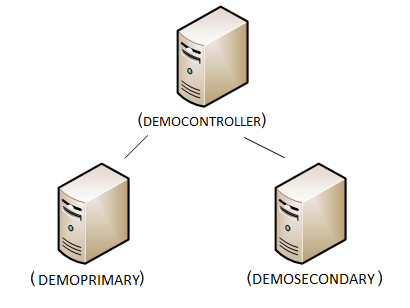
Let’s walkthrough a simple scenario where we want to setup and manage a server farm made up of two web servers. We’ll call these two web-servers the “DemoPrimary” and “DemoSeconday” servers. We’ll use a third “DemoController” machine to coordinate and manage the web farm. DemoController doesn’t technically need to be a separate machine – but makes it easier to understand the various roles in the walkthrough.
Installing the Web Farm Framework
We’ll begin by installing the current beta of the Microsoft Web Farm Framework using the Microsoft Web Platform Installer on our “DemoController” machine. It works with any machine that has IIS 7 (and above) installed.
Creating and Provisioning a Web Farm
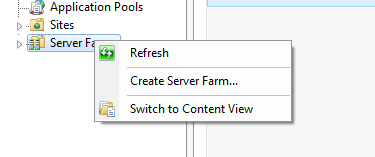
Once the Microsoft Web Farm Framework is installed, you’ll find a new “Server Farm” node listed within the left-hand tree view of the IIS Admin Tool on the “DemoController” machine. If you right-click on this “Server Farm” node you’ll see an option to “Create Server Farm…”
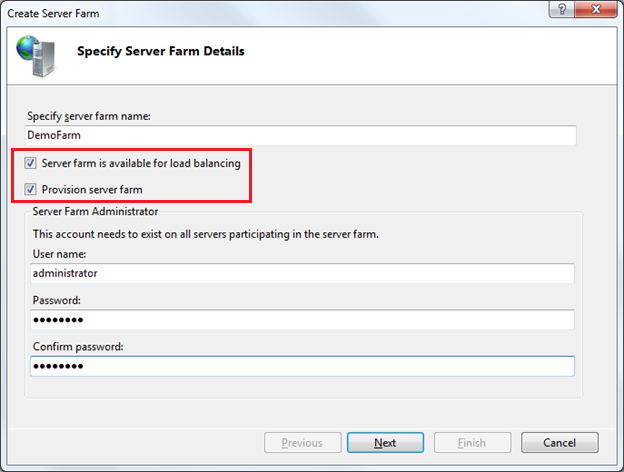
Selecting this option will bring up a “Create Server Farm” dialog – and allow us to configure and setup a farm of machines that we want to manage together.
We’ll name the new server farm we want to create “DemoFarm”, and indicate that we want to automatically provision all of the servers in the farm (by checking the “Provision Server Farm” option in the dialog). We’ll also indicate that we want to make it available for load-balancing with the IIS Application Request Routing (ARR) load-balancer:
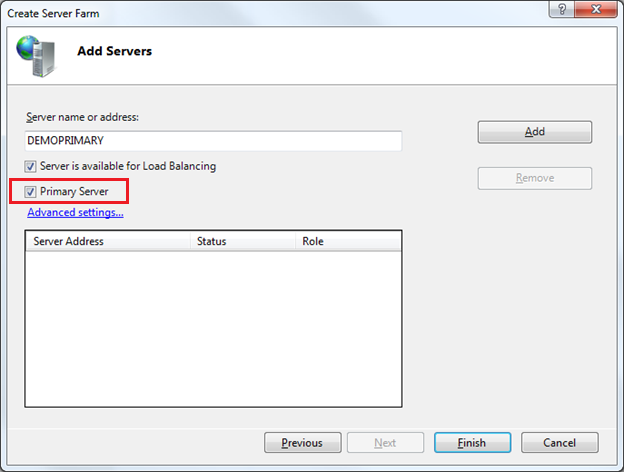
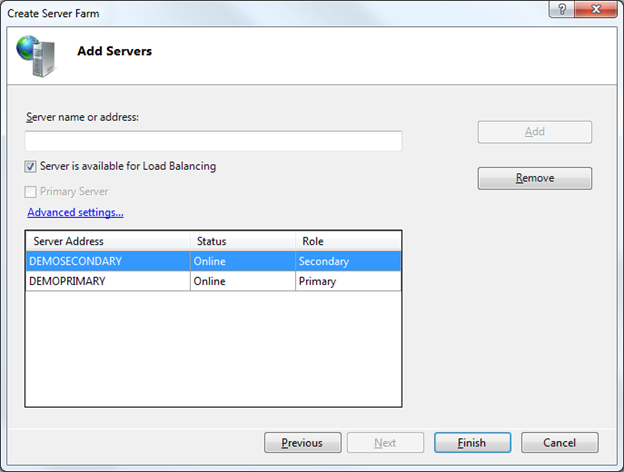
When we click the “Next” button the wizard will bring up an “Add Servers” dialog that allows us to specify the servers we want to have in the web farm. We can add any number of servers at the time of first setup. We can also come back and add more servers to the server farm later. When you add more servers to the farm later, the Web Farm Framework will automatically provision and update them to have the latest changes (allowing us to easily add additional capacity at any time).
For this walkthrough we’ll add our two servers – “DemoPrimary” and “DemoSeconday” to our server farm. We’ll start by adding the “DemoPrimary” machine. We’ll select the “Primary Server” checkbox in the dialog – which will indicate that its role is to act as the primary server that the other servers in the farm will replicate:
Once we add the “DemoPrimary” server we’ll also add the “DemoSecondary” server to the farm.
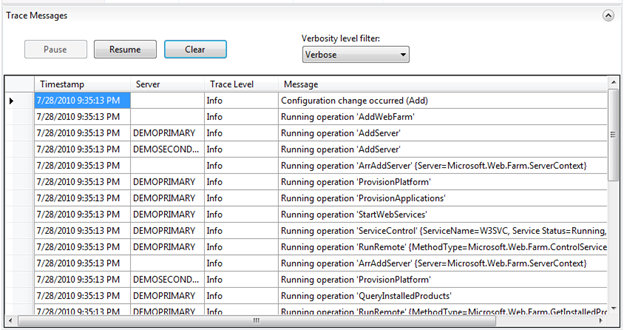
When we click the “Finish” button the Web Farm Framework will connect to the servers we’ve added to the farm and automatically provision the appropriate management software on them for us (no need for us to install anything manually – the web farm framework will automatically install its management service on the target machines). Clicking the “servers” tab in the “Server Farm” node in the IIS Admin tool always provides an up-to-date view of the provisioning and deployment operations happening across all the farm (you can also filter it by individual server if you want):
At this point we are completely done configuring our web farm. We now have a working, automated, web farm enabled.
We have setup our web farm for automated provisioning and synchronization/replication. If we were to create sites or application pools on the “DemoPrimary” web server, or install or update applications on it, they would be automatically replicated/synchronized on the “DemoSeconday” server. This is also true for any web platform components we install. We do not need to manually install or configure anything on any additional secondary servers we add to the farm. The Web Farm Framework will automate keeping them synchronized with our Primary Server – and enable us to manage the entire farm of servers as a group.
Managing a Web Farm
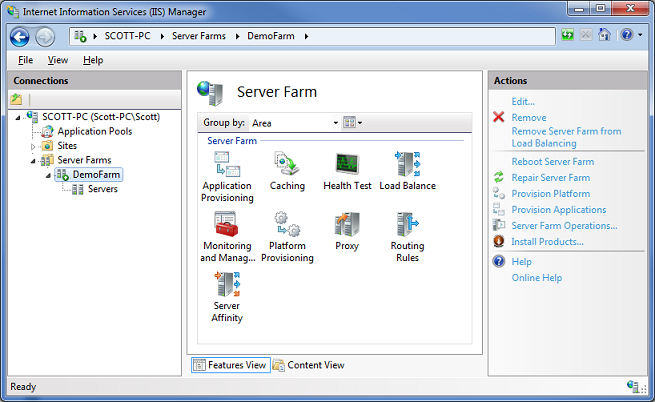
Clicking on the “DemoFarm” sub-node within the IIS Admin Tool enables us to manage, track and configure our server farm:
The view above combines the settings of both the Web Farm Framework, as well as the Application Request Routing capability of IIS (which adds load-balancing and cache management support).
You can click on the “Servers” sub-node of “DemoFarm” to see how the servers within the web farm are doing, if they are currently performing any deployment/provisioning operations, and if any errors have occurred on them. If any provisioning/deployment errors have occurred anywhere in the farm, you can drill down to detailed tracing to see what they were.
Platform Provisioning using the Web Farm Framework
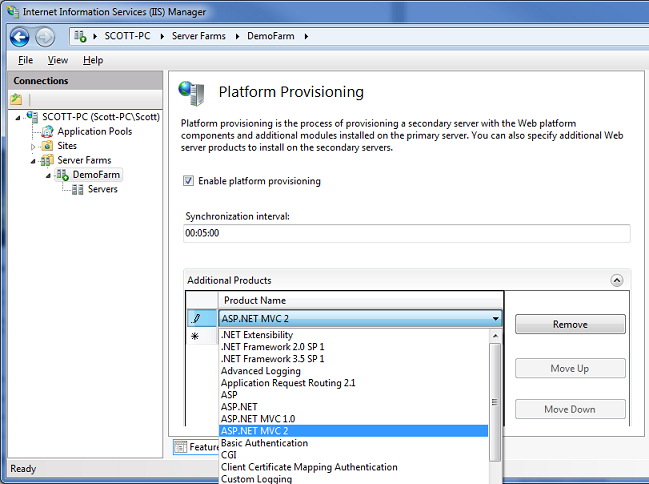
The Web Farm Framework enables you to easily add more platform components to your server-farm machines at anytime by using the “Platform Provisioning” icon above. This integrates our Microsoft Web Platform Installer technology, and enables you to easily install platform components on all of your web farm machines. It also allows you to easily check for any version differences in platform components between your primary and secondary machines in the farm.
Below we can add “ASP.NET MVC 2” to the server farm configuration:
Notice that the “Enable Platform Provisioning” checkbox is selected – this will ensure that products we add to the list are automatically provisioned across all of the servers in the farm. By default the Web Farm Framework will update each server in the farm one-by-one, and take it out of the load-balancer rotation while it does it, and then automatically add it back into the load balancer rotation once it is complete (ensuring your site never goes down). The Web Farm Framework will even handle scenarios where a server reboot is necessary – and complete the provisioning step and re-add the server back to rotation once the reboot is done.
Application Provisioning using the Web Farm Framework
The Web Farm Framework enables you to easily deploy and replicate/synchronize Sites, Applications, Content and Settings across a Web Farm. It uses the Microsoft Web Deploy technology to enable application deployment in an automated fashion (no manual steps required for both adding new applications and updating existing ones).
By default, the Web Farm Framework will automatically synchronize the Sites, Applications, Content and Settings we’ve configured on our “DemoPrimary” server to our “DemoSeconday” server (and any other web-servers we later add to the server farm). We can use any application deployment mechanism we want to create and copy the application up onto the “DemoPrimary” machine. This means we could use FTP/SFTP or the Microsoft Web Deploy framework to deploy the sites/content to “DemoPrimary”. It also means any web applications that use a custom MSI installer or custom batch-file/powershell script to deploy applications onto our “DemoPrimary” will also work.
The benefit of supporting any deployment mechanism is that you can leverage any of the existing application/site/app-pool deployment approaches you already use with IIS to update your primary server – and then use the Web Farm Framework to automatically have the installed application/site/content automatically replicated across the other machines in the web-farm. This makes it easier to integrate the Microsoft Web Farm Framework into your existing deployment workflows.
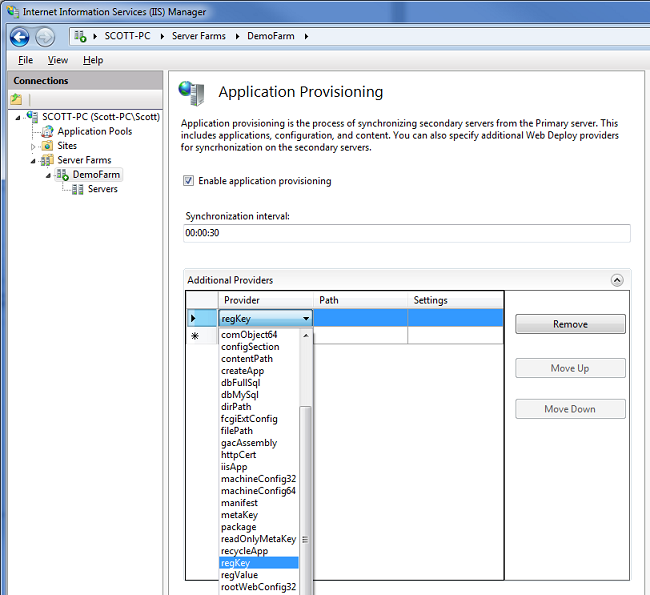
If you click the “Application Provisioning” icon in the IIS admin tool you can specify the synchronization frequency with which you want the servers in the web-farm to check for application/site/content updates (by default it happens every 30 seconds).
You can also optionally specify any additional Microsoft Web Deploy providers you want to use to copy custom settings across machines in the web-farm. For example, if you want a custom registry setting copied – you can enable that. If you want to set a custom NTFS security ACL – you can enable that. If you want to copy/register a COM object – you can enable that. If you’ve built your own custom “FooProvider” to do some custom stuff – you can enable that too.
When you make changes or updates to applications on your primary server, the Web Farm Framework will automatically synchronize and copy them to the other servers in the server-farm for you. No manual steps required.
Running Operations and Managing the Server Farm
The Web Farm Framework includes some built-in management infrastructure that allows you to check on the health of a server, and track its status. You can also use a product like Microsoft System Center (or any custom monitoring software or scripts you have) to monitor the server status within the farm. If you are using ARR for load-balancing, it also supports a bunch of monitoring and load-balancing settings that allow you to dynamically shift loads across the farm based on server performance and available utilization.
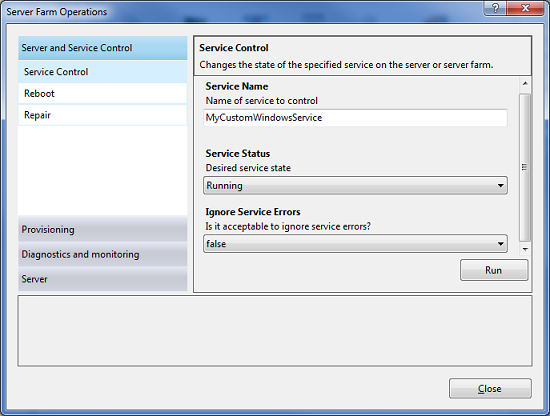
The Web Farm Framework also supports a “Server Farm Operations” task link within the IIS Admin Tool (on the right-hand side of the tool) that you can use to easily run commands across the server farm. For example, we could flash a command to all the servers in the web farm to ensure that a “MyCustomWindowsService” is started and running using the screen below:
You can also fully automate tasks using PowerShell scripts.
Summary
You can take advantage of the Microsoft Web Farm Framework to simplify the provisioning and deployment of your web server infrastructure – both the servers themselves, as well as the web applications and sites you run on top of them. It enables a smoother continuous deployment workflow. It also makes it easy to seamlessly scale your infrastructure by adding servers to it without additional management overhead. Best of all it is available at no extra cost and works with all editions of Windows Server.
Click here to learn more about the Microsoft Web Farm Framework. You can download a beta of the Microsoft Web Farm Framework here.
Hope this helps,
Scott
P.S. In addition to blogging, I am also now using Twitter for quick updates and to share links. Follow me at: twitter.com/scottgu
