Updates to Windows Azure (Mobile, Web Sites, SQL Data Sync, ACS, Media, Store)
This morning we released a number of enhancements to Windows Azure. These new capabilities include:
- Mobile Services (job scheduler support, Europe Region Support, Command Line Support)
- Web Sites (scale improvements, integrated source control)
- SQL Data Sync (support in the new HTML portal)
- ACS Management (support in the new HTML portal)
- Media Services (job and task management, blob storage support, reserved compute)
- Virtual Network enhancements
- Subscription Filtering Support
- Windows Azure Store (now available in more countries)
All of these improvements are now available to start using immediately (note: some of the services are still in preview). Below are more details on them:
Mobile Services
Windows Azure Mobile Services now supports the ability to easily schedule background jobs (aka CRON jobs) that execute on a pre-set timer interval, and which can run independently of a device accessing the service (ensuring that you don’t block or slow-down any requests from your users). This job scheduler functionality allows you to perform a variety of useful scenarios without having to create or manage a separate VM. Some of the scenarios you can enable with it include:
- Periodically purging old/duplicate data from your tables.
- Periodically querying and aggregating data from external web service (tweets, RSS entries, location information) and cache it in your tables for subsequent use.
- Periodically processing/resizing images submitted by users of your service.
- Scheduling the sending of push notifications or SMS messages to your customers to ensure they arrive at the right time of the day.
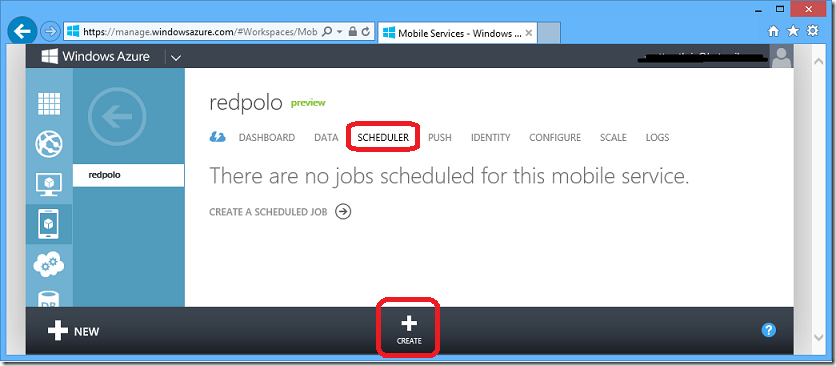
Using today’s release you can now easily register background tasks by navigating to the new Scheduler tab of your mobile service in the Windows Azure portal, and then by clicking the Create button:
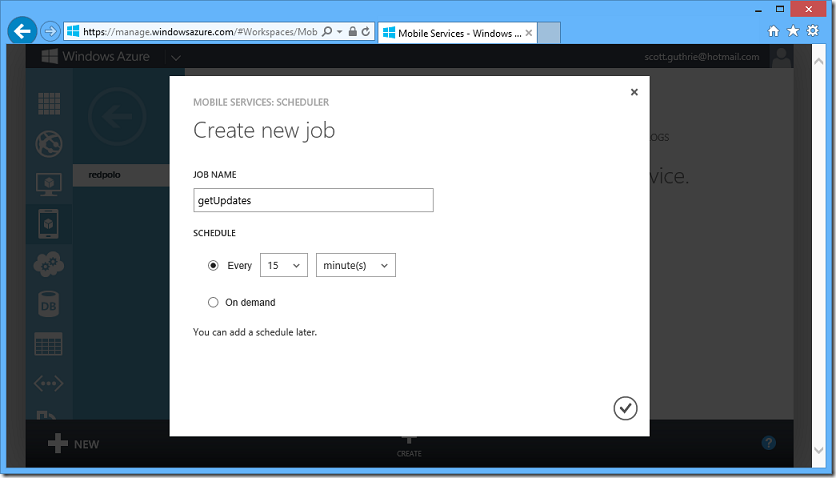
Doing this enables you to name a new job, and select how often you want to run it (note: you can also change the schedule later on):
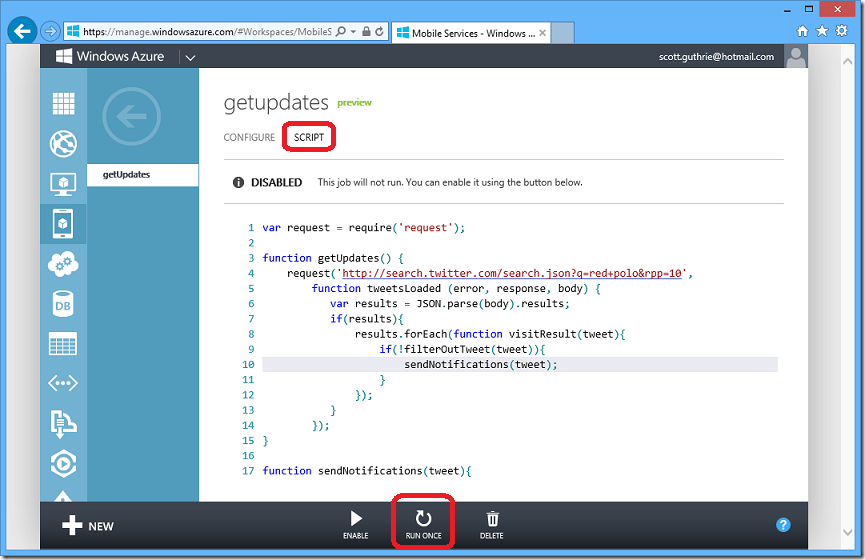
Once a job is created, you can drill into it and select the Script tab to author the server script you want to be executed on a recurring interval. As an example, the below script fetches Twitter updates about “red polos” and sends out a push notification from the mobile service:
Once you’ve entered the script, you can save and then click the Run Once button to execute a trial run. The Run Once functionality lets you easily test your job script before you enable the job for recurring execution. To enable recurring execution of the job, click either the Enable button within the script-view or go back to the Scheduler tab, select the job, and click the Enable button to activate it.
This new job scheduler capability makes it incredibly easy to integrate background work within your Mobile Service (without having to create or manage a separate VM to run it in). It can be used by all Mobile Service (even the free-tier level). The free-tier of Mobile Services includes support that allows you to run one background job every hour. If you upgrade your mobile service to have a reserved instance you can run up to 10 jobs every 15 minutes.
Check-out the Windows Azure Mobile Services documentation for an even more in-depth job scheduler tutorial.
Mobile Service Region Support in Europe
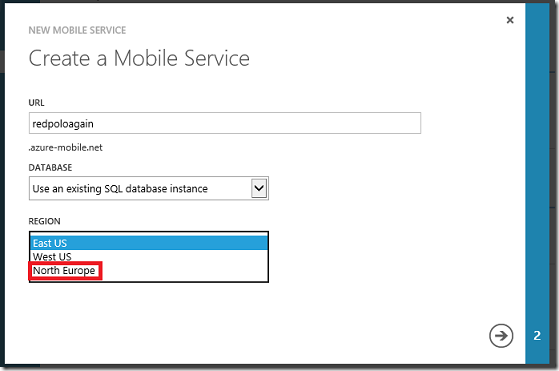
Before today, our preview of Windows Azure Mobile Services was only supported in the US East and US West regions of Windows Azure. With this week’s update you can now also create Mobile Services in the North Europe region as well. As with every Windows Azure service, over time we will extend Mobile Services to all Windows Azure regions world-wide:
Mobile Service Command Line Support
Earlier this year we released a cross-platform Windows Azure Command Line Tool (a.k.a ‘azure’) that allows you to manage Windows Azure Web Sites, VMs and other services from the command line on Windows, Mac, and Linux. You can learn more about it here. Today we have released an update for this tool that adds support for Windows Azure Mobile Services as well. To get started, install the ‘azure’ tool for Windows or Mac.
If you haven’t used the tool before, you need to perform a one-time step and download/import the Windows Azure management credentials for your account. In a command prompt run the following command to download Windows Azure publish settings:
> azure account download
then import the .publishsettings file you just downloaded:
> azure account import "C:\temp\my-credentials.publishsettings"
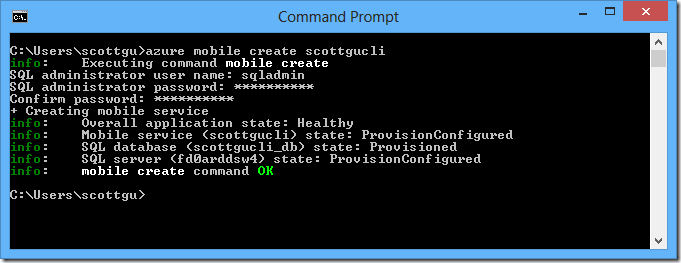
Once you do this you’ll be able to access your Windows Azure subscription and perform operations against it entirely from the command-line. For example, using today’s update we can now create a new Window Azure Mobile Service entirely from the command-line (no portal interaction required at all):
> azure mobile create scottgucli
And with that simple command we now have a newly created Windows Azure Mobile Service!
Creating new tables with the mobile service can likewise now be done entirely from the command-line:
> azure mobile table create scottgucli products
Many users have asked for the ability to directly upload scripts from their file system (without having to go through the portal) and the new CLI support makes this really easy. For example, to upload an “insert” script for the products table we just created above you can use the following command:
> azure mobile script upload scottgucli table/products.insert -f c:\code\products.js
Now this script will run every time a record is inserted into the products table.
Web Sites
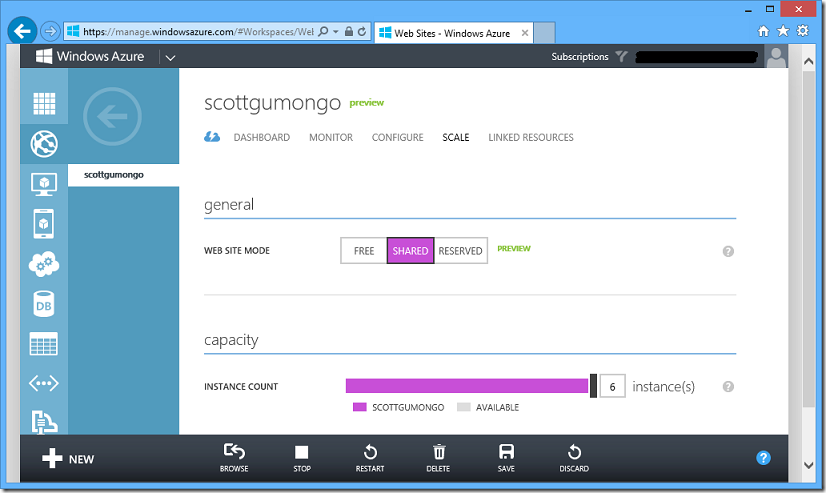
With today’s release we have increased the scaling capabilities of our Windows Azure Web Sites service.
Previously a web-site could only be scaled up to run across 3 shared instances or 3 reserved VMs. With today’s release we now support the ability for you to scale up a web-site to run across 6 shared instances (beyond which it is cheaper to switch to a reserved instance):
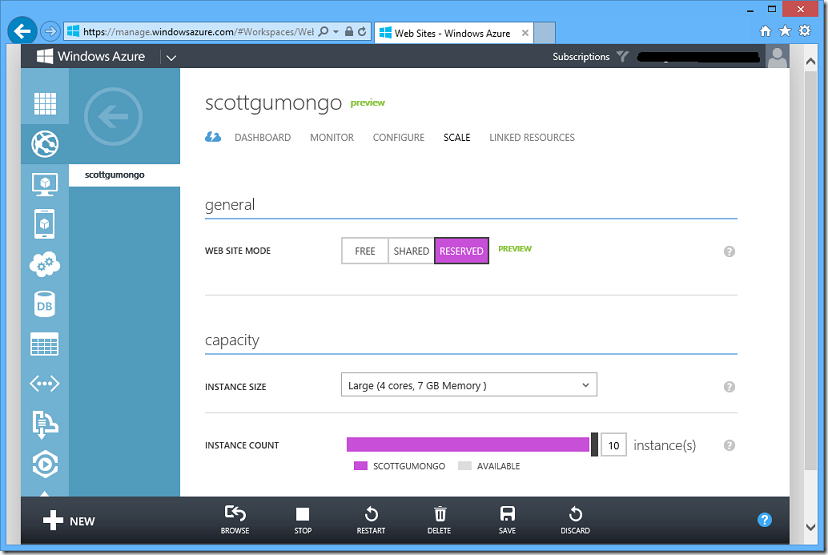
With today’s release we also now support the ability for you to scale up a web-site to run across 10 reserved VM instances (where you are guaranteed to be the only customer using those VMs). You can use either Small, Medium, or Large sized VMs when doing this:
This provides you the ability to dramatically scale up (or scale down) your web-site resources in only seconds.
New Custom Create Workflow for Websites
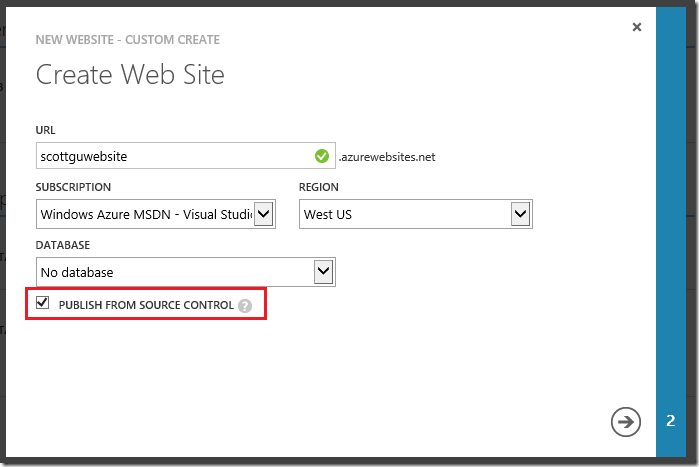
One of the other nice improvements with today’s release is a new Custom Create workflow for setting up web-sites that allows you to configure source control settings as part of the site creation (instead of having to do it after the fact). Choose the NEW->Website->Custom Create command to try this out:
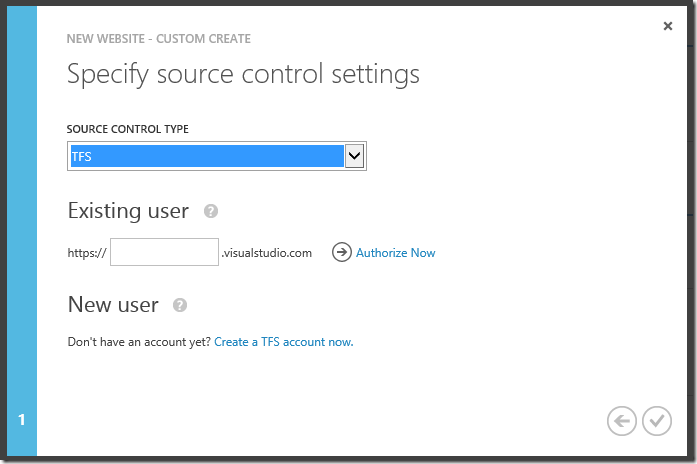
Selecting the “Publish from Source Control” checkbox above will display a new second-step with the custom-create wizard that allows you to configure either TFS based publishing:
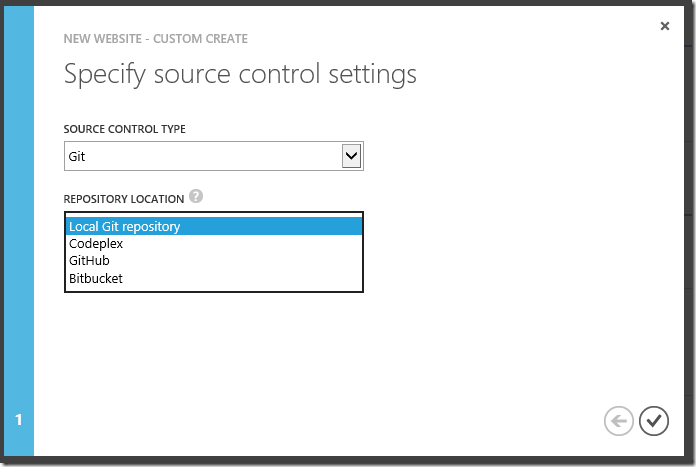
Or enable Git based publishing, and allow you to push either from a local repository or associate with a Git-based hosting provider:
This makes it super easy to setup a new site with continuous delivery already enabled in only seconds.
SQL Data Sync
With today’s release you can also now leverage SQL Data Sync Services from within the new Windows Azure Management Portal. SQL Data Sync lets you synchronize data between multiple SQL databases. These SQL databases can span across your on-premises environment and the cloud, or across multiple cloud hosted databases (for example: within multiple Windows Azure regions around the world). It is a very powerful capability that can enable a variety of interesting scenarios.
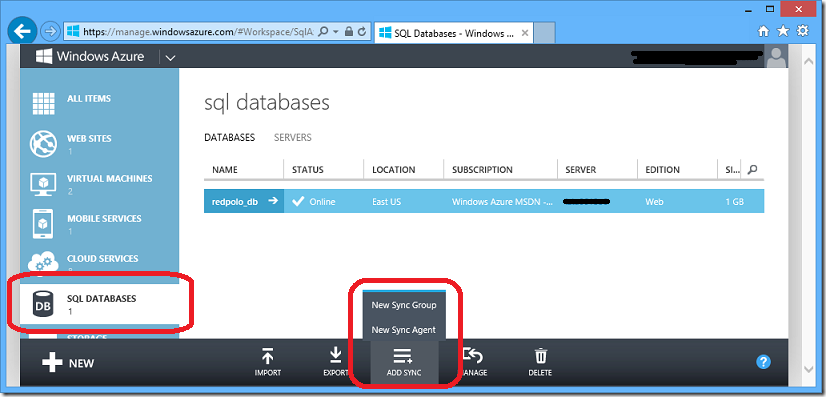
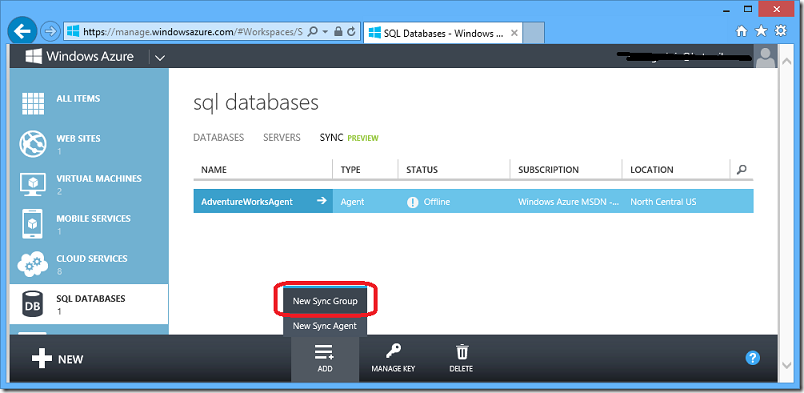
To use SQL Data Sync, go to the SQL Databases section of the new Windows Azure Management Portal and click on the new ADD SYNC command in the bottom tray of it:
CREATING A SYNC AGENT
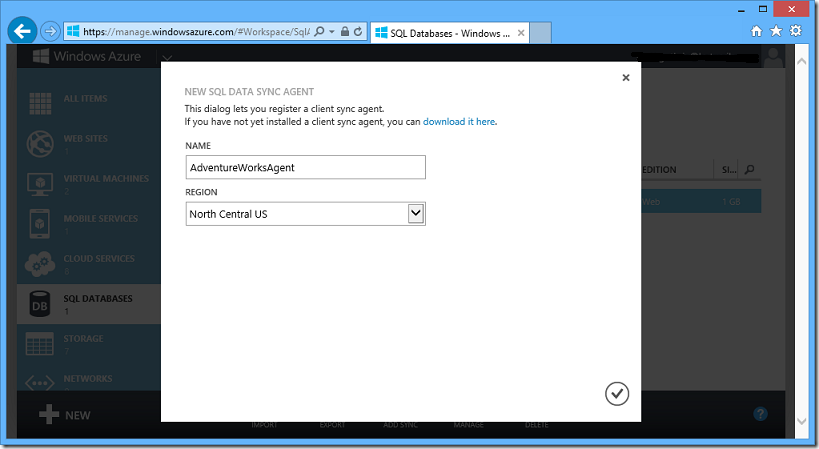
If you plan on synchronizing with SQL Server databases that reside in your on-premises environment (or another cloud hosting provider besides Windows Azure) then you will first need to download, install and configure an agent with your SQL Server. Click the NEW SYNC AGENT command above to then associate this agent with Windows Azure:
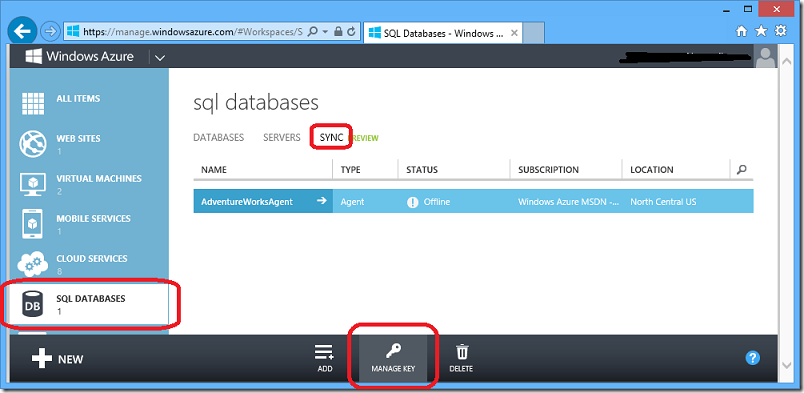
After you create an agent endpoint (or any Data Sync resource) you will see a new SYNC preview tab that appears when the “SQL Databases” extension is selected in the left navigation pane of the portal. The agent you just created will appear in the list within that tab. Click MANAGE KEY to generate and copy the key you’ll need to use when configuring the on-premises SQL Server Agent to connect to Windows Azure.
CREATING A SYNC GROUP
Once you have your databases ready, you can create a new Sync Group. A sync group defines references to databases that will be sync’d as well as the configuration that defines how and when the syncing will occur.
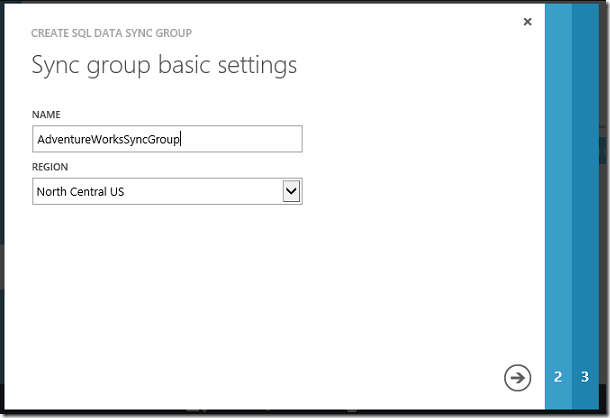
Select the New Sync Group command in the portal and use the wizard to complete the following steps:
1. Give it a name.
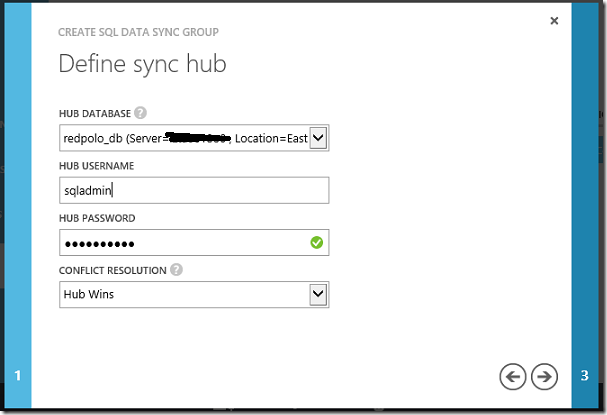
2. Choose the hub database, and provide connection credentials. The hub database is the central database within the group and must be a SQL Database in Windows Azure:
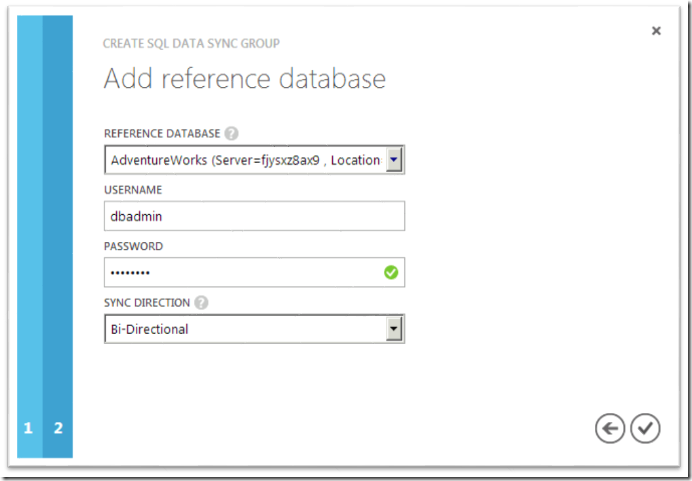
3. Then add a reference database, and provide connection credentials. Think of reference databases as “spoke” or “member” databases that connect with the hub database. They can be any combination of on-premise SQL Servers or other Windows Azure SQL Databases. They can sync bi-directionally with the hub, to the hub, or from the hub:
Once you’ve completed the above steps, your sync group is setup.
DEFINING SYNC RULES
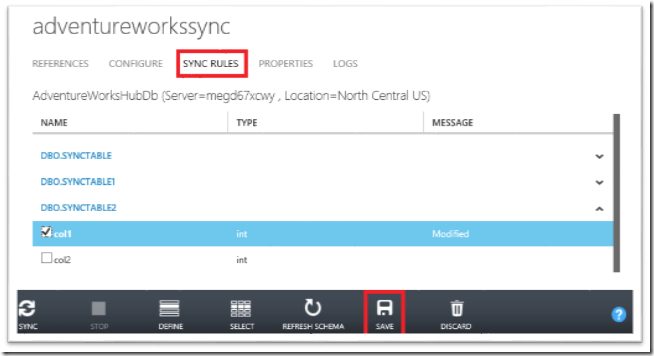
You can now drill into the sync group to define your sync rules, manage the reference databases, add new reference databases, configure sync settings, and view historical sync logs. Note that you must define your sync rules via the SYNC RULES tab before syncing will begin. These rules determine the tables, columns, and even the rows that will be involved in the sync. You will want to choose the rules based on the needs of the application.
CONFIGURING SYNC
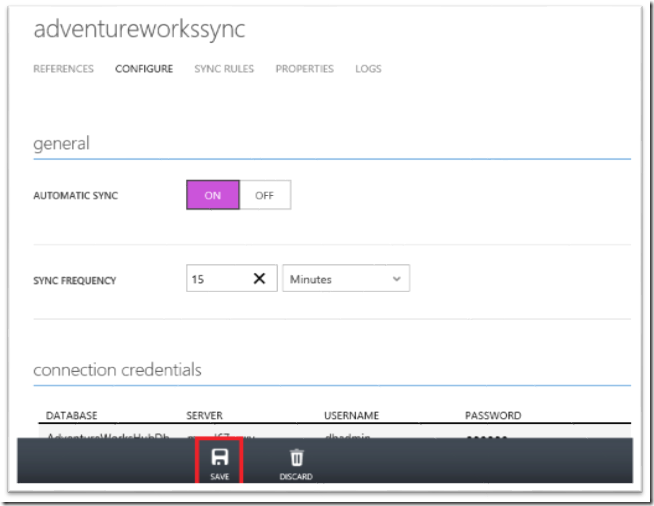
Once the sync rules have been defined, the sync group can be synchronized, either on demand using the SYNC button or on regular scheduled interval. Use the CONFIGURE tab to setup a sync schedule to have the synchronization happen automatically.
Once setup, your databases will automatically synchronize. This can work either between your on-premises environment and the cloud, or between multiple cloud databases (for example: within multiple Windows Azure regions around the world). It is a very powerful capability that can enable a variety of compelling scenarios.
Active Directory Access Control Management (ACS) Support
With today’s release, you can also now create and manage Windows Azure Active Directory Access Control namespaces from the new Windows Azure Management Portal.
Windows Azure AD Access Control is a service that lets you authenticate and authorize users for your web applications and services, while allowing authentication and authorization features to be factored out of your code. ACS works with standards-based identity providers, including enterprise directories such as Active Directory, and web identities such as Windows Live ID, Google, Yahoo!, and Facebook. For more information, see Windows Azure AD Access Control.
Creating an ACS Namespace
To create an Access Control namespace, click NEW in the Windows Azure Management Portal, and select APP SERVICES -> ACCESS CONTROL ->QUICK CREATE. In the namespace field, type the name of the Access Control namespace that you want to create:
Managing a Namespace
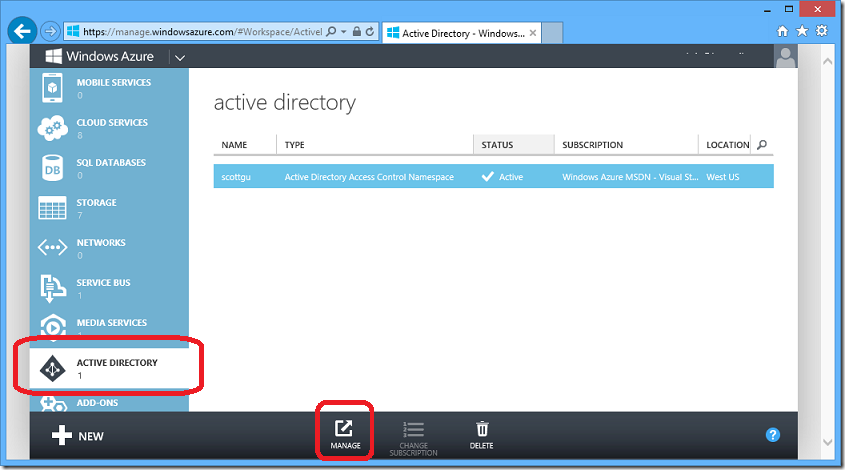
To manage an Access Control namespace, click on the new Active Directory node in the navigation bar on the left-hand side of the portal:
Then, select the namespace you want to manage, and click the MANAGE button in the command bar at the bottom of the screen. This will open the ACS Management Portal. You can additionally move your ACS namespaces from one subscription to another via the CHANGE SUBSCRIPTION command in the bottom of the page.
For more information about other recent enhancements that make Windows Azure AD more useful for developers, read Alex Simons’ blog post here, and Bill Hilf’s post here. Even more Active Directory functionality will be integrated within the Windows Azure Portal next year.
Media Service Enhancements
Today’s release contains a number of great enhancements to Windows Azure Media Services. This release includes investments to:
- Job and Task management
- Adding content from a Windows Azure storage account
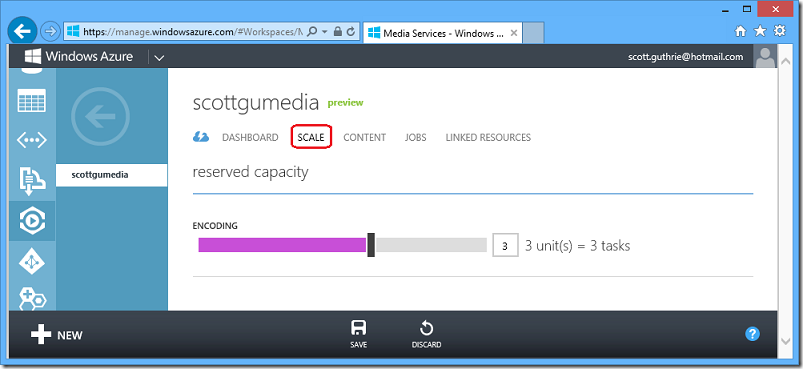
- Scaling your media services account to increase encoding concurrency
Job and Task Management
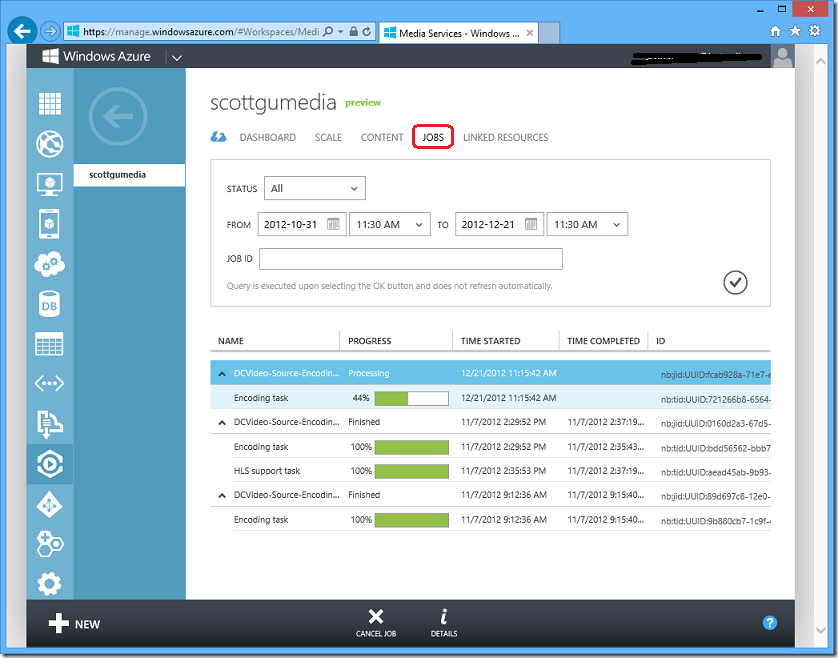
You can now track the progress and history of your media encoding jobs from within the Windows Azure Portal. The new JOBS tab within the Media Services extension lets you define custom queries for jobs by status, timeframe, or Job Id:
The results of your queries will appear below the query editor. You can expand jobs to see information about the tasks that make up the job giving you deeper insight into each individual job and determine where things are progressing as planned or might require attention. You can also select a job within the list to either cancel the job or view details including errors related to the tasks.
Adding Content from Windows Azure Storage
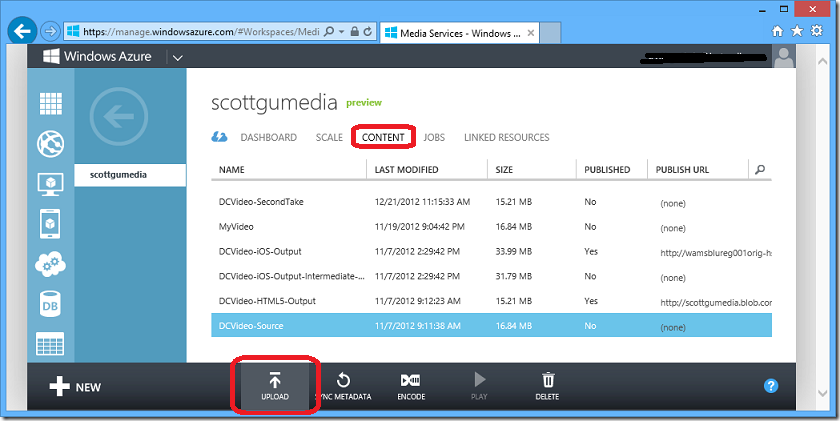
Prior to this release, the only way to get content into your media services account was to write code using the Azure Media SDK, or upload a file within the portal from your local computer. Today we are introducing a new feature within the Windows Azure Portal that lets you choose existing media files from Windows Azure Blob Storage, thereby reducing your upload latency. From the CONTENT tab within the Media Services extension, you can select the UPLOAD command.
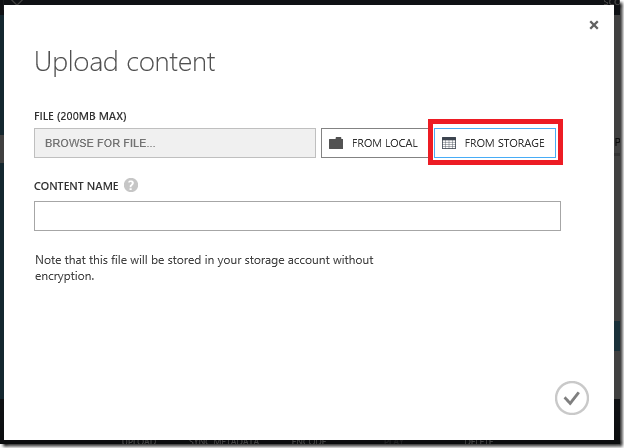
Notice the file browser now offers a FROM STORAGE option in addition to the previous “FROM LOCAL” support we already shipped. Note that the 200 MB limit mentioned in the header only applies to the FROM LOCAL option. Files sizes in the tens of gigabytes are supported via the FROM STORAGE option:
The FROM STORAGE option will open the storage browser; you will be able to select a media file from blob storage from here.
Reserved Capacity for Media Service Jobs
With today’s release we have also added a new capability that allows you to scale up the number of encoding tasks you are processing. By default, we only support having one active encoding task at a time. Using the new SCALE page, you can reserve encoding units that let you encode multiple tasks concurrently and have even more processing power reserved for your media workflows:
Virtual Networking Simplifications
Based on customer feedback, we have significantly simplified the virtual network creation workflow within the Windows Azure Portal. In an earlier release, we had introduced a “Quick Create” workflow that simplified the most common virtual networking scenarios. In this release, we have further simplified the “Custom Create” experience to make creating more advanced scenarios easier as well. Here’s a quick tour of the updates.
In the Portal, Start with NEW -> NETWORKS -> CUSTOM CREATE
This opens up the Create Virtual Network wizard, where you can fill in the name of the VNET and Affinity group, just as you do today.
When you do this, you then be presented with a new experience – an updated page where we abstract away the complexities of CIDR:
The experience is pretty simple. Need to add another address space? Click the add address space button. Need to add a subnet? Click the add subnet button. The best part is, we do the calculations for you and automatically provide you with the starting IP address. With a few clicks, soon it can be fully fleshed out and ready to use:
Subscription Filtering Support within the Windows Azure Portal
Many Windows Azure users have multiple Azure subscriptions that are used for different scenarios. Some users have one subscription for each department in their company; others have one for each environment (development, testing, and production). Some users even have one for each external customer that they work with. Regardless of which category you fall into, you might find that managing all of the resources across all subscriptions can be challenging, difficult to navigate, and can result in a sluggish experience.
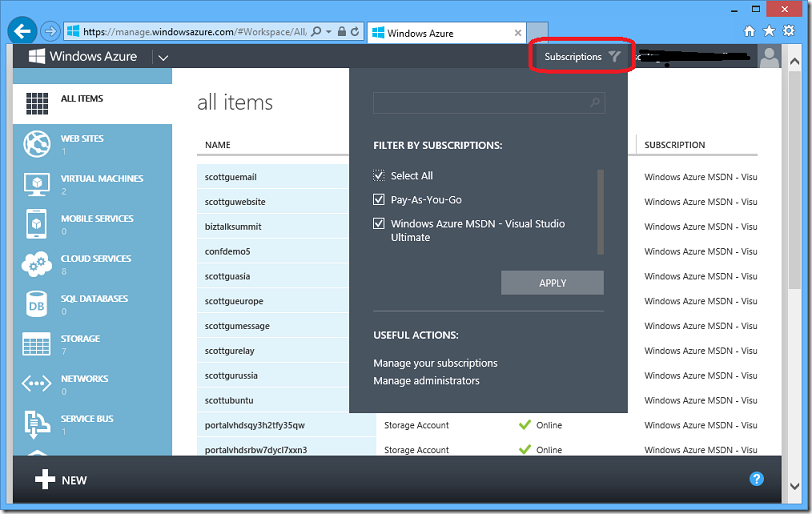
Starting today a new subscription filter UI now appears next to your user name in the top right-hand side of the Windows Azure portal to help filter your views by one or more subscriptions. Selecting it will display a drop-down list that enables you to quickly filter which subscriptions you want to see in the portal:
By default, all of your subscriptions are selected and loaded into the portal. Using the dropdown, you can now pick and choose exactly which subscriptions you want to manage. This will provide a few noticeable benefits:
- Resources associated with hidden subscriptions are filtered out of all the experiences across the portal.
- Your filter selection roams with you across sessions and devices. If you set a filter on your laptop it will take affect when you return to your desktop or mobile device.
- Users with many subscriptions will notice a significant performance improvement when loading only a small subset of their subscriptions since data for subscriptions that are filtered out is never loaded.
Note: If you only have one subscription, this change doesn’t affect you one bit. Your experience remains unchanged. In fact, you’ll only see the subscription filter UI show-up if you have more than subscription.
Windows Azure Store Now Available in More Countries
This week we have also expanded the number of countries that the Windows Azure Store is available within (previously it was only available in the United States). The Windows Azure Store enables you to easily subscribe to services provided by 3rd party partners of ours – and have them automatically added to your Windows Azure bill. It is an incredibly cool capability – and one I’ll be blogging a lot more about shortly.
In the mean-time, try it out by selecting the New->Store command within the portal and sign-up for one of the services in it today.
Summary
The above features are now available to start using immediately (note: some of the services are still in preview). Below are more details on them:If you don’t already have a Windows Azure account, you can sign-up for a free trial and start using them today. Visit the Windows Azure Developer Center to learn more about how to build apps with it.
Hope this helps,
Scott
P.S. In addition to blogging, I am also now using Twitter for quick updates and to share links. Follow me at: twitter.com/scottgu



![clip_image002[4] clip_image002[4]](https://aspblogs.blob.core.windows.net/media/scottgu/Media/clip_image0024_thumb_70CC06E7.png)
![clip_image004[4] clip_image004[4]](https://aspblogs.blob.core.windows.net/media/scottgu/Media/clip_image0044_thumb_09CA67DE.png)
![clip_image006[4] clip_image006[4]](https://aspblogs.blob.core.windows.net/media/scottgu/Media/clip_image0064_thumb_0DD74661.png)
![clip_image010[4] clip_image010[4]](https://aspblogs.blob.core.windows.net/media/scottgu/Media/clip_image0104_thumb_46184E2A.png)
