Azure: VM Security Extensions, ExpressRoute GA, Reserved IPs, Internal Load Balancing, Multi Site-to-Site VPNs, Storage Import/Export GA, New SMB File Service, API Management, Hybrid Connection Service, Redis Cache, Remote Apps and more…
This morning we released a massive amount of enhancements to Microsoft Azure. Today’s new capabilities and announcements include:
- Virtual Machines: Integrated Security Extensions including Built-in Anti-Virus Support and Support for Capturing VM images in the portal
- Networking: ExpressRoute General Availability, Multiple Site-to-Site VPNs, VNET-to-VNET Secure Connectivity, Reserved IPs, Internal Load Balancing
- Storage: General Availability of Import/Export service and preview of new SMB file sharing support
- Remote App: Public preview of Remote App Service – run client apps in the cloud
- API Management: Preview of the new Azure API Management Service
- Hybrid Connections: Easily integrate Azure Web Sites and Mobile Services with on-premises data+apps (free tier included)
- Cache: Preview of new Redis Cache Service
- Store: Support for Enterprise Agreement customers and channel partners
All of these improvements are now available to use immediately (note that some features are still in preview). Below are more details about them:
Virtual Machines: Integrated Security Extensions including Built-in Anti-Virus Support
In a previous blog post I talked about the new VM Agent we introduced as an optional extension to Virtual Machines hosted on Azure. The VM Agent is a lightweight and unobtrusive process that you can optionally enable to run inside your Windows and Linux VMs. The VM Agent can then be used to install and manage extensions, which are software modules that extend the functionality of a VM and help make common management scenarios easier.
Today I’m pleased to announce three new security extensions that we are enabling via the VM Agent:
- Microsoft Antimalware
- Symantec Endpoint Protection
- TrendMicro’s Deep Security Agent
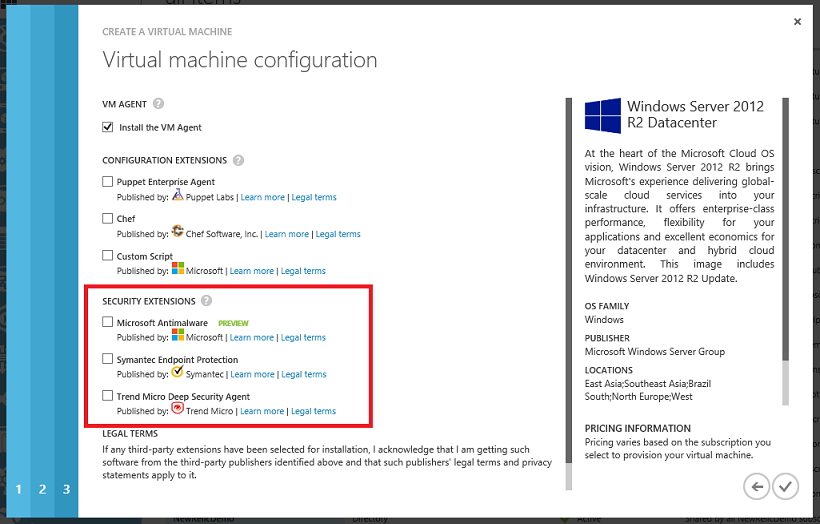
These extensions enable you to add richer security protection to your Virtual Machines using respected security products that we automate installing/managing. These extensions are easy to enable within your Virtual Machines through either the Azure Management Portal or via the command-line. To enable them using the Azure Management Portal simply check them when you create new a new Virtual Machine:
Once checked we’ll automate installing and running them within your VM.
Custom Powershell Script
This week we’ve also enabled a new “Custom Script” extension that enables you to specify a Powershell script file (.ps1 extension) to run in the VM immediately after it’s created. This provides another way to customize your VM on creation without having to RDP in. Alternatively you can also take advantage of the Chef and Puppet extensions we shipped last month.
Virtual Machines: Support for Capturing Images with both OS + Data Drives attached
Last month at the //Build conference we released command-line support for capturing VM images that contain both an OS disk as well as multiple data disks attached. This new VM image support made it much easier to capture and automate VMs with richer configurations, as well as to snapshot VMs without having to run sysprep on them.
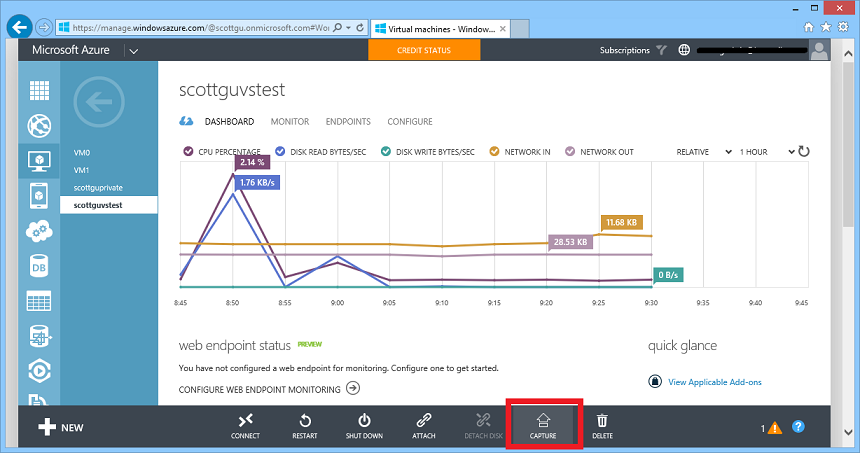
With today’s release we have updated the Azure Management Portal to add support for capturing VM images that contain both an OS disk and multiple data disks as well. One cool aspect of the “Capture” command is that it can now be run on both a stopped VM, as well as on a running VM as well (there is no need to restart it and the capture command completes in under a minute).
To try this new support out, simply click the “Capture” button on a VM, and it will present a dialog that enables you to name the image you want to create:
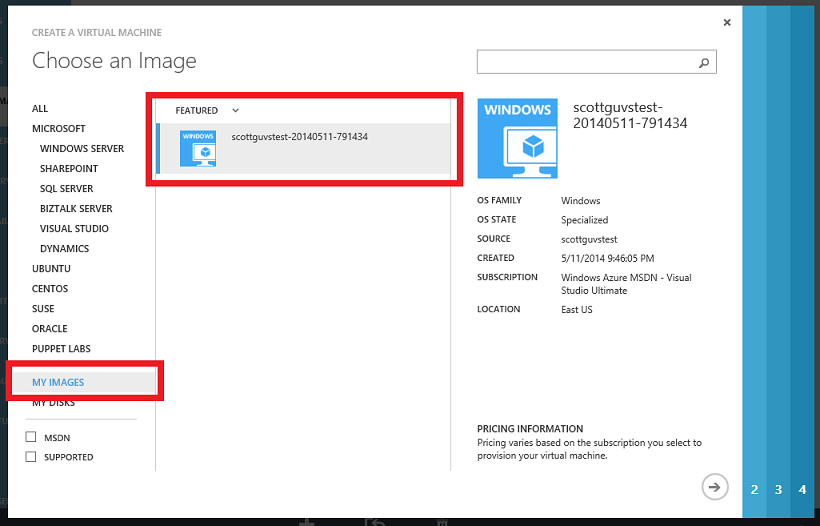
Once the image is captured it will show up in the “Images” section of the VM gallery – allowing to you easily create any number of new VM instances from it:
This new support is ideal for dev/test scenarios as well as for creating re-usable images for use with any other VM creation scenario.
Networking: General Availability of Azure ExpressRoute
I’m excited to announce the general availability release today of the Azure ExpressRoute service.
ExpressRoute enables dedicated, private, high-throughput network connectivity between Azure datacenters and your on-premises IT environments. Using ExpressRoute, you can connect your existing datacenters to Azure without having to flow any traffic over the public Internet, and enable–guaranteed network quality-of-service and the ability to use Azure as a natural extension of an existing private network or datacenter. As part of our GA release we now offer an enterprise SLA for the service, as well as a variety of bandwidth tiers.
We have previously announced several provider partnerships with ExpressRoute including with: AT&T, Equinix, Verizon, BT, and Level3. This week we are excited to announce new partnerships with TelecityGroup, SingTel and Zadara as well. You can use any of these providers to setup private fiber connectivity directly to Azure using ExpressRoute.
You can get more information on the ExpressRoute website.
Networking: Multiple Site-to-Site VPNs and VNET-to-VNET Connectivity
I’m excited to announce the general availability release of two highly requested virtual networking features: multiple site-to-site VPN support and VNET-to-VNET connectivity.
Multiple Site to Site VPNs
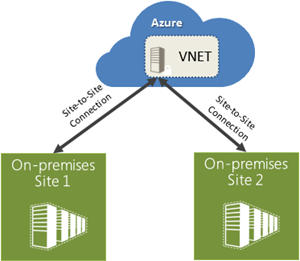
Virtual Networks in Azure now supports more than one site-to-site connection, which enables you to securely connect multiple on-premises locations with a Virtual Network (VNET) in Azure. Using more than one site-to-site connection comes at no additional cost. You incur charges only for the VNET gateway uptime.
VNET to VNET Connectivity
With today’s release, we are also enabling VNET-to-VNET connectivity. That means that multiple virtual networks can now be directly and securely connected with one another. Using this feature, you can connect VNETs that are running in the same or different Azure regions and in case of different Azure regions have the traffic securely route via the Microsoft network backbone.
This feature enables scenarios that require presence in multiple regions (e.g. Europe and US, or East US and West US), applications that are highly available, or the integration of VNETs within a single region for a much larger network. This feature also enables you to connect VNETs across multiple different Azure account subscriptions, so you can now connect workloads across different divisions of your organization, or even different companies. The data traffic flowing between VNETs is charged at the same rate as egress traffic.
You can get more information on the Virtual Network website.
Networking: IP Reservation, Instance-level public IPs, Internal Load Balancing Support, Traffic Manager
With today’s release we are also making available three highly request IP address features:
IP Reservations
With IP reservation, you can now reserve public IP addresses and use them as virtual IP (VIP) addresses for your applications. This enables scenarios where applications need to have static public IP addresses, and you want to be able to have the IP address survive the application being deleted and redeployed. You can now reserve up to 5 addresses per subscription free of charge and assign them to VM or Cloud Service instances of your choice. If additional VIP reservations are needed, you can also reserve more addresses at additional cost.
This feature is now generally available as of today. You can enable it via the command-line using new powershell cmdlets that we now support:
#Reserve a IP
New-AzureReservedIP -ReservedIPName EastUSVIP -Label "Reserved VIP in EastUS" -Location "East US"#Use the Reserved IP during deployment
New-AzureVM -ServiceName "MyApp" -VMs $web1 -Location "East US" -VNetName VNetUSEast -ReservedIPName EastUSVIP
We will enable portal management support in a future management portal update.
Public IP Address per Virtual Machine
With Instance-level Public IPs for VMs, you can now assign public IP addresses to your virtual machines, so they become directly addressable without having to map an endpoint through a VIP. This feature will enable scenarios like easily running FTP servers in Azure and monitoring virtual machines directly using their IPs.
We are making this new capability available in preview form today. This feature is available only with new deployments and new virtual networks and can be enabled via PowerShell.
Internal Load Balancing (ILB) Support
Today’s new Internal Load Balancing support enables you to load-balance Azure virtual machines with a private IP address. The internally load balanced IP address will be accessible only within a virtual network (if the VM is within a virtual network) or within a cloud service (if the VM isn’t within a virtual network) – and means that no one outside of your application can access it. Internal Load Balancing is useful when you’re creating applications in which some of the tiers (for example: the database layer) aren’t public facing but require load balancing functionality. Internal Load Balancing is available in the standard tier of VMs at no additional cost.
We are making this new capability available in preview form today. ILB is available only with new deployments and new virtual networks and can be accessed via PowerShell.
Traffic Manager support for external endpoints
Starting today, Traffic Manager now supports routing traffic to both Azure endpoints and external endpoints (previously it only supported Azure endpoints).
Traffic Manager enables you to control the distribution of user traffic to your specified endpoints. With support for endpoints that reside outside of Azure, you can now build highly available applications that span both Azure, on-premises environments, and even other cloud providers. You can apply intelligent traffic management policies across all managed endpoints. This functionality is available now in preview and you can manage it via the command-line using powershell.
Learning More
You can learn more about Reserved IP addresses and the above networking features here.
Storage: General Availability Release of Azure Import/Export Service
Last November, we launched the preview of our Microsoft Azure Import/Export Service. Today, I am excited to announce the general availability release of the service.
The Microsoft Azure Import/Export Service enables you to move large amounts of data into and out of your Microsoft Azure Storage accounts by transferring them on hard disks. You can ship encrypted hard drives directly to our Microsoft Azure data centers, and we will automatically transfer the data to or from your Microsoft Azure Blobs for your storage account. This enables you to import or export massive amounts of data quickly, cost effectively, and without being constrained by your network bandwidth.
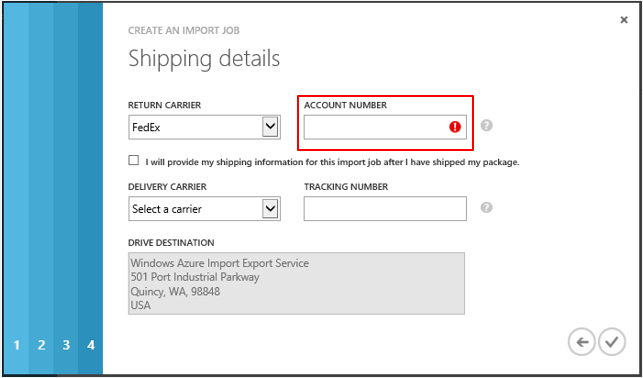
This release of the Import/Export service has several new features as well as improvements to the preview functionality. We have expanded our service to new regions in addition to the US. We are now available in the US, Europe and the Asia Pacific regions. You can also now use either FedEx or DHL to ship the drives. Simply provide an appropriate Fedex/DHL account number and we will also automatically ship the drives back to you:
More details about the improvements and new features of the Import/Export service can be found on the Microsoft Azure Storage Team Blog. Check out the Getting Started Guide to learn about how to use the Import/Export service. Feel free to send questions and comments to the waimportexport@microsoft.com.
Storage: New SMB File Sharing Service
I’m excited to announce the preview of the new Microsoft Azure File Service. The Azure File Service is a new capability of our existing Azure storage system and supports exposing network file shares using the standard SMB protocol. Applications running in Azure can now easily share files across Windows and Linux VMs using this new SMB file-sharing service, with all VMs having both read and write access to the files. The files stored within the service can also be accessed via a REST interface, which opens a variety of additional non-SMB sharing scenarios.
The Azure File Service is built on the same technology as the Blob, Table, and Queue Services, which means Azure Files is able to leverage the existing availability, durability, scalability, and geo redundancy that is built into our Storage platform. It is provided as a high-availability managed service run by us, meaning you don’t have to manage any VMs to coordinate it and we take care of all backups and maintenance for you.
Common Scenarios
- Lift and Shift applications: Azure Files makes it easier to “lift and shift” existing applications to the cloud that use on-premise file shares to share data between parts of the application.
- Shared Application Settings: A common pattern for distributed applications is to have configuration files in a centralized location where they can be accessed from many different virtual machines. Such configuration files can now be stored in an Azure File share, and read by all application instances.
- Diagnostic Share: An Azure File share can also be used to save diagnostic files like logs, metrics, and crash dumps. Having these available through both the SMB and REST interface allows applications to build or leverage a variety of analysis tools for processing and analyzing the diagnostic data.
- Dev/Test/Debug: When developers or administrators are working on virtual machines in the cloud, they often need a set of tools or utilities. Installing and distributing these utilities on each virtual machine where they are needed can be a time consuming exercise. With Azure Files, a developer or administrator can store their favorite tools on a file share, which can be easily connected to from any virtual machine.
To learn more about how to use the new Azure File Service visit here.
RemoteApp: Preview of new Remote App Service
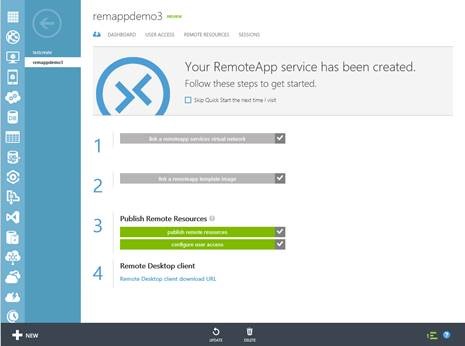
I’m happy to announce the public preview today of Azure RemoteApp, a new service delivering Windows Client applications from the Azure cloud.
Azure RemoteApp can be used by IT to enable employees to securely access their corporate applications from a variety of devices (including mobile devices like iPads and Phones). Applications can be scaled up or down quickly without expensive infrastructure costs and management complexity.
With Azure RemoteApp, your client applications run in the Azure cloud. Employees simply install the Microsoft Remote Desktop client on their devices and then can access applications via Microsoft’s Remote Desktop Protocol (RDP). IT can optionally connect the applications back to on-premises networks (enabling hybrid connectivity) or alternatively run them entirely in the cloud.
With this service, you can bring scale, agility and global access to your business applications.
Azure RemoteApp is free during preview period. Learn more about Azure RemoteApp and try the service free during preview.
Hybrid Connections: Easily integrate Azure Websites and Mobile Services with on-premises resources
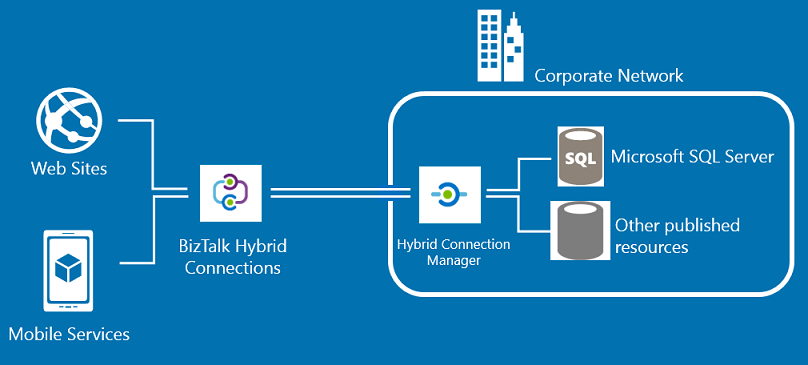
I’m excited to announce Hybrid Connections, a new and easy way to build hybrid applications on Azure. Hybrid Connections enable your Azure Website or Mobile Service to connect to on-premises data & services with just a few clicks within the Azure Management portal. Today, we're also introducing a Free tier of Azure BizTalk Services that enables everyone to use this new hybrid connections feature for free.
With Hybrid Connections, Azure websites and mobile services can easily access on-premises resources as if they were located on the same private network. This makes it much easier to move applications to the cloud, while still connecting securely with existing enterprise assets.
Hybrid Connections support all languages and frameworks supported by Azure Websites (.NET, PHP, Java, Python, node.js) and Mobile Services (node.js, .NET).
The Hybrid Connections service does not require you to enable a VPN or open up firewall rules in order to use it. This makes it easy to deploy within enterprise environments. Built-in monitoring and management support still enables enterprise administrators control and visibility into the resources accessed by their hybrid applications.
You can learn more about Hybrid Connections using the following links:
- Overview: Hybrid Connections
- How-To: Connect an Azure Website with an On-Premises Resource
- Tutorial: Connect an Azure Website to an On-Premises SQL Server using Hybrid Connections
- Tutorial: Connect an Azure Mobile Services .NET Backend to an On-Premises Resource using Hybrid Connections
API Management: Announcing Preview of new Azure API Management Service
With the proliferation of mobile devices, it is important for organizations to be able to expose their existing backend systems via mobile-friendly APIs that enable internal app developers as well as external developer programs. Today, I’m excited announce the public preview of the new Azure API Management service that helps you better achieve this.
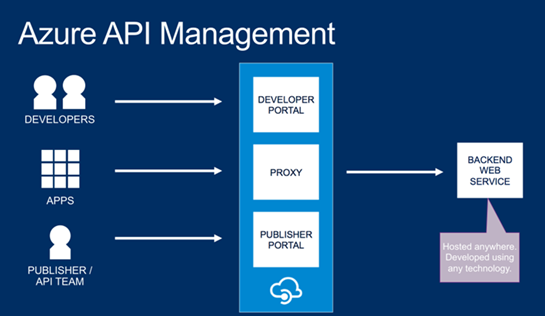
The new Azure API management service allows you to create an easy to use API façade over a diverse set of mobile backend services (including Mobile Services, Web Sites, VMs, Cloud Services and on-premises systems), and enables you to deliver a friendly API developer portal to your customers with documentation and samples, enable per-developer metering support that protects your APIs from abuse and overuse, and enable to you monitor and track API usage analytics:
Creating an API Management service
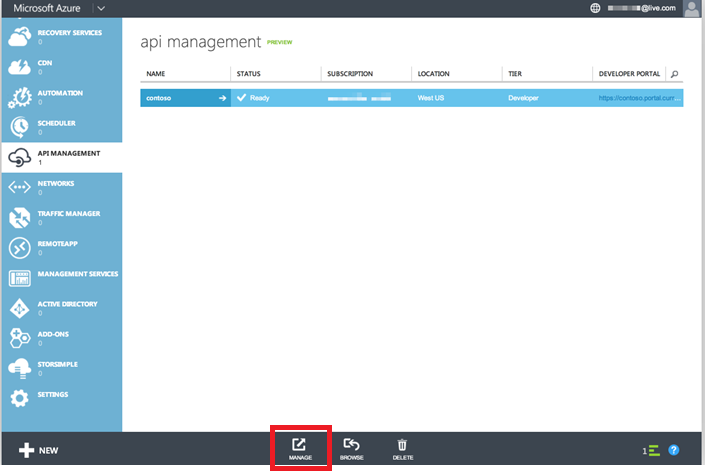
You can easily create a new instance of the Azure API Management service from the Azure Management Portal by clicking New->App Services->API Management->Create. Once the service has been created, you can get started on your API by clicking on the Manage button and transitioning to the Dashboard page on the Publisher portal.
Publishing an API
A typical API publishing workflow involves creating an API: first creating a façade over an existing backend service, and then configuring policies on it and packaging/publishing the API to the Developer portal for developers to be able to consume.
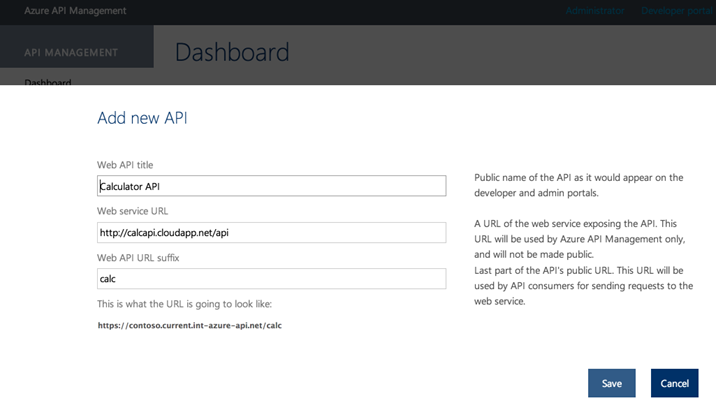
To create an API, select the Add API button within the publisher portal, and in the dialog that appears enter the API name, location of the backend service and suffix of the API root under the service domain name. Note that you can implement the back-end of the API anywhere (including non-Azure cloud providers or locations). You can also obviously host the API using Azure – including within a VM, Cloud Service, Web Site or Mobile Service.
Once you’ve defined the settings, click Save to create the API endpoint:
Once you’ve defined have created your API endpoint, you can customize it. You can also set policies such as caching rules, and usage quotas and rate limits that you can apply for developers calling the API. These features end up being extremely useful when publishing an API for external developers (or mobile apps) to consume, and help ensure that your APIs cannot be abused.
Developer Portal
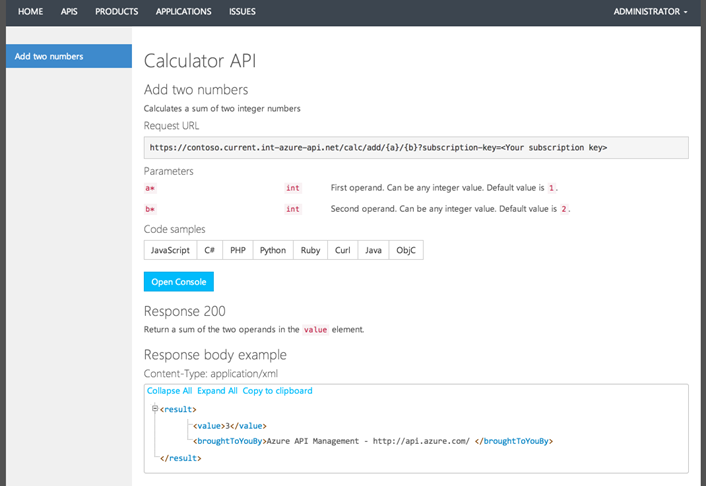
Once your API has been published, click on the Developer Portal link. This will launch a developer portal page that can be used by developers to learn how to consume and use the API that you have published. It provides a bunch of built-in support to help you create documentation pages for your APIs, as well as built-in testing tools. You’ll also get an impressive list of copy-and-paste-ready code samples that help teach developers how to invoke your APIs from the most popular programming languages. Best of all this is all automatically generated for you:
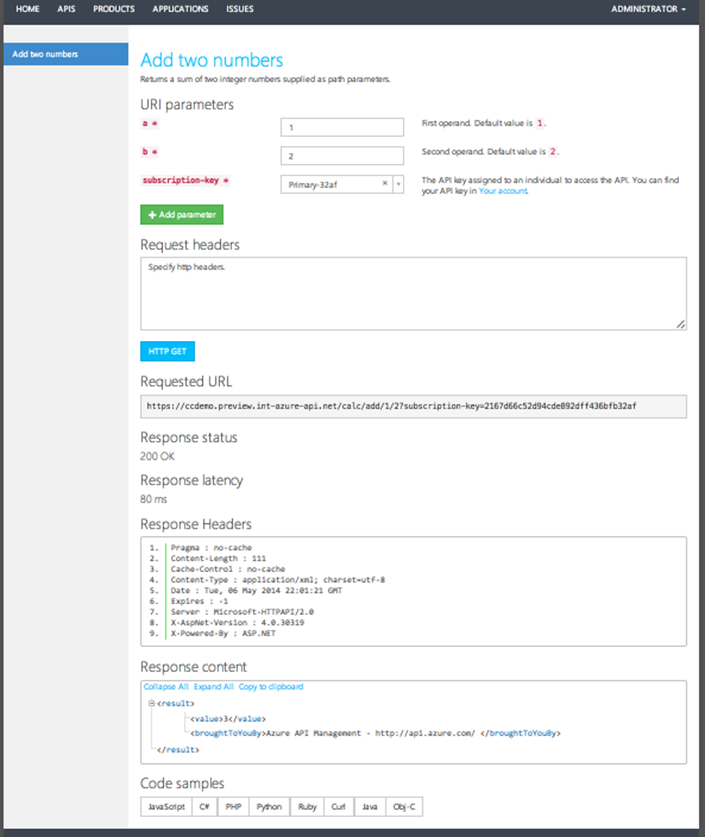
You can test out any of the APIs you’ve published without writing a line code by using the interactive console.
Analytics and reports
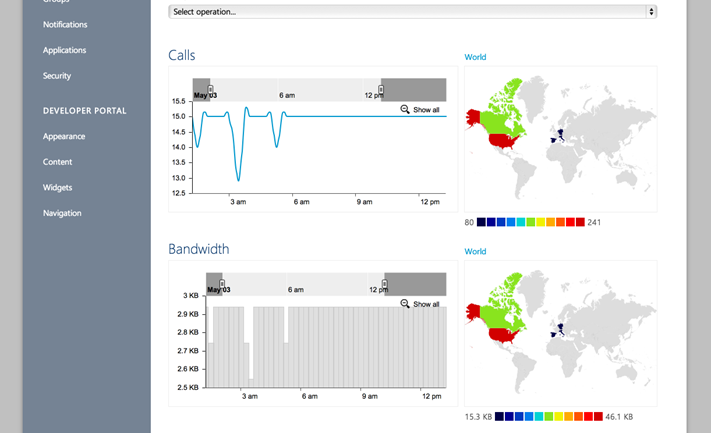
Once your API is published, you’ll want to be able to track how it is being used. Back in the publisher portal you can click on the Analytics page to find reports on various aspects of the API, such as usage, health, latency, cache efficiency and more. With a single click, you can find out your most active developers and your most popular APIs and products. You can get time series metrics as well maps to show what geographies drive them.
Learn More
We are really excited about the new API Management service, and it is going to make securely publishing and tracking external APIs much simpler. To learn more about API Management, follow the tutorials below:
- Easily create an API façade for the existing backend services
- Quickly add new capabilities to the APIs, such as response caching and cross domain access
- Package and publish APIs to developers and partners, internal and external
- Reliably protect published APIs from misuse and abuse
- Azure API Management developer center
Cache: New Azure Redis Cache Service
I’m excited to announce the preview of a new Azure Redis Cache Service.
This new cache service gives customers the ability to use a secure, dedicated Redis cache, managed by Microsoft. With this offer, you get to leverage the rich feature set and ecosystem provided by Redis, and reliable hosting and monitoring from Microsoft.
We are offering the Azure Redis Cache Preview in two tiers:
- Basic – A single Cache node (ideal for dev/test and non-critical workloads)
- Standard – A replicated Cache (Two nodes, a Master and a Slave)
During the preview period, the Azure Redis Cache will be available in a 250 MB and 1 GB size. For a limited time, the cache will be offered free, with a limit of two caches per subscription.
Creating a New Cache Instance
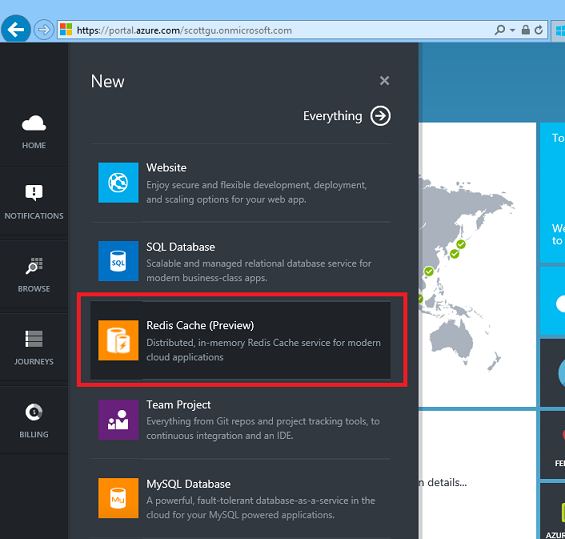
Getting started with the new Azure Redis Cache is easy. To create a new cache, sign in to the Azure Preview Portal, and click New -> Redis Cache (Preview):
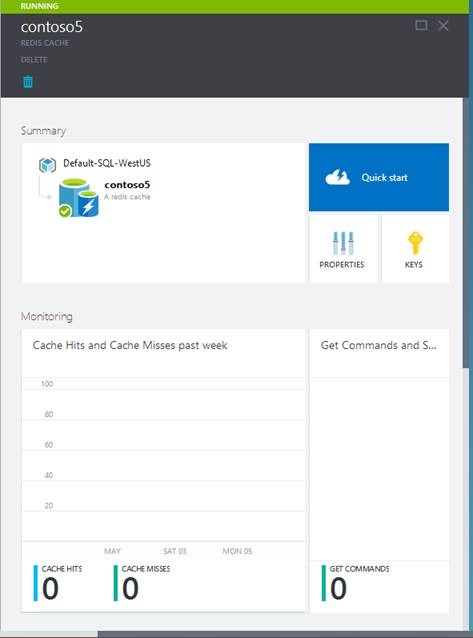
Once the new cache options are configured, click Create. It can take a few minutes for the cache to be created. After the cache has been created, your new cache has a Running status and is ready for use with default settings:
Connect to the Cache
Application developers can use a variety of languages and corresponding client packages to connect to the Azure Redis Cache. Below we’ll use a .NET Redis client called StackExchange.Redis to connect to the cache endpoint. You can open any Visual Studio project and add the StackExchange.Redis NuGet package to it, via the NuGet package manager.
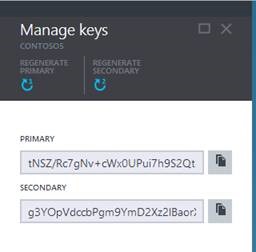
The cache endpoint and key can be obtained respectively from the Properties blade and the Keys blade for your cache instance within the Azure Preview Portal:
Once you’ve retrieved these you can create a connection instance to the cache with the code below:
var connection = StackExchange.Redis
.ConnectionMultiplexer.Connect("contoso5.redis.cache.windows.net,ssl=true,password=...");
Once the connection is established, you can retrieve a reference to the Redis cache database, by calling the ConnectionMultiplexer.GetDatabase method.
IDatabase cache = connection.GetDatabase();
Items can be stored in and retrieved from a cache by using the StringSet and StringGet methods.
cache.StringSet("Key1", "HelloWorld");
string value = cache.StringGet("Key1");
You have now stored and retrieved a “Hello World” string from a Redis cache instance running on Azure.
Learn More
For more information, visit the following links:
- Getting Started guide
- Documentation
- MSDN forum for answers to all your Redis Cache questions
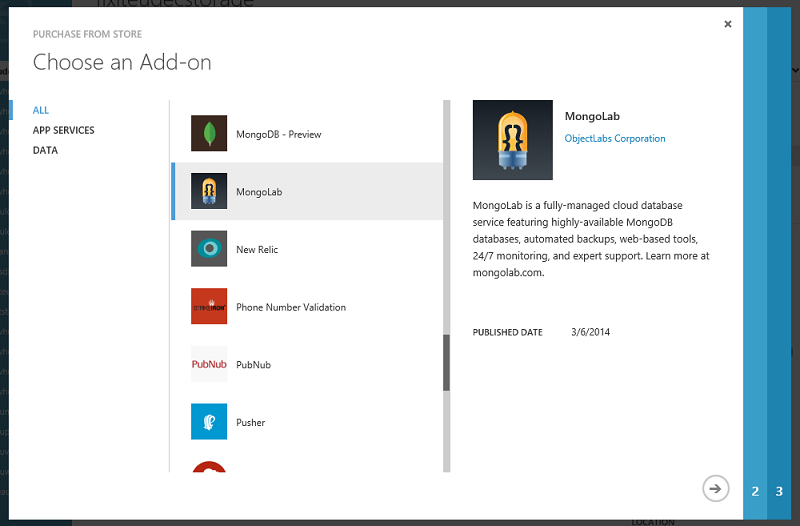
Store: Support for EA customers and channel partners in the Azure Store
With today’s update we are expanding the Azure Store to customers and channel partners subscribed to Azure via a direct Enterprise Agreement (EA). Azure EA customers in North America and Europe can now purchase a range of application and data services from 3rd party providers through the Store and have these subscriptions automatically billed against their EA.
You will be billed against your EA each quarter for all of your Store purchases on a separate, consolidated invoice. Access to Azure Store can be managed by your EA Azure enrollment administrators, by going to Manage Accounts and Subscriptions under the Accounts section in the Enterprise Portal, where you can disable or re-enable access to 3rd party purchases via Store. Please visit Azure Store to learn more.
Summary
Today’s Microsoft Azure release enables a ton of great new scenarios, and makes building applications hosted in the cloud even easier.
If you don’t already have a Azure account, you can sign-up for a free trial and start using all of the above features today. Then visit the Microosft Azure Developer Center to learn more about how to build apps with it.
Hope this helps,
Scott
P.S. In addition to blogging, I am also now using Twitter for quick updates and to share links. Follow me at: twitter.com/scottgu
