Announcing the release of AMQP support with Windows Azure Service Bus
For the past five years, Microsoft has been working with a diverse group of companies to develop the Advanced Message Queuing Protocol (AMQP) standard. The group of 20+ companies consisted of tech vendors, including Red Hat and VMware, and enterprises like JPMorgan Chase and Credit Suisse. The goal has been to build an open, wire-level protocol standard for messaging that enables easy interoperability between different vendor products. Back in October 2012, the OASIS standards organization announced the approval of AMQP 1.0 as an OASIS Standard and, on the same day, we released a preview implementation of it with Windows Azure Service Bus.
Today, I’m pleased to announce that AMQP 1.0 support in Windows Azure Service Bus has been released as a general availability (GA) feature – and it is ready for production use, and backed by an enterprise SLA.
Interoperable Messaging
This release is a big deal. With support for AMQP 1.0, you can now use Windows Azure Service Bus to build applications using a variety of messaging libraries written using different languages and running on different operating systems – that can now all communicate using an efficient, binary, wire-level protocol.
Because AMQP 1.0 defines a portable data representation, it means that a message sent to Service Bus from a .NET program can be read from a Java program or Python/Ruby/PHP script without losing any of the structure or content of the message. For Java, the standard Java Message Service (JMS) API is supported so it’s straightforward to port an existing Java application to Service Bus from any another JMS provider.
The end result is really powerful middleware that can be used to build distributed systems, and glue together applications that span on-premises/cloud environments or run across multiple cloud providers.
Walkthrough of How to Build a Pub/Sub Solution using AMQP
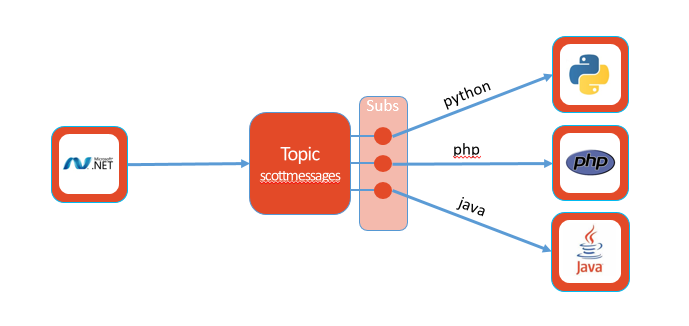
To highlight how easy it is to use this new messaging support, I’m going to walkthrough how to create a simple .NET console app that sends messages using a publish/subscribe messaging pattern to receiver apps written in Java, Python and PHP. The Windows Azure Service Bus now provides all of the pub/sub messaging support necessary to facilitate this using the open AMQP protocol and existing messaging frameworks.
The .NET sender app will post the messages to a Service Bus “Topic” – which is a durable messaging intermediary. Unlike Queues, where each message to a Queue is processed by a single consumer app, Topics provide a one-to-many form of communication using a publish/subscribe pattern. It is possible to register multiple subscriptions to a topic – and when a message is sent to the topic, it is then made available to each subscription to handle/process independently.
You can think of each subscription as a virtual durable queue that receives copies of the messages that were sent to the topic. You can then optionally register filter rules for a topic on a per-subscription basis, which allows you to filter/restrict which messages to a topic are received by which topic subscriptions. This enable you to scale to process a very large number of messages across a very large number of users and applications.

For this scenario we are going to have the .NET console app post messages to a “scottmessages” topic, and then setup separate subscriptions for three app listeners – one written in Java, Python and PHP – to receive and process the messages.
Step 1: Create a Service Bus Topic and 3 Subscriptions
Our first step will be to create a Service Bus Topic using the Windows Azure portal.
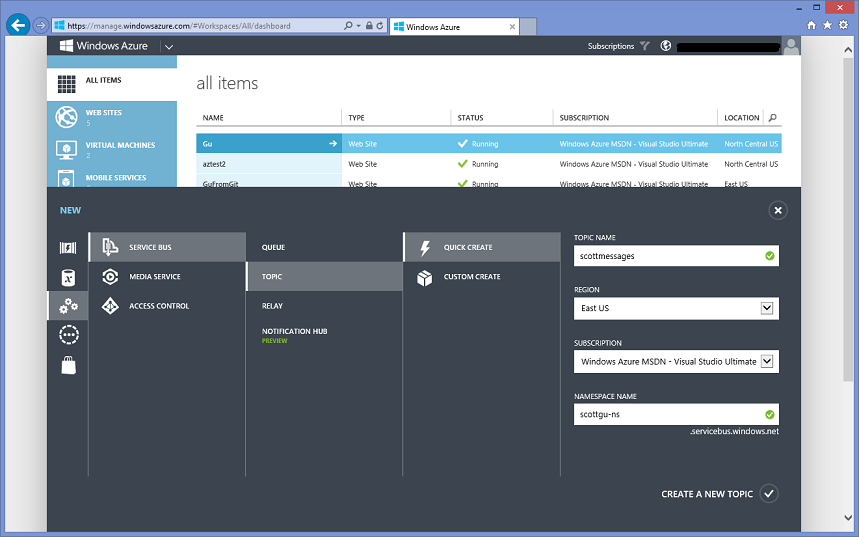
We’ll create a Topic named “scottmessages” in a “scottgu-ns” namespace. The Windows Azure Management Portal makes this easy to do – just click the New button and navigate to the App Services->Service Bus->Topic->Quick Create option (you can also create this programmatically and from the command-line):
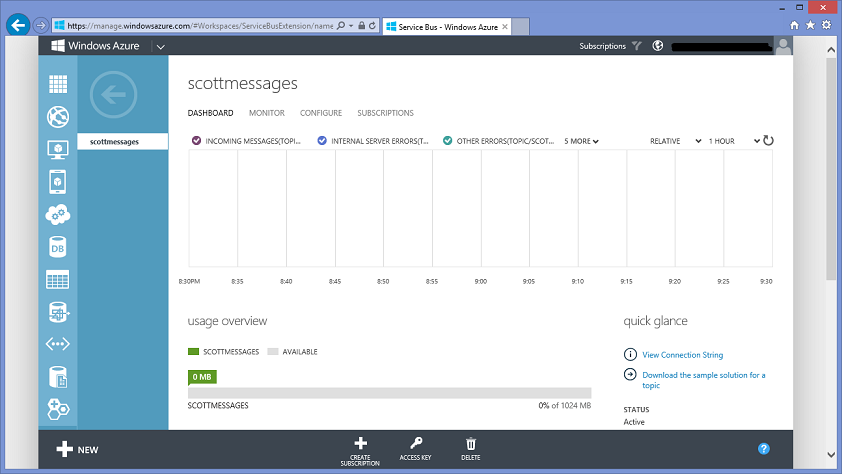
Once the “scottmessages” topic is created, we can drill into it to see a familiar Windows Azure dashboard monitoring view of it:
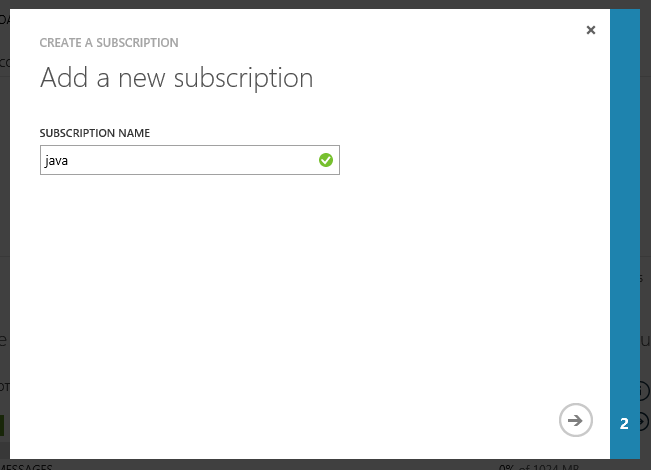
We’ll then create three subscriptions for the Topic – one for each of our app listeners. We’ll name these “java”, “python”, and “php” to correspond to the language that each app is written in (note: we could name them whatever we wanted to – I am using these names just to make it clearer which maps to which). We can do this programmatically, or by clicking the “Create Subscription” button in the portal command bar. This will launch a dialog that allows us to name the subscription we want to create:
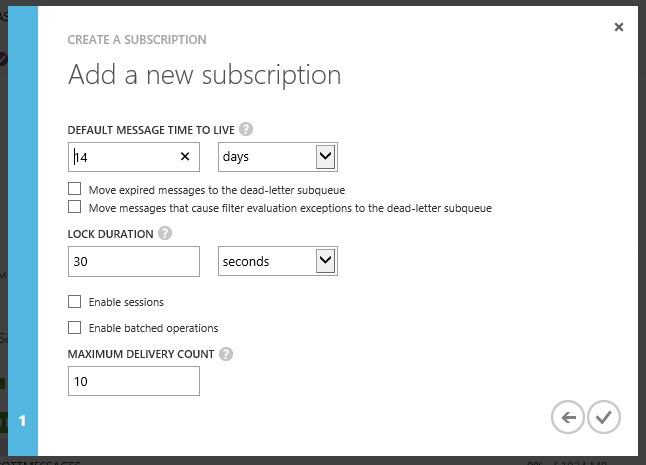
The second screen of the dialog allows us to set custom subscription properties like the default message time to live (how long it will remain queued before being deleted), lock and session settings, etc:
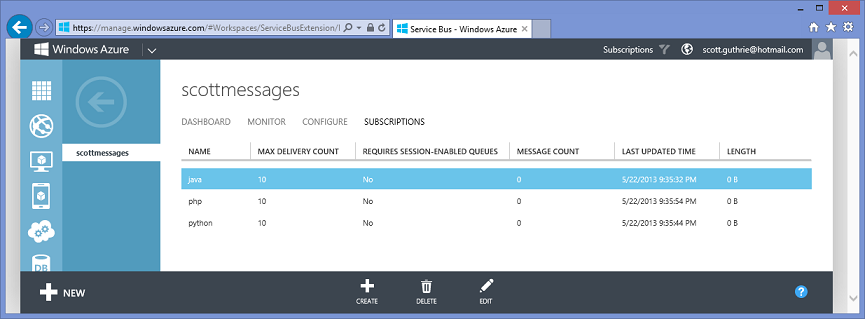
Clicking the ok button will create a subscription for our Topic. We’ll can then repeat this step to create two more subscriptions so that we have all three we want:
After we’ve done this, whenever a message is posted to the “scottmessages” topic it will be durably queued for each subscription. Durably queued means that a consumer app doesn’t need to be actively listening on the subscription at the time the message is posted. The message will be automatically queued up for the subscriber app to process whenever they connect later. This enables a very robust, loosely coupled application architecture that allows you to scale the processing of a large number of messages across a very large number of users and applications.
Step 2: Writing the .NET Sender App
Now that we have the Service Bus Topic and Subscriptions created, we’ll write a simple .NET program to send messages to the Topic.
The AMQP support is Service Bus is available in the latest version of the Service Bus .NET client library which you can retrieve via NuGet - http://nuget.org/packages/WindowsAzure.ServiceBus/. Version 2.1.0 or later is required. Just type “Install Package WindowsAzure.ServiceBus” to download and add it to your .NET application.
The code below is a simple .NET console application that prompts users of the console app to type messages, and then the app uses the Service Bus .NET API to post each message the user types to the “scottmessages” Service Bus Topic we created above:
using System;
using System.Configuration;
using Microsoft.ServiceBus.Messaging;

namespace SendToScott
{
    class Program
    {
        static void Main(string[] args)
        {
            string connectionString = ConfigurationManager.AppSettings["Microsoft.ServiceBus.ConnectionString"];

            TopicClient topicClient = TopicClient.CreateFromConnectionString(connectionString, "scottmessages");

            Console.WriteLine("Type messages you wish to post to the Topic:");

            while (true)
            {
                Console.Write("> ");
                string messageText = Console.ReadLine();

                topicClient.Send(new BrokeredMessage(messageText));
            }
        }
    }
}
The above code uses NET’s ConnectionManager class to pull in configuration settings from an app.config file. I’m using this approach to retrieve the connection string to our Service Bus Topic (and to avoid hard coding it into the code). Here’s the App.config file I’m using to specify this:
<?xml version="1.0" encoding="utf-8" ?>
<configuration>
<startup>
<supportedRuntime version="v4.0" sku=".NETFramework,Version=v4.5" />
</startup>
<appSettings>
<add key="Microsoft.ServiceBus.ConnectionString"
value="Endpoint=sb://scottgu-ns.servicebus.windows.net/;SharedSecretIssuer=owner;SharedSecretValue=sSDdaewGUo3/wsaewtjhELlCi1y3SRwjFMX01tz2c/AXw=;TransportType=Amqp" />
</appSettings>
</configuration>
Note: You can retrieve the connection string of a Service Bus Topic from the Windows Azure Portal by selecting the Topic and then clicking the “Access Key” button in the command bar at the bottom of the portal. Note that to configure the .NET client library to use AMQP, I appended “;TransportType=Amqp” to the connection string.
Running the Console App
Now let’s run the .NET console app. Hitting F5 produces a console app and we can now type messages to send to the Topic. Here’s some sample input:
Each message entered above was posted to our Service Bus Topic – which will in turn durably queue a copy of the message for each of the three Subscriptions we’ve setup to process.
Step 3: Writing a Java App Listener
Now let’s write a java app that will connect to one of the Subscriptions and process the messages.
The standard API for messaging in Java is JMS - the Java Message Service. JMS doesn’t specify anything about the underlying transport so different JMS products use different protocols under the covers to talk to their respective messaging brokers. I’m going to use a standard JMS Provider from Apache that uses AMQP 1.0 as the underlying protocol. Using this library, Windows Azure Service Bus becomes an open standards JMS Provider!
You can obtain the Apache AMQP provider at http://people.apache.org/~rgodfrey/qpid-java-amqp-1-0-client-jms.html. The following four JAR files from the distribution archive need to be added to your Java CLASSPATH when building and running applications that use it:
- geronimo-jms_1.1_spec-1.0.jar
- qpid-amqp-1-0-client-[version].jar
- qpid-amqp-1-0-client-jms-[version].jar
- qpid-amqp-1-0-common-[version].jar
We can then write the following Java code which uses the standard JMS messaging API to connect to our Service Bus subscription and process messages in it:
// ReceiveScottsMessages.java
import javax.jms.*;
import javax.naming.Context;
import javax.naming.InitialContext;
import java.util.Hashtable;
public class ReceiveScottsMessages implements MessageListener {
public static void main(String[] args) {
try {
Hashtable<String, String> env = new Hashtable<String, String>();
env.put(Context.INITIAL_CONTEXT_FACTORY,
"org.apache.qpid.amqp_1_0.jms.jndi.PropertiesFileInitialContextFactory");
env.put(Context.PROVIDER_URL, "servicebus.properties");
Context context = new InitialContext(env);
ConnectionFactory cf = (ConnectionFactory) context.lookup("SBCF");
Topic topic = (Topic) context.lookup("EntityName");
Connection connection = cf.createConnection();
Session session = connection.createSession(false, Session.AUTO_ACKNOWLEDGE);
TopicSubscriber subscriber = session.createDurableSubscriber(topic, "java");
subscriber.setMessageListener(new ReceiveScottsMessages());
connection.start();
System.out.println("Receiving messages. Press enter to stop.");
System.in.read();
System.out.println("Shutting down.");
connection.stop();
subscriber.close();
session.close();
connection.close();
} catch (Exception e) {
System.err.println("Caught exception. Exiting.");
System.exit(1);
}
}
@Override
public void onMessage(Message message) {
try {
System.out.println("Message From Scott > " + ((TextMessage) message).getText());
} catch (JMSException e) {
System.err.println("Caught exception receiving message: " + e);
}
}
}
Note that the Apache JMS provider uses a simple file based JNDI provider to configure the JMS “Administered Objects”, including the connection details and the logical to physical name mappings of the messaging entities. Here’s the servicebus.properties file I’m using to embed the connection string details to our Windows Azure Service Bus Topic:
connectionfactory.SBCF = amqps://owner:sSDdaYGUo3%2FwpewtjhELlCi1y4SSwjFGX01tz2c%2FAXw%3D@scottgu-ns.servicebus.windows.net
topic.EntityName = scottmessages
This properties file defines a ConnectionFactory called “SBCF” which contains the constituent parts from the Service Bus connection string. The format is as follows:
amqps://[username]:[password]@[namespace].servicebus.windows.net
In the format above, the [username] corresponds to the issuer name, [password] is a URL-encoded form of the issuer key. You must URL-encode the issuer key manually. A useful URL-encoding utility is available at http://www.w3schools.com/tags/ref_urlencode.asp.
Running the Java App
When we run this Java app it will connect to the “Java” subscription on our Service Bus Topic and produce the output below:
Receiving messages. Press enter to stop.
Message From Scott > Red Shirts are cool
Message From Scott > Cross-platform messaging is so simple with AMQP and Service Bus
Message From Scott > Windows Azure Rocks!
Shutting down.
Note how the messages we sent to the Topic using .NET were seamlessly consumed from the Java app!
Popular Java frameworks like Spring and JEE use JMS to integrate different messaging systems – you can now write components using these frameworks and have the messaging system powered by the Windows Service Bus, and seamlessly interoperate and integrate with other languages and frameworks as well.
Step 4: Creating a Python App Listener
Let’s now write a Python app that will connect to another of the Subscriptions and process the messages. We’ll host this Python app in a Linux VM.
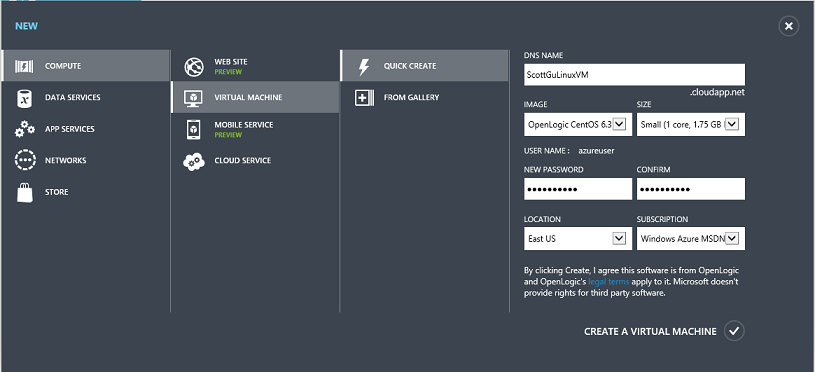
We can create the Linux VM very easily using Windows Azure. Just select the New command in the portal and use the Compute->Virtual Machine->Quick Create option to create a CentOS virtual machine:
Once the VM is provisioned we can SSH into it to configure and setup.
Installing the Proton Library on our Linux VM
For both the Python and PHP apps, we’ll use the Proton client libraries from Apache which are available for download from http://qpid.apache.org/proton/download.html. The Proton library provides a AMQP 1.0 compliant library that we’ll be able to use to communicate with the Windows Azure Service Bus. The README file in the Proton distribution details the steps required to install the dependencies and build Proton. Here’s a summary of the steps I took using the command-line of the Linux VM:
1) Edit the yum config file (/etc/yum.conf) and comment out the exclusion for updates to kernel headers (# exclude=kernel*). This is necessary to install the gcc compiler
2) Install the various pre-requisite packages:
>> yum install gcc cmake libuuid-devel
>> yum install openssl-devel
>> yum install swig python-devel ruby-devel php-devel java-1.6.0-openjdk
>> yum install epydoc
3) Download the Proton library
>> wget http://www.bizdirusa.com/mirrors/apache/qpid/proton/0.4/qpid-proton-0.4.tar.gz
4) Extract the Proton code from the distribution archive
>> tar -xvf qpid-proton-0.4.tar.gz
5) Build and install the code using the following steps, taken from the README file
From the directory where you found this README file:
mkdir build
cd build
# Set the install prefix. You may need to adjust depending on your
# system.
cmake -DCMAKE_INSTALL_PREFIX=/usr ..
# Omit the docs target if you do not wish to build or install
# documentation.
make all docs
# Note that this step will require root privileges.
sudo make install
Following all this, Proton will be installed on the machine and ready for you to use. Here’s the Python code I wrote to receive messages from the “python” subscription on our Windows Azure Service Bus Topic:
import sys
from proton import Messenger, Message
broker = "amqps://owner:sSDdaYHUo3/wpewtjhEDlCi1y6SRwjFMX01tz2c/AXw=@scottgu-ns.servicebus.windows.net"
entityName = "scottmessages/Subscriptions/python"
messenger = Messenger()
messenger.subscribe("%s/%s" % (broker, entityName))
messenger.start()
msg = Message()
while True:
messenger.recv(10)
while messenger.incoming:
try:
messenger.get(msg)
except Exception, e:
print e
else:
print "Message From Scott > %s" % msg.body
messenger.stop()
print "Done"
A couple of things to note above:
- The connection string for the broker is of the form
amqps://[issuer-name]:[issuer-key]@[namespace].servicebus.windows.net - The entityName that we’re receiving messages from is of the form
[topic-name]/Subscriptions/[subscription-name].
And now when we run the above python script (from our Linux VM) we will connect to the Windows Azure Service Bus using AMQP and see the messages we published from our .NET app:
One of the really cool things about the app above is that it is running in a Linux VM using Python, and leverages an open source AMQP library that communicates with the Windows Azure Service Bus messaging system using only the open AMQP protocol.
Step 5: Creating a PHP App Listener
Let’s now finish by writing a PHP app that connects to our final topic subscription and processes the messages. We’ll host this PHP app in the same Linux VM we used above, and use the same Proton library that we used with Python. Here is the code to use it from PHP:
<?php
include("proton.php");
$broker = "amqps://owner:sSDdaGGUo3/cpewtjhELlCi1y5SRwjFMX01tz2c/AXw=@scottgu-ns.servicebus.windows.net";
$entityName = "scottmessages/Subscriptions/php";
$messenger = new Messenger();
$messenger->start();
$messenger->subscribe("$broker/$entityName");
$msg = new Message();
while (true) {
$messenger->recv(10);
while ($messenger->incoming) {
try {
$messenger->get($msg);
} catch (Exception $e) {
print "$e\n";
continue;
}
print "Message From Scott > $msg->body\n";
}
}
$messenger->stop();
?>
And here is the output when we run it from the command-line in our Linux VM:
Summary
The above sample demonstrates how easy it is to connect to the Windows Azure Service Bus using the open AMQP protocol and the existing AMQP 1.0 libraries already supported by various communities.
The new AMQP support in the Windows Azure Service Bus will make it even easier to build powerful distributed applications that can span and interoperate across multiple systems. One cool thing to note with the same above is how the message has been preserved as it is exchanged between the different languages. This example used a simple text string for the body but the same is true for more complex message formats including lists and maps. This is achievable due to the portable data representation of AMQP 1.0.
Here are a few links to some more information on the Service Bus support for AMQP 1.0:
- Windows Azure Service Bus
- Latest Service Bus .NET client library on NuGet
- AMQP 1.0 support in Windows Azure Service Bus
- How to use AMQP 1.0 with the Service Bus .NET API
- Service Bus AMQP 1.0 Developer's Guide
- David Ingham’s presentation on Service Bus and AMQP 1.0 from the 2012 //build/ conference
- Apache Qpid AMQP 1.0 JMS library
- Apache Qpid Proton
If you don’t already have a Windows Azure account, you can sign-up for a free trial and start using all of the above features today.
Hope this helps,
Scott
P.S. In addition to blogging, I am also now using Twitter for quick updates and to share links. Follow me at: twitter.com/scottgu
