Contents tagged with c#
-
WebView2 Getting Started
The Microsoft WebView2 control allows you to embed Web Tech in native applications. It’s miles better than the old web browser controls. The WebView2 control is based on the Chromium platform.
The official docs for the control are found here: https://docs.microsoft.com/en-us/microsoft-edge/webview2/
Pre-reqs
Important note (as of 2021-01-20) - ensure you installed the following list of pre-requisites before proceeding:
- WebView2 Runtime or any non-stable Microsoft Edge (Chromium) Canary channel installed on Windows 10, Windows 8.1, or Windows 7.
- Visual Studio 2017 or later.
I suggest you visit https://www.microsoftedgeinsider.com/download and get the “Edge Canary Channel” that way.
Install WebView2 SDK in Visual Studio
Once you’ve created your WebForms or WPF project, install the Microsoft.Web.WebView2 package from Nuget:
PM> Install-Package Microsoft.Web.WebView2
Initializing WebView2 Control
Much about the control is asynchronous, and to make sure the control is loaded and ready, add an InitializeAsync() method to your form constructor, and place the events of interest there, like so:
        public webView2TestForm()
        {
            InitializeComponent();
            InitializeAsync();
        }

        async void InitializeAsync()
        {
            webViewControl.NavigationCompleted += WebViewControlOnNavigationCompleted;
            webViewControl.WebMessageReceived += WebViewControlOnWebMessageReceived;

            await webViewControl.EnsureCoreWebView2Async(null);
        }
Send Message to Web Page
Easiest way to communicate between the web page and the native application is to send messages. From the native app:
webViewControl.CoreWebView2.PostWebMessageAsString("proxy.object.added");To handle messages, the web page need some scripting:
        window.chrome.webview.addEventListener('message',
            event => {
                console.log('Got message from host!');
                console.log(event.data);
                handleMessages(event.data);
            });
Send Message to Host
To send a message from the web page
window.chrome.webview.postMessage('page.ready');To handle messages from web page in the host:
        private void WebViewControlOnWebMessageReceived(object sender, CoreWebView2WebMessageReceivedEventArgs e)
        {
            var message = e.TryGetWebMessageAsString();
            switch (message)
            {
                case "page.ready":
                    Trace.TraceInformation("Got page.ready message!");
                    break;
                default:
                    Trace.TraceWarning("Unknown message received: " + message);
                    break;
            }
        }
Proxy Objects
One of the coolest features availeble is to send a “proxy object” from the native application to the web page. There are some limitations but powerful enough. The best info I’ve found is this: https://docs.microsoft.com/en-us/dotnet/api/microsoft.web.webview2.core.corewebview2.addhostobjecttoscript
The class/object must be exposed as a COM object (!):
    [ClassInterface(ClassInterfaceType.AutoDual)]
    [ComVisible(true)]
    public class ProxyHostObject
    {
        // sample property
        public string Name { get; set; } = "Johan";

        // sample method
        public string GetName()
        {
            return Name;
        }

        // sample indexed property
        [System.Runtime.CompilerServices.IndexerName("Items")]
        public string this[int index]
        {
            get => _dictionary[index];
            set => _dictionary[index] = value;
        }
        private Dictionary<int, string> _dictionary = new Dictionary<int, string>();
    }
The use of the ClassInterface attribute is discussed in the Edge github repo, because the AutoDual value is not recommended in the docs, and even deprecated in dotnet:
Using AutoDual is strongly discouraged because of the versioning limitations described in System.Runtime.InteropServices.ClassInterfaceAttribute.
The issue is discussed here: https://github.com/MicrosoftEdge/WebView2Feedback/issues/517
To create and use the proxy object in the web page:
async function handleMessages(message) { switch (event.data) { case 'proxy.object.added': { const obj = window.chrome.webview.hostObjects.proxyobject; console.log(obj); var name1 = await obj.Name; console.log('name prop: ' + name1); var name2 = await obj.GetName(); console.log('name func: ' + name2); obj.GetName().then(name => { console.log("GetName promise name: " + name); }); // Indexed properties let index = 123; obj[index] = "test"; let result = await obj[index]; console.log(result); } break; default: console.log("unknown message: " + event.data); } } -
Secure ASP.NET Web API with Windows Azure AD
Note that the APIs, tools and methods change quickly in this area, this blog post will get old and die eventually…
Many organizations now look at the Azure environment to host their websites and web APIs, and some decide to move their mail and Active Directory too. Now with the latest updates and previews in Azure, you’re able to secure your web APIs with Azure AD. Vittorio Bertocci wrote an article for MSDN Magazine about Secure ASP.NET Web API with Windows Azure AD and Microsoft OWIN Components and it worked fine up until a couple of weeks ago when things moved around in these parts of Azure

I will try to describe in detail how to secure your web API with Azure Active Directory now, using Visual Studio 2013 and the preview of ADAL (Active Directory Authentication Library) package.
Create a web API project
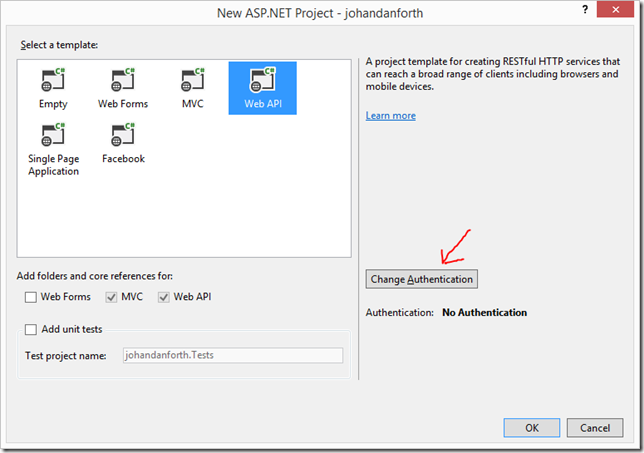
Fire up Visual Studio and create a new ASP.NET Web Application. I’m calling mine “johandanforth”, I’m selecting “Web API” and click the “Change Authentication”
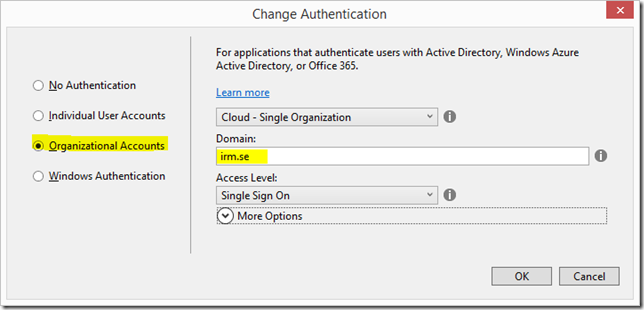
In the next dialog, click “Organizational Account” and enter the domain of your Azure AD tenant, in my case it’s “irm.se”:
After you press “OK” you’ll be asked to login with your Azure AD account, then “OK” again and Visual Studio will create a web application resource in your Azure AD. Now look it up in the Azure Management application. Note that you may have to log out and in again or restart the Azure management web app to see the newly created application.
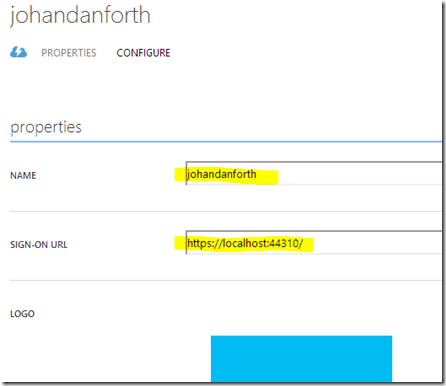
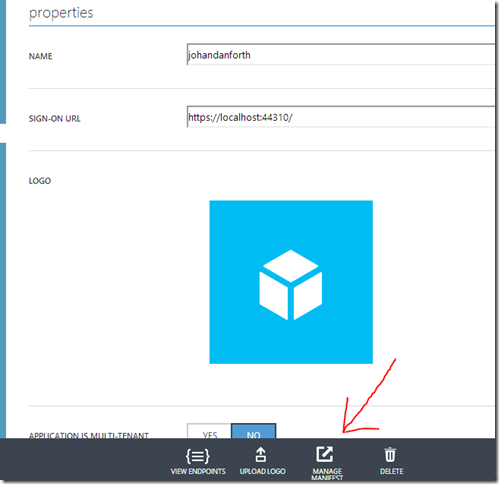
In my case the application has been named “johandanforth” and is for securing your development project on localhost. The SIGN-ON URL (also called the APP URL in the management application) is https://localhost:44310/ which can be seen both on the applications overview and if you click on the application and go to the CONFIGURE “tab”:
The sign-on url should be the same as where the web API is hosted, in this case the same localhost-settings as you got in the development project web-settings.
Open up web.config of your web API project and have a look at these settings:
    <add key="ida:Audience" value="https://irm.se/johandanforth" />
    <add key="ida:ClientID" value="d169beb7-34bc-441b-8b93-87e3181a1132" />
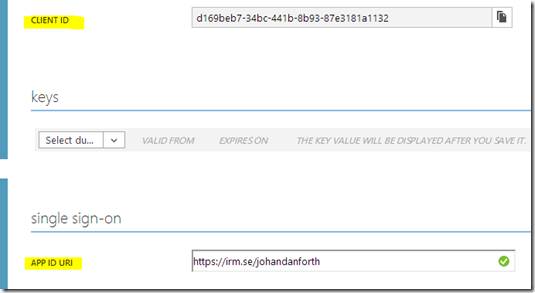
The “ida:Audience” in web.config correspond to the value of APP ID URI of the application resource in the management portal and the “ida:ClientID” correspond to the CLIENT ID in the portal.
Update the web application manifest
Before you any application can access this resource, we must update the “manifest”. Still on the CONFIGURE tab for your web API resource, there should be a MANAGE MANIFEST menu option down at the bottom toolbar. Click it and select “Download Manifest”. It’s a json-text-file, and should save it somewhere where you know is, because we will add a section to it and then upload it again using the same menu option:
Open the json-manifest and replace the "appPermissions": [], section with this:
"appPermissions":[
      {
         "claimValue":"user_impersonation",
         "description":"Allow the application full access to the service on behalf of the signed-in user",
         "directAccessGrantTypes":[

         ],
         "displayName":"Have full access to the service",
         "impersonationAccessGrantTypes":[
            {
               "impersonated":"User",
               "impersonator":"Application"
            }
         ],
         "isDisabled":false,
         "origin":"Application",
         "permissionId":"b69ee3c9-c40d-4f2a-ac80-961cd1534e40",
         "resourceScopeType":"Personal",
         "userConsentDescription":"Allow the application full access to the service on your behalf",
         "userConsentDisplayName":"Have full access to the service"
      }
   ],
At the moment, there doesn’t seem to much in way of documentation on this manifest file, but it should work without modifications. I’ll try to write something about this manifest file as soon as I get some more docs on it.Next thing you do is upload the modified manifest file. Note that the portal may give you an error message during upload, but things seems to work anyway! It may look like this:Create a client
Now let’s try and access the sample ValuesController Web API in your development environment using a web browser, Fiddler or similar. In my case it’s https://localhost:44309/api/values and you should get a HTTP/1.1 401 Unauthorized error back. To be able to access the protected resource, you must add a client resource in the AD and configure it to access the web API.
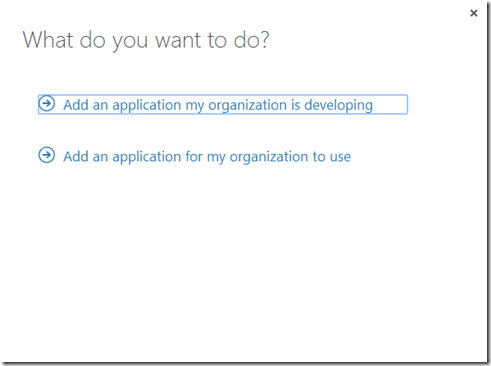
If you are not there already, in the Azure management portal, go to Active Directory, click on your domain name and select the APPLICATIONS tab. Then click the ADD-icon down the center of the bottom toolbar. Then go ahead and select “Add an application my organization is developing”:
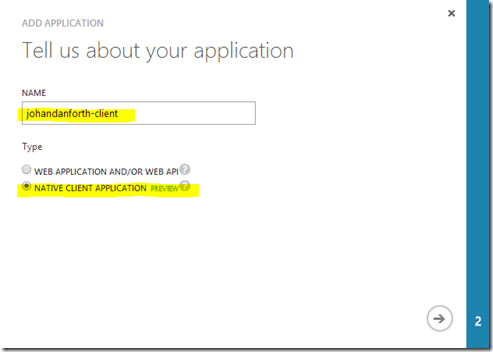
Enter a name for your client (I’m going with “johandanforth-client”, and make sure you select NATIVE CLIENT APPLICATION because we’re going to write a simple Windows WPF client to call our web API:
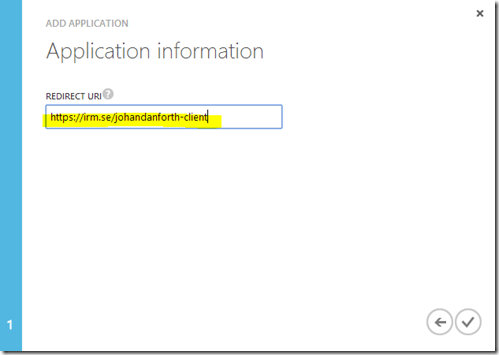
On the second page, type in a redirect url for your client – it can be anything as long as it is a valid url. I’m going with https://irm.se/johandanforth-client.
Your client is now created, but the last step to do is to give permission to our web API. Scroll down to the bottom of the client application CONFIGURE page and look at the “permissions to other applications (preview)” section. In the dropdown marked “select application” you should be able to see and select your web API. You must also select the “Delegated permissions” dropdown and mark the only option available for you. As you can see, the description matches the text in the manifest file:
Remember to SAVE!
Almost there, hang on…
Create a Windows WPF application for testing
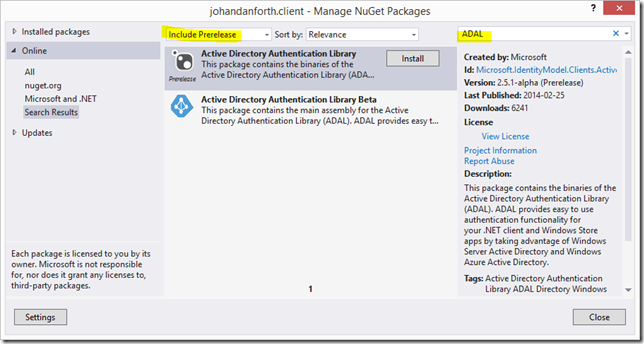
Add a new Windows WPF Application to your solution, I’m calling it “johandanforth.client”, and create a button with a click-event or something to hold the code that will authenticate and get values from your API. Bring up NuGet and search for “ADAL”, make sure you have “Include Prerelease” selected:
Install the prerelease package from February 2014 (it will probably be updated soon), then paste this code into the click-event of that button you created earlier:
using System;
using System.Net.Http;
using System.Windows;
using Microsoft.IdentityModel.Clients.ActiveDirectory;

namespace johandanforth.client
{
    public partial class MainWindow : Window
    {
        public MainWindow()
        {
            InitializeComponent();
        }

        private async void Button_Click(object sender, RoutedEventArgs e)
        {
            //this is to accept dev certificates - do not use in production!
            System.Net.ServicePointManager.ServerCertificateValidationCallback = ((a, b, c, d) => true);

            var ac = new AuthenticationContext("https://login.windows.net/irm.se");   //ad domain = irm.se

            var ar1 = ac.AcquireToken("https://irm.se/johandanforth",   //app id uri of the web api
              "91b4bc31-92c2-4699-86f5-fa84a718da30",                   //the client id
              new Uri("https://irm.se/johandanforth-client"));          //the client redirect uri

            var authHeader = ar1.CreateAuthorizationHeader();

            var client = new HttpClient();
            var request = new HttpRequestMessage(HttpMethod.Get, "https://localhost:44310/api/values");
            request.Headers.TryAddWithoutValidation("Authorization", authHeader);
            var response = await client.SendAsync(request);
            var responseString = await response.Content.ReadAsStringAsync();
            MessageBox.Show(responseString);
        }
    }
}
There are a few lines that must be change to work with your sample code. First change the AuthenticaitonContext to match your Azure AD domain/tenant name:
var ac = new AuthenticationContext("https://login.windows.net/irm.se");Next look at the code part which acquires a token – this is when the login dialog pops up and asks the user to log in using his or hers organizational account. This line corresponds to the web API uri, which is the same as the “ida:Audience” in your web.config file, so update it to match that value:
var ar1 = ac.AcquireToken("https://irm.se/johandanforth",
The next line is the client id of the application client you created in Azure AD, look it up and change the id accordingly:
"91b4bc31-92c2-4699-86f5-fa84a718da30",
The last line is the redirect-uri of the client, look it up on the same page in the Azure management portal:
new Uri("https://irm.se/johandanforth-client"));
You must also modify the line with the call to the web API method to match your web server localhost settings:
var request = new HttpRequestMessage(HttpMethod.Get, "https://localhost:44310/api/values");
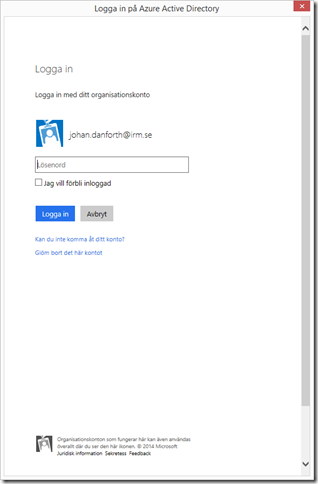
Now, start the web API program in debug mode and wait until you see the Home Page, then right click and start debug of the WPF client. Click the button and you should be prompted to log in with your organizational account (this is the look of it in Swedish):
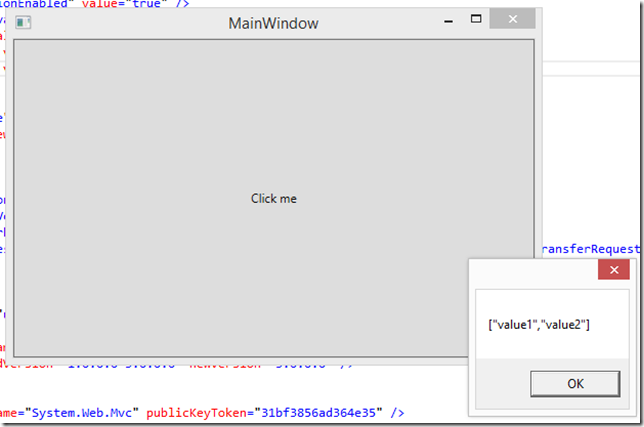
After a successful login, the code continues and you should be greeted with this:
Still with me?
Deploy to Azure
This is all well and good (hopefully), but we want to deploy our web API to Azure and run our clients against it in the cloud. To do that we need to:
1) Create a web site to host our web API in Azure
2) Publish our code to the site
3) Create an Azure AD resource for the web API (VS does this for you)
4) Modify the manifest for the web API (like before)
5) Give the client permission to the new resource (like before)
6) Update web.config and the client code to match the IDs and URIs of the new resources (ida:Audience == APP ID URI == the resource you want to access)
7) Publish the code again (to get the updated web.config uploaded)
8) Run!
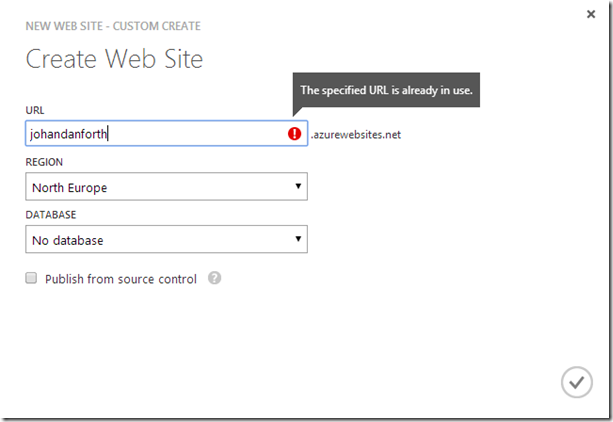
Here’s some quick shots of some of the steps. First create a web site in Azure by selecting “WEB SITES” in the left hand menu of the Azure Portal, press the big plus-sign down in the corner and create a custom web site. I’m calling mine “johandanforth” (ignore the error message
 )
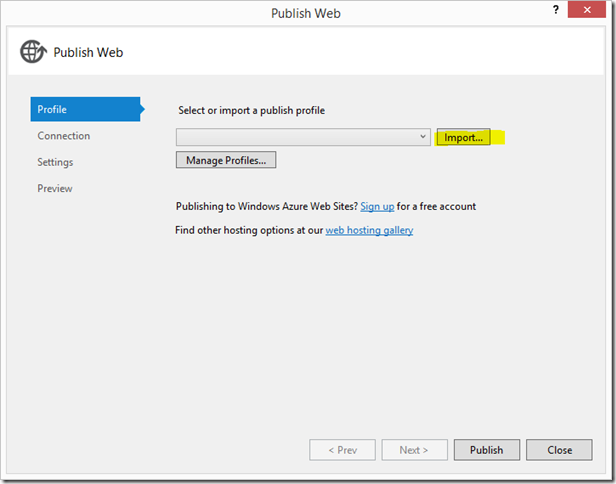
)Now go back to Visual Studio, right click the web API project and select “Publish…”.
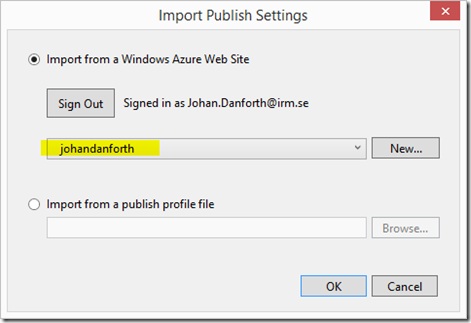
Press the “Import…” button to download and import the publishing profile of the web site you created, and select the newly created Web Site in the dropdown. Click OK.
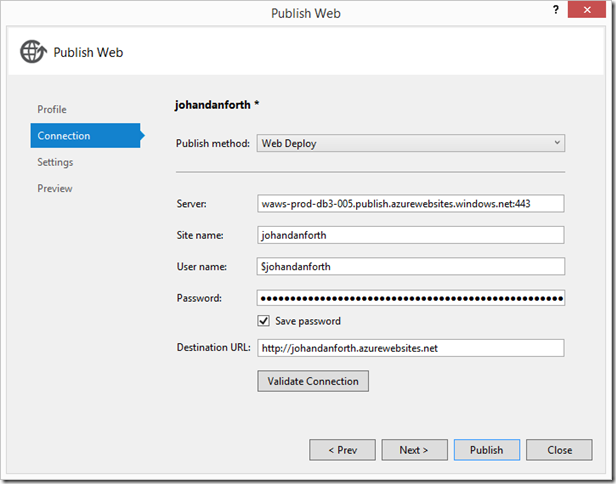
You have to authenticate one or two times to get past these steps, but should finally get to the last step of the Publish process:
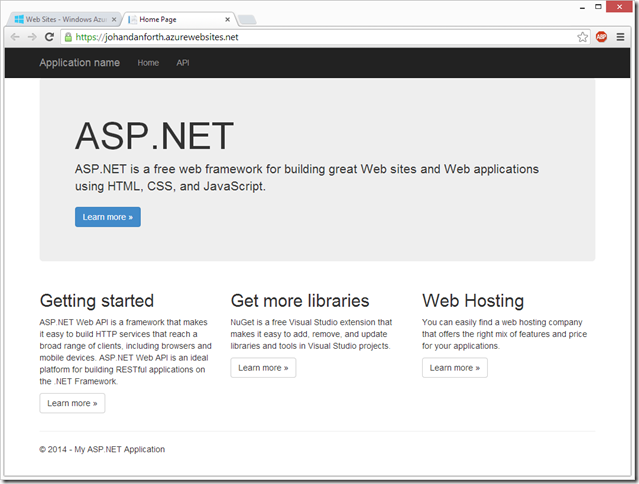
When Visual Studio is done publishing, a browser page will open up with the Home Page showing:
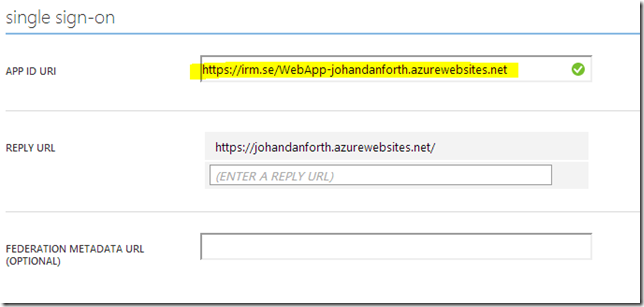
Visual Studio should now have created a new application resource in the Azure Active Directory, so get back to the portal and have a look at the list of AD applications. A resource named “WebApp-xxxxxxxxx.azurewebsites.net” should be listed there. Note – you may have to sign out and sign in to the portal to show the web api resource. This has happened to me a couple of times!
Click on the resource and look at the details in the CONFIGURE tab.
Copy the name of the “APP ID URI” and past it into the “ida:Audience” value in the web.config file of your web API project in Visual Studio:
<add key="ida:Audience" value="https://irm.se/WebApp-johandanforth.azurewebsites.net" />
The same value must also be updated in the WPF client:
var ar1 = ac.AcquireToken(https://irm.se/WebApp-johandanforth.azurewebsites.net,
You must also (of course) update the call to the web API method to point at the web site in the cloud:
var request = new HttpRequestMessage(HttpMethod.Get, "https://johandanforth.azurewebsites.net/api/values");
We’re not done yet though… now you have to do the same steps you did for the localhost resource earlier - download and update the manifest file for the web API resource and give the client resource permission to use the service.
Finally (yes finally) – publish the web API project again to get the updated web.config file to the cloud site!
Once the code is published, you should be able to run the client successfully.
Please give feedback if you have problems with any step/s of this walkthrough. Other questions, bugs and such is better asked on the Windows Azure Active Directory forum. I’m still learning these things and trying to keep up with the changes

-
Binding MediaElement to a ViewModel in a Windows 8 Store App
If you want to play a video from your video-library in a MediaElement control of a
MetroWindows Store App and tried to bind the Url of the video file as a source to the MediaElement control like this, you may have noticed it’s not working as well for you:<MediaElement Source="{Binding Url}" />
I have no idea why it’s not working, but I managed to get it going using ContentControl instead:
<ContentControl Content="{Binding Video}" />
The code behind for this is:
protected override void OnNavigatedTo(NavigationEventArgs e)
{
_viewModel = new VideoViewModel("video.mp4");
DataContext = _viewModel;
}
And the VideoViewModel looks like this:
public class VideoViewModel
{
private readonly MediaElement _video;
private readonly string _filename;
public VideoViewModel(string filename)
{
_filename = filename;
_video = new MediaElement { AutoPlay = true };
//don't load the stream until the control is ready
_video.Loaded += VideoLoaded;
}
public MediaElement Video
{
get { return _video; }
}
private async void VideoLoaded(object sender, RoutedEventArgs e)
{
var file = await KnownFolders.VideosLibrary.GetFileAsync(_filename);
var stream = await file.OpenAsync(FileAccessMode.Read);
_video.SetSource(stream, file.FileType);
}
}
I had to wait for the MediaElement.Loaded event until I could load and set the video stream.
-
File Activation in Windows RT
The code sample for file activation on MSDN is lacking some code
 so a simple way to pass the file clicked to your MainPage could be:
protected override void OnFileActivated(FileActivatedEventArgs args)
{
var page = new Frame();
page.Navigate(typeof(MainPage));
Window.Current.Content = page;
var p = page.Content as MainPage;
if (p != null) p.FileEvent = args;
Window.Current.Activate();
}
And in MainPage:
public MainPage()
{
InitializeComponent();
Loaded += MainPageLoaded;
}
void MainPageLoaded(object sender, RoutedEventArgs e)
{
if (FileEvent != null && FileEvent.Files.Count > 0)
{
//… do something with file
}
}
-
Read All Text from Textfile with Encoding in Windows RT
A simple extension for reading all text from a text file in WinRT with a specific encoding, made as an extension to StorageFile:
public static class StorageFileExtensions
{
async public static Task<string> ReadAllTextAsync(this StorageFile storageFile)
{
var buffer = await FileIO.ReadBufferAsync(storageFile);
var fileData = buffer.ToArray();
var encoding = Encoding.GetEncoding("Windows-1252");
var text = encoding.GetString(fileData, 0, fileData.Length);
return text;
}
} -
MiniBuss on Codeplex
 The micro service bus framework for msmq called MiniBuss is now open source on Codeplex at http://minibuss.codeplex.com
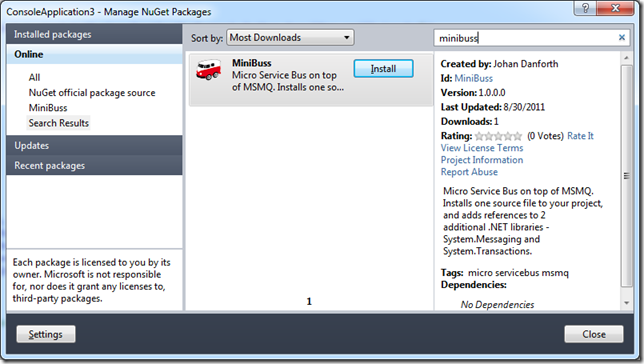
There is also now a NuGet package available for easy install into projects:
If you’re interested in co-op on this project, please contact me via Codeplex! I’m looking for devs and tester who knows their c#, msmq and concurrency.
-
Create Tag-Cloud from RSS Feed in ASP.NET MVC
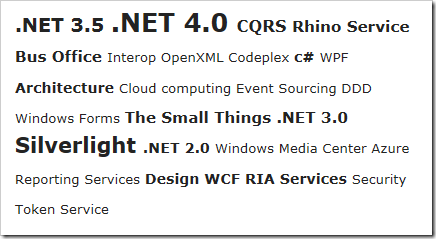
Say you want to generate your own tag-cloud from a list of categories or tags you pull from an RSS-feed or similar. This is one way to do it. I’m using ASP.NET MVC for this sample which creates a simple tag-cloud in a Razor-view with HTML looking something like this:
The controller-code to start out with looks like this, where you read in the RSS-feed into a SyndicationFeed class, then pull out and flatten all the categories you have in that feed. Then group all those categories and count them to build up this simple view-model which is a Dictionary of category and percentage:
public class HomeController : Controller
{
public ActionResult Index()
{
//get feed
var feed = SyndicationFeed.Load(XmlReader.Create("http://blog.irm.se/blogs/MainFeed.aspx"));
//get flat list of all categories/tags in the feed
var categoriesList = feed.Items.SelectMany(item => item.Categories).Select(category => category.Name);
var categoryGroups = categoriesList.GroupBy(category => category);
decimal maxNrOfACategory = categoryGroups.Max(w => w.Count());
//build a dictionary with category/percentage of all categories
var tagCloudDictionary = new Dictionary<string, int>();
foreach (var tag in categoryGroups)
{
var percent = (tag.Count() / maxNrOfACategory) * 100;
tagCloudDictionary.Add(tag.Key, (int)percent);
}
return View(tagCloudDictionary);
}
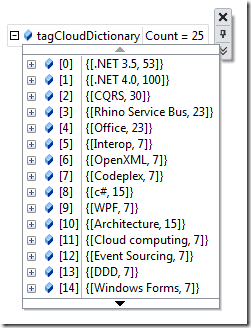
}So now we got this view-model which is a Dictionary<string,int> and contains category/percentage data like this:
So all we need to do is create some kind of cloud in HTML or similar in the view. One way of doing it is this, which creates the output shown at the top:
@model Dictionary<string, int>
@{
ViewBag.Title = "Index";
}
<h2>Tag cloud</h2>
<div style="width: 400px; font-size: 25px;">
@foreach (var tag in Model)
{
<span style="font-size: @(tag.Value / 2 + 50)%; ">
@if (tag.Value > 10)
{
<span style=" font-weight: bold;">@tag.Key </span>
}
else
{
<span>@tag.Key </span>
}
</span>
}
</div>Obviously, to be able to click on a tag and so on you need to create a richer view-model, I just wanted to show how I grab and count the tags from the feed

-
Refactored Dapper Extensions
Making extensions for Dapper-dot-net was so fun and I needed a few more simple ones so I refactored a bit and made a few Update() and Delete() extensions as well. I’m also looking for Id-properties with the [Key] attribute on them. The class grew a bit, but it now supports the functions below. Note that this will only work for very simple objects and tables, but it might be helpful for some of you

I’m trying to follow the overall Dapper syntax as much as I can. If you done specify the table name with the input parameter, I’m using the name of the class/entity as table name, except where anonymous types are used.
The object I’m using for testing
    public class Test
    {
        [Key]
        public int Id { get; set; }
        public string Name { get; set; }
        public int Age { get; set; }
    }
Insert typed object
                var entity = new Test() { Name = "Johan", Age = 44 };
                connection.Insert(entity);
Insert anonymous object
connection.Insert("insert into test", new { Name = "Johan", Age = 20 });Update typed object (where-clause built up from Id-properties)
                var entity = new Test() { Id = 16, Name = "Johan", Age = 50 };
                connection.Update(entity);
Delete typed object (where-clause built up from Id-properties)
                var entity = new Test() { Id = 4, Name = "Johan", Age = 44 };
                var deletedCount = connection.Delete(entity);
Delete anonymous object (where-clause built up from anonymous object)
var deletedCount = connection.Delete("delete from test", new { Name = "Johan" });The Code:
public static class DapperExtensions
{
    public static void Insert(this IDbConnection connection, object entityToInsert)
    {
        Insert(connection, null, entityToInsert);
    }

    public static void Insert(this IDbConnection connection, string sql, object entityToInsert)
    {
        var name = entityToInsert.GetType().Name;
        var sb = new StringBuilder(sql);
        if (sql == null)
            sb.AppendFormat("insert into {0}", name);
        sb.Append(" (");
        BuildInsertParameters(entityToInsert, sb);
        sb.Append(") values (");
        BuildInsertValues(entityToInsert, sb);
        sb.Append(")");
        connection.Execute(sb.ToString(), entityToInsert);
    }

    public static int Update(this IDbConnection connection, object entityToUpdate)
    {
        return Update(connection, null, entityToUpdate);
    }

    public static int Update(this IDbConnection connection, string sql, object entityToUpdate)
    {
        var idProps = GetIdProperties(entityToUpdate);
        if (idProps.Count() == 0)
            throw new ArgumentException("Entity must have at least one [Key] property");

        var name = entityToUpdate.GetType().Name;

        var sb = new StringBuilder(sql);
        if (sql == null)
            sb.AppendFormat("update {0}", name);

        sb.AppendFormat(" set ");
        BuildUpdateSet(entityToUpdate, sb);
        sb.Append(" where ");
        BuildWhere(sb, idProps.ToArray());

        return connection.Execute(sb.ToString(), entityToUpdate);
    }

    public static int Delete<T>(this IDbConnection connection, T entityToDelete)
    {
        return Delete(connection, null, entityToDelete);
    }

    public static int Delete<T>(this IDbConnection connection, string sql, T entityToDelete)
    {
        var idProps = typeof (T).IsAnonymousType() ?
            GetAllProperties(entityToDelete) :
            GetIdProperties(entityToDelete);

        if (idProps.Count() == 0)
            throw new ArgumentException("Entity must have at least one [Key] property");

        var name = entityToDelete.GetType().Name;

        var sb = new StringBuilder(sql);
        if (sql == null)
            sb.AppendFormat("delete from {0}", name);

        sb.Append(" where ");
        BuildWhere(sb, idProps);

        return connection.Execute(sb.ToString(), entityToDelete);
    }

    private static void BuildUpdateSet(object entityToUpdate, StringBuilder sb)
    {
        var nonIdProps = GetNonIdProperties(entityToUpdate).ToArray();

        for (var i = 0; i < nonIdProps.Length; i++)
        {
            var property = nonIdProps[i];

            sb.AppendFormat("{0} = @{1}", property.Name, property.Name);
            if (i < nonIdProps.Length - 1)
                sb.AppendFormat(", ");
        }
    }

    private static void BuildWhere(StringBuilder sb, IEnumerable<PropertyInfo> idProps)
    {
        for (var i = 0; i < idProps.Count(); i++)
        {
            sb.AppendFormat("{0} = @{1}", idProps.ElementAt(i).Name, idProps.ElementAt(i).Name);
            if (i < idProps.Count() - 1)
                sb.AppendFormat(" and ");
        }
    }

    private static void BuildInsertValues(object entityToInsert, StringBuilder sb)
    {
        var props = GetAllProperties(entityToInsert);

        for (var i = 0; i < props.Count(); i++)
        {
            var property = props.ElementAt(i);
            if (property.GetCustomAttributes(true).Where(a => a is KeyAttribute).Any()) continue;
            sb.AppendFormat("@{0}", property.Name);
            if (i < props.Count() - 1)
                sb.Append(", ");
        }
    }

    private static void BuildInsertParameters(object entityToInsert, StringBuilder sb)
    {
        var props = GetAllProperties(entityToInsert);

        for (var i = 0; i < props.Count(); i++)
        {
            var property = props.ElementAt(i);
            if (property.GetCustomAttributes(true).Where(a => a is KeyAttribute).Any()) continue;
            sb.Append(property.Name);
            if (i < props.Count() - 1)
                sb.Append(", ");
        }
    }

    private static IEnumerable<PropertyInfo> GetAllProperties(object entity)
    {
        return entity.GetType().GetProperties();
    }

    private static IEnumerable<PropertyInfo> GetNonIdProperties(object entity)
    {
        return GetAllProperties(entity).Where(p => p.GetCustomAttributes(true).Any(a => a is KeyAttribute) == false);
    }

    private static IEnumerable<PropertyInfo> GetIdProperties(object entity)
    {
        return GetAllProperties(entity).Where( p => p.GetCustomAttributes(true).Any(a => a is KeyAttribute));
    }
}

public static class TypeExtension
{
    public static Boolean IsAnonymousType(this Type type)
    {
        if (type == null) return false;

        var hasCompilerGeneratedAttribute = type.GetCustomAttributes(typeof(CompilerGeneratedAttribute), false).Count() > 0;
        var nameContainsAnonymousType = type.FullName.Contains("AnonymousType");
        var isAnonymousType = hasCompilerGeneratedAttribute && nameContainsAnonymousType;

        return isAnonymousType;
    }
}
Feel free to fork the code as much as you can, I’m too tired to stay up longer. Dapper is getting really useful
-
Simple Insert Extension for Dapper
Last week I started using Dapper (dapper-dot-net on Google Code) for a project I’m working on. Dapper is a micro ORM, which extends IDbConnection. It’s very fast and works very well for queries where you want to return both typed and dynamic lists of objects. Have a quick look at the webpage and you’ll see what I mean.
Today I needed to do some inserting, which you can do with the Execute() extension, but you’d have to type out all the “insert into xxx (col1,col2) values (@val1, @val2)” stuff. Some guys suggested to create a dapper.contrib and adding extensions of insert, update, delete and so on but it’s not there yet (at time of writing).
Anyway, the extensions in dapper are already so well written I thought it should be quite easy to just add a dead simple (or stupid if you prefer) Insert() extensions on top of the existing Execute(), and I ended up with this raw unrefactored code. All it does really is building up the SQL for the insert using some property reflection, dapper itself does the heavy lifting:
public static class DapperExtensions
{
    public static void Insert(this IDbConnection connection,
                              object entityToInsert, string sql = "insert into " )
    {
        var name = entityToInsert.GetType().Name;

        if (sql == "insert into ")
        {
            sql = "insert into " + name + " ";
        }
        sql += " (";
        for (var i = 0; i < entityToInsert.GetType().GetProperties().Length; i++)
        {
            var propertyInfo = entityToInsert.GetType().GetProperties()[i];
            sql += propertyInfo.Name;
            if (i < entityToInsert.GetType().GetProperties().Length - 1)
                sql += ",";
        }
        sql += ") values (";
        for (var i = 0; i < entityToInsert.GetType().GetProperties().Length; i++)
        {
            var propertyInfo = entityToInsert.GetType().GetProperties()[i];
            sql += "@" + propertyInfo.Name;
            if (i < entityToInsert.GetType().GetProperties().Length - 1)
                sql += ",";
        }
        sql += ")";
        connection.Execute(sql, entityToInsert);
    }
}
I’m using it like this with a type:using (var connection = new SqlConnection(connectionString)) { connection.Open(); var entity = new Test() { Name = "Johan", Age = 43 }; connection.Insert(entity); }public class Test { public string Name { get; set; } public int Age { get; set; } }…or like this with an anonymous type:
using (var connection = new SqlConnection(connectionString))
{
    connection.Open();
    connection.Insert(new { Name = "Johan", Age = 43 }, "insert into test");
}
Works for me ™

-
Case Switching on CLR Types
As most .NET developers know, you cannot do case/switch on CLR types and one of the reasons for it was explained pretty well years ago by Peter Hallam on the C# team.
But there are many cases where you would like to iterate through a list of objects if mixed types and do specific things depending on it’s type. For fun I started to try out different ways to do it, some are better than others but they all do the same thing, more or less. I’m also exploring method extensions, method chaining and lambdas and some of the samples almost started to become fluent and DLS like.
Note
Oh, I’m as far from a C# language expert as anyone can be, so there are other ways of doing this I’m sure. The random code below is just me playing around for a simple way of doing case/switching on types that worked in the code I’m currently working on.
Also, if you would like a derived class to do something special, you normally override a method, send in some parameters and let that code whatever it so special. That’s basic OOD, see the Eat() method in the sample code below. But there are cases where you for one reason or other would not like to do this. Enough of that, this is just for fun.
A List of Pets
I was working with a class hierarchy of pets like this:
namespace TypeCase
{
public abstract class Pet
{
public string Name { get; set; }
public abstract void Eat();
public override string ToString()
{
return Name;
}
public Pet Case<T>(Action<T> action) where T : Pet
{
if (this is T)
action.Invoke((T)this);
return this;
}
}
public class Dog : Pet
{
public override void Eat()
{
Console.WriteLine(Name + " eats cats.");
}
}
public class Cat : Pet
{
public override void Eat()
{
Console.WriteLine(Name + " eats mice.");
}
}
}
We got a Cat and a Dog which are both different types of Pet. They have a Name and they can Eat() which is good enough for testing.
Creating the List
I’m creating a simple typed List like this:
var pets = new List<Pet>
{
new Cat { Name = "Morris"},
new Dog { Name = "Buster"}
};
Now we have something to play with. First do something you often see, especially in .NET 1.x code.
Case Switching on Strings
It’s perfectly fine to switch on strings, so this is quite common:
foreach (var pet in pets)
{
switch (pet.GetType().ToString())
{
case "TypeCase.Cat":
Console.WriteLine("A cat called " + pet);
break;
case "TypeCase.Dog":
Console.WriteLine("A dog called " + pet);
break;
}
}
I’m not too fond of this, because you may rename Cat or Dog in the future, or change namespace of “TypeCase” to something else, and even though renaming stuff with Resharper is powerful, strings are often missed. It would have been nice to:
case typeof(Cat):
But that’s not allowed. The case must be a constant.
If Is
A much safer way is to use if … else if … and instead of using string comparing, check the type with the is statement. It’s also faster to type:
foreach (var pet in pets)
{
if (pet is Cat) Console.WriteLine("A cat called " + pet);
else if (pet is Dog) Console.WriteLine("A dog called " + pet);
}
This code is perfectly fine and I’ve used it many times. But what if I wanted to have a Case-like syntax?
Method Extension on Type
I’m thinking of a syntax like this one:
pet.GetType().
Case(typeof(Cat), () => Console.WriteLine("A cat called " + pet)).
Case(typeof(Dog), () => Console.WriteLine("A dog called " + pet));
In this case we’re extending the Type type with a Case method, like this:
public static class TypeExt
{
public static Type Case(this Type t, Type what, Action action)
{
if (t == what)
action.Invoke();
return t;
}
}
The Action parameter encapsulate the anonymous method we’re sending in, containing the stuff we want to do with the pet in question. In the Case() extension method we’re testing to see if we’re given the right Type and Invoke() the anonymous method if so.
Important Note: Without going into details, just make sure you don’t fall into a case of “Access to modified closure” when doing for(each) loops around anonymous methods. To be safe, you have to create a local pet-variable outside of the method:
foreach (var pet in pets)
{
//some code
var safePet = pet;
pet.GetType().
Case(typeof(Cat), () => Console.WriteLine("A cat called " + safePet)).
Case(typeof(Dog), () => Console.WriteLine("A dog called " + safePet));
//some more code
}
Better Method Extension on Type
But I’m not happy with this syntax. If feels more cumbersome than the if…is…if…else… syntax, and whenever you see the use of typeof() in code like this, generics can do some work for you. So I’m going for a syntax like this:
pet.GetType().
Case<Cat>(obj => Console.WriteLine("A cat called " + pet)).
Case<Dog>(obj => Console.WriteLine("A dog called " + pet));
This requires a new method extension:
public static class TypeExt
{
public static Type Case<T>(this Type t, Action<Type> action)
{
if (t == typeof(T))
action.Invoke(t);
return t;
}
}
Looks better, but you still risk getting into the issues with modified closure above and I would like to work on the “obj” parameter as if it was the Pet objekt itself, not the Type. Let’s make it even better:
Even Better Method Extension on Pet
Now I’m going for a syntax that looks like this:
foreach (var pet in pets)
{
pet.
Case<Cat>(c => Console.WriteLine("A cat called " + c)).
Case<Dog>(d => Console.WriteLine("A dog called " + d));
pet.Eat();
}
As you can see, the syntax is cleaner and I can work with the pet object itself as a parameter handled to anonymous method in the lambda statement.
To do this I have to create a method extension which knows about the Pet class:
public static class PetExt
{
public static Pet Case<T>(this Pet pet, Action<T> action) where T : Pet
{
if (pet is T)
action.Invoke((T)pet);
return pet;
}
}
It’s not a generic Case Switcher on Type, but it feels good to me and is easy to work with. And you don’t have the issue with access to modified closures with this one.
Refined Method Extension on List of Pets
I’m throwing in a final variant here, adding the Case method to the list itself:
pets.
Case((Cat c) =>
{
Console.WriteLine("A cat called " + c);
c.Eat();
}).
Case<Dog>(d =>
{
Console.WriteLine("A dog called " + d);
d.Eat();
});
pets.
Case((Cat c) => Console.WriteLine("A cat called " + c)).
Case<Dog>(d => Console.WriteLine("A dog called " + d));
As you can see, there are two ways syntactically to provide the type and the simple extension method for this variant looks like this:
public static class PetListExt
{
public static List<Pet> Case<T>(this List<Pet> pets, Action<T> action) where T : Pet
{
foreach (var pet in pets)
{
if (pet is T)
action.Invoke((T)pet);
}
return pets;
}
}
That’s it. I’ve seen a number of more complex ways to do roughly the same, but I’m not trying to create the ultimate Switch/Case framework, just playing around with c# to create something simple that may make the code easier to read (and fun to code).
