Contents tagged with ASP.NET MVC
-
Build and Debug ASP.NET MVC 5 Framework Web Application 4.x in VS Code
Some of us are stuck with older, brownfield web projects based on Framwork 4.x that has to be supported yet for a while. But we’ve also tasted the sweetness of the still not bloated (dream on suckers, it will be bloated) VS Code and want to use it while it’s still pristine and fast. But is it possible?
Yes, it’s possible
It requires some editing with the launch.json and tasks.json files in the .vscode folder. Hang on and note that I just got this running last night.
Fist, open the folder where your “old” web application is located. In the same directory as your .sln file, create a folder named .vscode. In the .vscode folder, a file called tasks.json, which describes one or more build steps.
tasks.json
{
"version": "2.0.0",
"tasks": [
{
"label": "build",
"type": "shell",
"command": "C:\\Program Files (x86)\\Microsoft Visual Studio\\2019\\Professional\\MSBuild\\Current\\Bin\\msbuild.exe",
"args": [
"${workspaceFolder}/WebApplication1/WebApplication1.csproj",
"/t:build",
"/p:GenerateFullPaths=true",
"/p:Configuration=Debug",
"/consoleloggerparameters:NoSummary"
],
"group": {
"kind": "build",
"isDefault": true
}
"presentation": {
"reveal": "silent"
},
"problemMatcher": "$msCompile"
},
]
}
Of course, you will have to replace “WebApplication1” with your project name, and you may also have to change the path to which ever msbuild.exe you want or need to run (bold, italic above).
To build i VS Code, press CTRL+SHIFT+B and your project should do just that. The task we defined is set to be the default, so VS Code will not ask you for anything, just build. Hopefully.
Run in IIS Express, 64-bit
To run this application in IIS Express, add the following task to tasks.json “tasks” array:
tasks.json (part)
… stuff before…
{
"label": "iisexpress",
"type": "shell",
"command": "C:\\Program Files\\IIS Express\\iisexpress.exe",
"args": [
"/path:${workspaceRoot}\\WebApplication1",
"/port:5006"
],
"presentation": {
"reveal": "silent"
},
"problemMatcher": "$msCompile"
},
…stuff after…Again – replace “WebApplication1” with your project name.
Note that the iisexpress.exe we point at MUST be the 64-bit version, or we won’t be able to debug later on. The 64-bit version is located in c:\program files\ directory, and the 32-bit version in – you guessed it – the c:\program files(x86)\ directory.
To get IIS Express going from VS Code, press CTRL+SHIFT+P, to bring up the command prompt, then type/select “Tasks: Run Task” and select “iisexpress”.
You should see something like this in the VS Code terminal window (you may have to bring it up):
Starting IIS Express ...
Successfully registered URL "http://localhost:5006/" for site "Development Web Site" application "/"
Registration completed
IIS Express is running.
Enter 'Q' to stop IIS ExpressYou can now open a browser and point at http://localhost:5006, your web application should hopefully start.
Debugging
Debugging in VS Code is defined in the launch.json file. VS Code has to “attach” to the iisexpress.exe process. So create a launch.json file in .vscode directory, and add this:
launch.json
{
"version": "0.2.0",
"configurations": [
{
"name": ".NET Attach",
"type": "clr",
"request": "attach",
"processName": "iisexpress.exe",
}
]
}
To “attach” and debug our running application. Press F5 in VS Code. If all is well, the debugger should start running, and you should be able to set breakpoints and whatnot. I’ve not looked at how to debug *.cshtml files yet, but I’m sure it can be done if needed.
Build, Run and Browse
It’s possible to do build, run in iis express and start Chrome/Edge in one step for convenience. This is my full tasks.json file for that. On F5 it will run the default task “build run browse” which depends on the tasks “build”, “iisexpress” and “browser”. You might want to exclude the “browser” subtask, but here it is:
{
// See https://go.microsoft.com/fwlink/?LinkId=733558
// for the documentation about the tasks.json format
//https://bigfont.ca/debug-an-iis-express-web-application-from-vs-code/
//appcmd add site /name:"WebApplication1" /bindings:https/*5006:localhost /physicalPath:C:\code-test\framework\WebApplication1\WebApplication1\obj\Debug\Package\PackageTmp
//"C:\Program Files (x86)\IIS Express\appcmd.exe" add site /name:"WebApplication1" /bindings:https/*5006:localhost /physicalPath:C:\code-test\framework\WebApplication1\WebApplication1\obj\Debug\Package\PackageTmp
"version": "2.0.0",
"tasks": [
{
"label": "build run browse",
"dependsOn": [
"build",
"iisexpress",
"browser"
],
"group": {
"kind": "build",
"isDefault": true
}
},
{
"label": "build",
"type": "shell",
"command": "C:\\Program Files (x86)\\Microsoft Visual Studio\\2019\\Professional\\MSBuild\\Current\\Bin\\msbuild.exe",
"args": [
"${workspaceFolder}/WebApplication1/WebApplication1.csproj",
"/t:build",
"/p:GenerateFullPaths=true",
"/p:Configuration=Debug",
"/consoleloggerparameters:NoSummary"
],
"group": "build",
"presentation": {
"reveal": "silent"
},
"problemMatcher": "$msCompile"
},
{
"label": "iisexpress",
"type": "shell",
"command": "C:\\Program Files\\IIS Express\\iisexpress.exe",
"args": [
"/path:${workspaceRoot}\\WebApplication1",
"/port:5006"
],
"presentation": {
"reveal": "silent"
},
"problemMatcher": "$msCompile"
},
{
"label": "browser",
"type": "shell",
"command": "C:\\Program Files (x86)\\Google\\Chrome\\Application\\chrome.exe",
"args": [
"http://localhost:5006"
],
"problemMatcher": []
}
]
}
Hopefully this might help some of you out there to use VS Code with Framework projects and transition over to .net 5 or 6. VS Code is still fast and really, really useful, though VS 2022 looks awesome and seems to outshine VS Code for me.
-
How to setup Continuous Integration and Deploy Pipeline for ASP.NET MVC Framework application to Azure Web App
In this article I will try to explain in as few steps as possible a way to do CI and deploy from an Azure DevOps repository to an Azure hosted Web App. There are many ways to do this, but this worked for me (2021-01-18).
I’m creating the CI from the Azure portal, but you can also do it more manually, like described by Scott Hanselman in this blog post, which can be useful to read through: https://www.hanselman.com/blog/azure-devops-continuous-builddeploytest-with-aspnet-core-22-preview-in-one-hour
Tools and Frameworks used: Visual Studio 2019 Version 16.8.4, .Net Framework 4.7.2
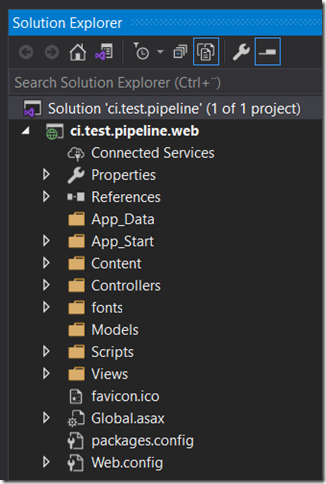
Pre-reqs: I assume you already have an Azure Web App registered that runs ASP.NET 4.8 or similar. Mine is called ‘ci-test-pipeline’. I also assume you already have a repository and a project in Azure DevOps, again, mine is called ‘ci-test-pipeline’. You can also have your repo in github, the steps should be similar. In this repo, I have a vanilla ASP.NET MVC application created and checked in. In my case ‘ci.test.pipeline.web’ in a ‘ci.test.pipeline’ solution:
Initially the pipeline page in DevOps will be empty, unless you’ve already setup a pipeline. To create a CI pipeline you can go about it in a few different ways, but this article describes how to do it from the Web App page in Azure portal.
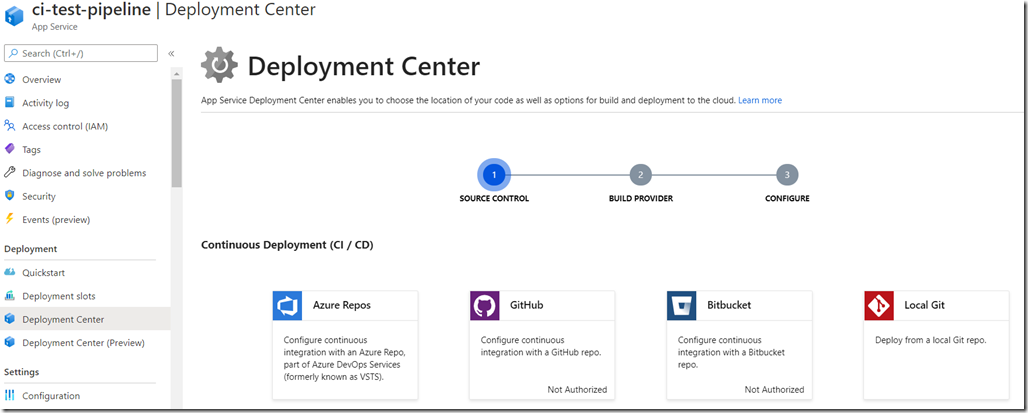
Goto the Deployment Center page in the Web App menu, and select to create a Continous Deployment (CI / CD) deployment for ‘Azure Repos’.
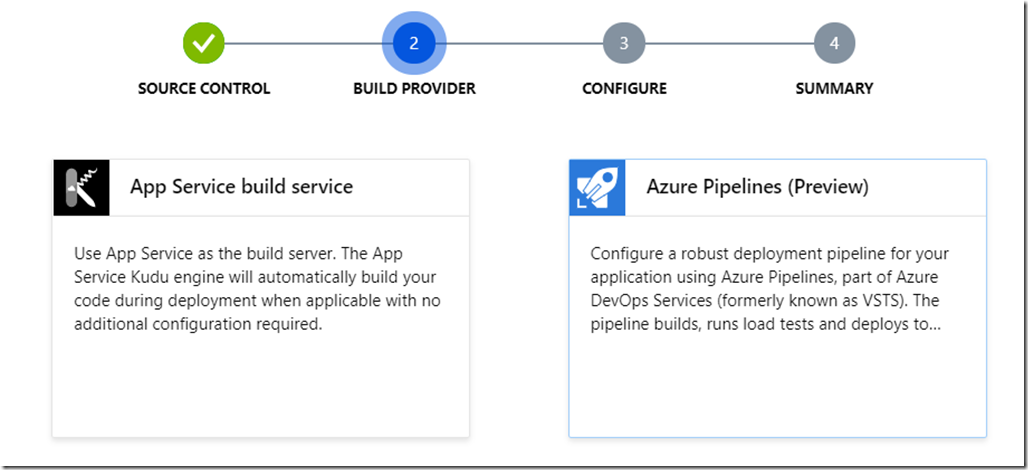
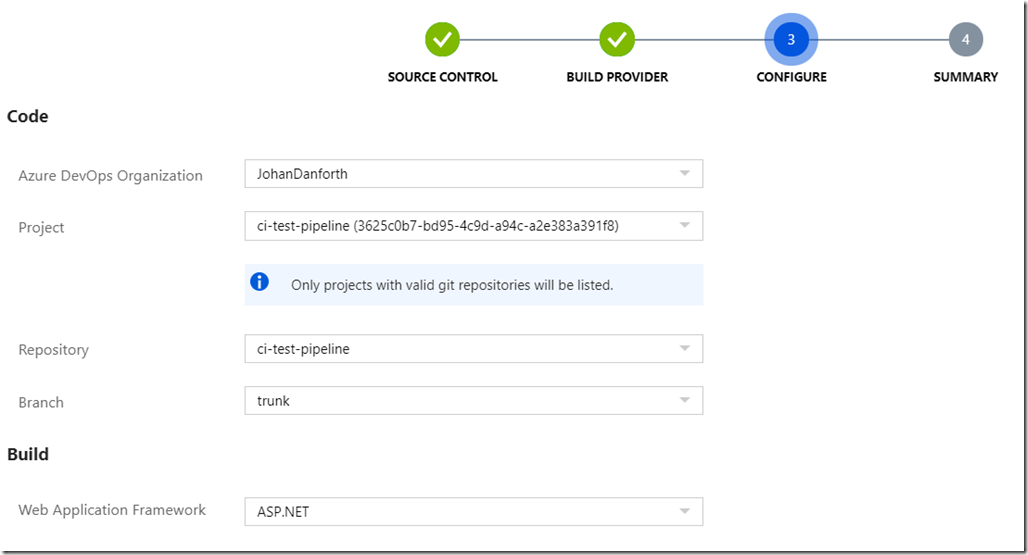
Then just follow the steps, it’s hard to do anything wrong as the wizard helps you with dropdowns along the way. Just make sure you select the correct repo and which ‘Web Application Framework’ you are using. In my case for an ASP.NET MVC .Net Framework solution, select ‘ASP.NET’.
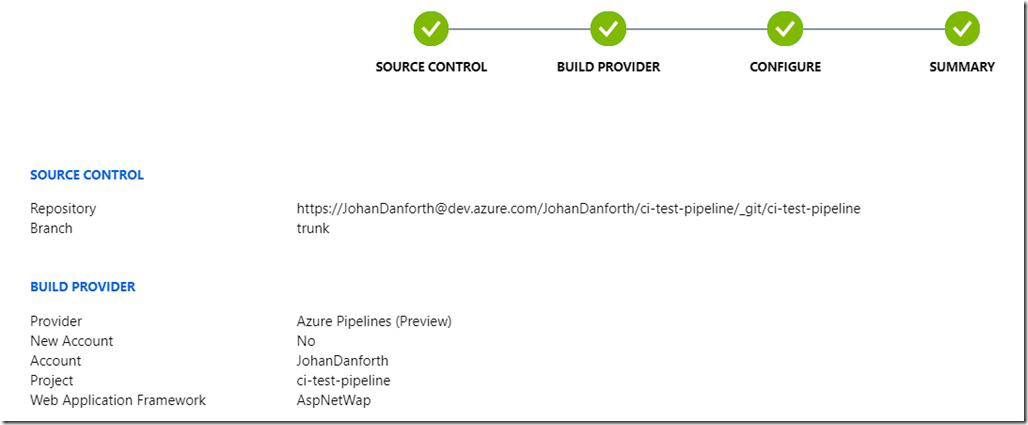
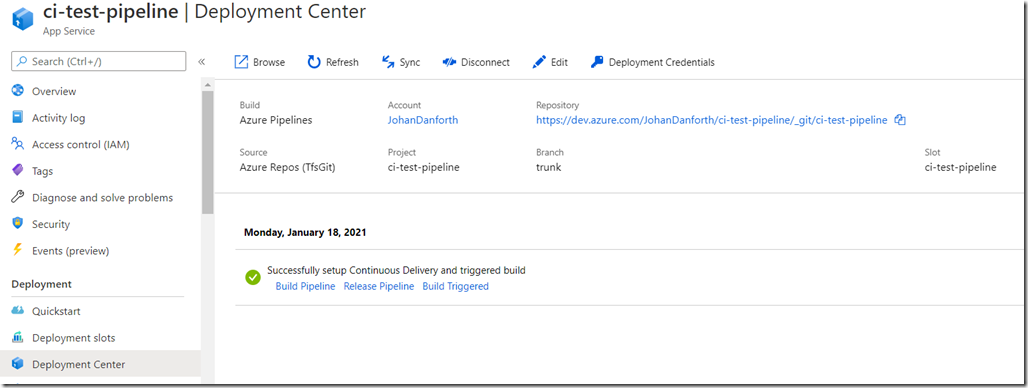
Once the pipeline is created, it should look something like this on the deployment center page, with a message of a successful setup. This is still in the Azure portal, under your Web App:
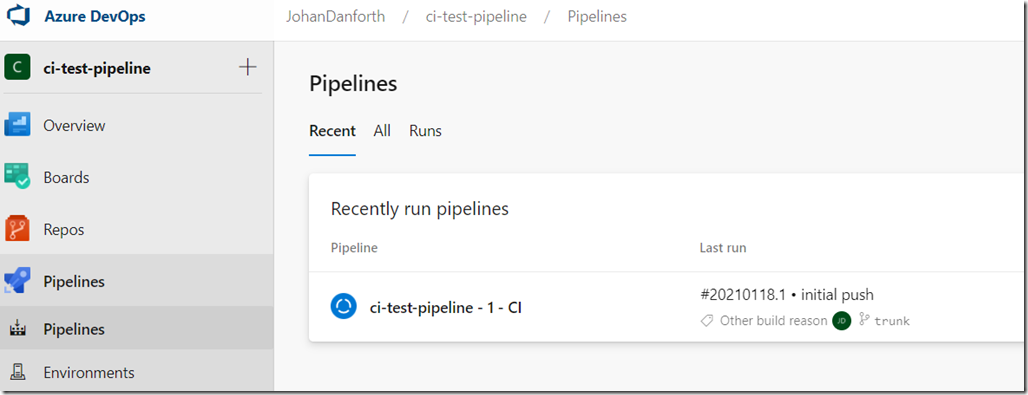
If your project was already checked in, like in my case, this also triggers a first build + deployment in Azure DevOps:
And you should eventually get an email from Azure DevOps with a success or failure message. In my case I get a ‘partial success’ because of an error in the pipeline:
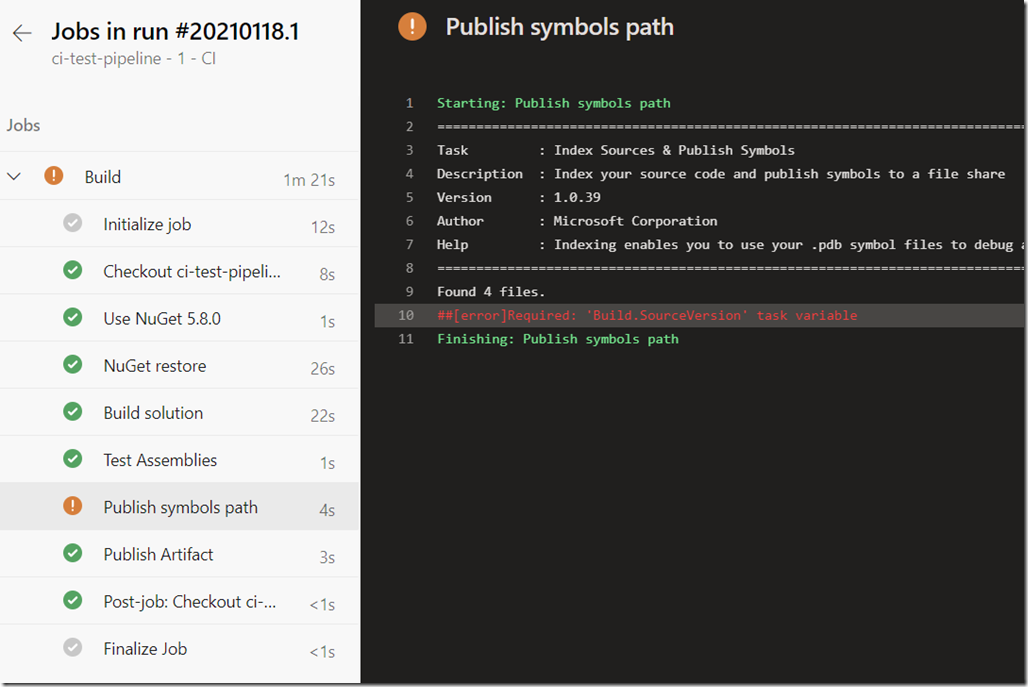
To view the deails of this message, just look through the detailed steps in the last run in Azure DevOps. You can easily get to these details by clicking the ‘View results’ link/button in the email, and drill into the job details:
For some reason the ‘Publish symbols path’ is missing a required task variable – ‘Build.SourceVersion’, but the build succeded and published/uploaded the artifact to a ‘drop container’ and the application is deployed to the Azure Web App. I’m not concerned about this warning right now, just happy it runs through.
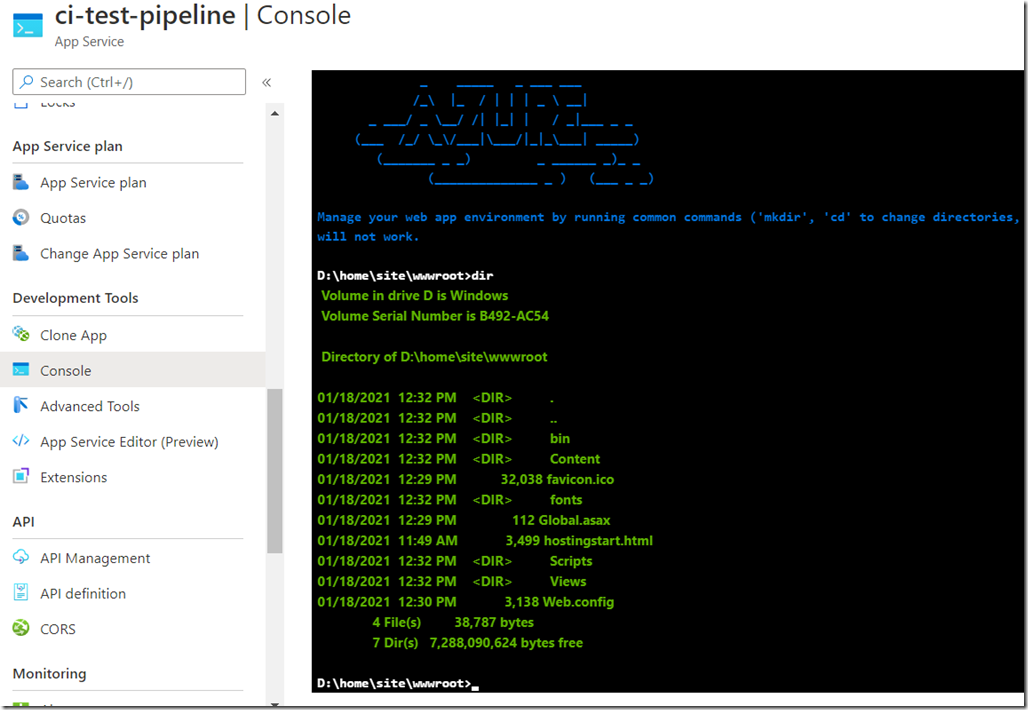
To see the deployed files in the Azure portal, you can go look at the console development tool for the Web App in Azure portal, which is neat:
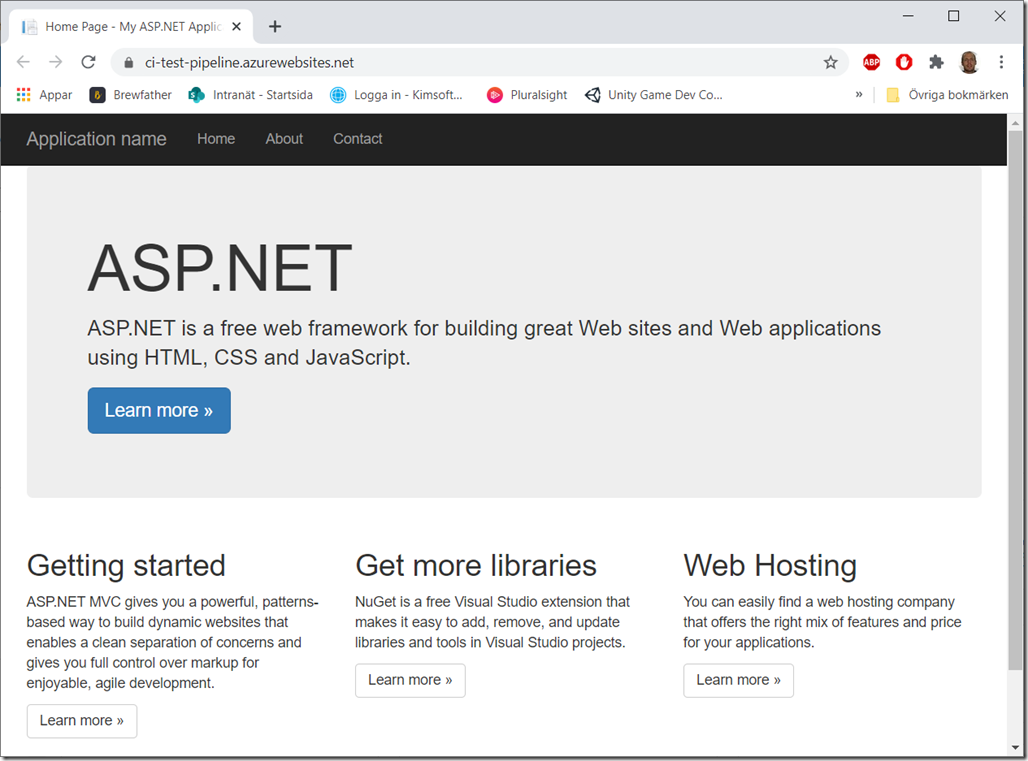
And you should also be able to view your website at <your web app name>.azurewebsites.net, to see that it works as expected:
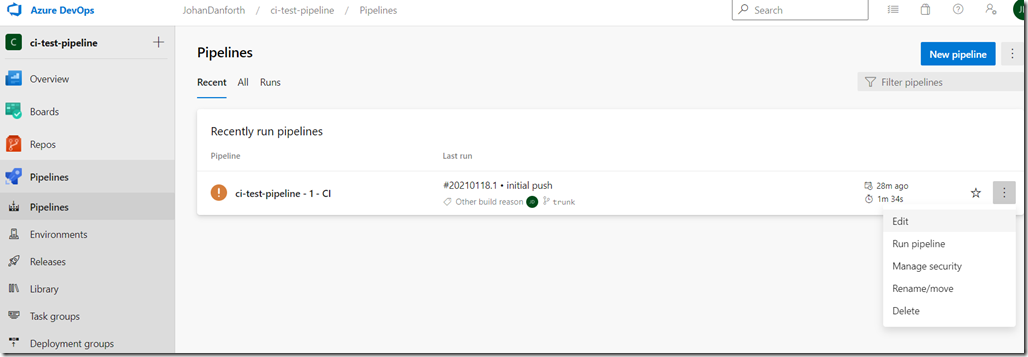
To view and edit the pipelines steps created for you by the Azure portal wizard, visit the pipelines menu in Azure DevOps, and select to ‘Edit’ the pipeline:
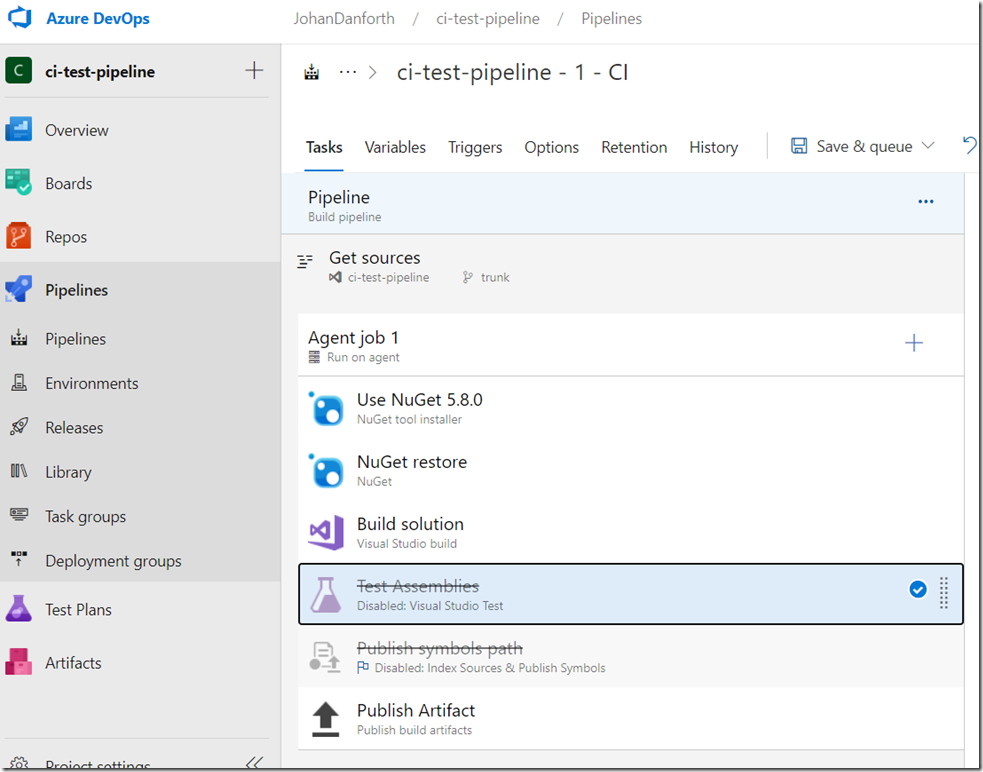
In edit mode, you see all the steps, and you may opt to disable the ‘Test Assemblies’ and ‘Publish symbols path’, until they are needed:
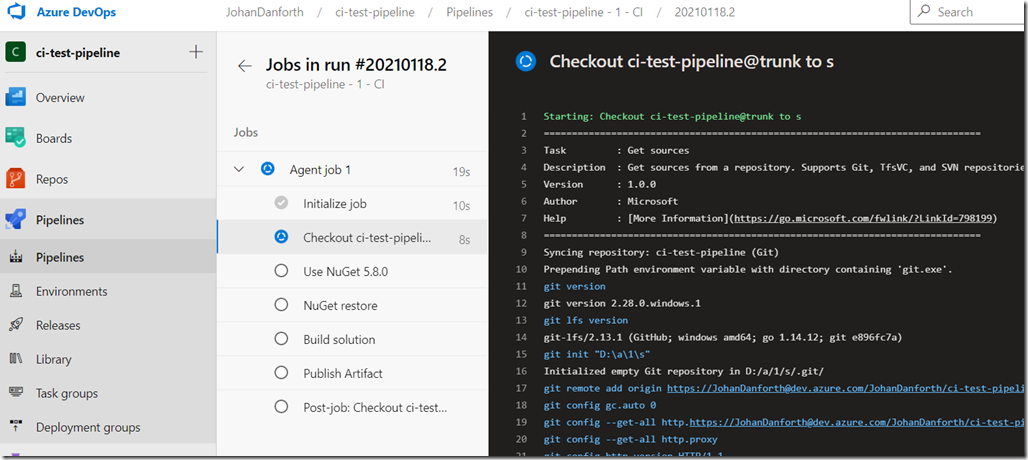
Remember to save the changes, and try them out again. It’s useful to follow the pipeline job by clicking on the ‘Agent’ that runs the job. the screen updates for every step:
There are loads of different pipeline steps you can add and customize, which is very helpful if you want to do pre- or post-build steps with your code – like adding build information to your website - which build is deployed and what source code version is actually running.
That’s enough screenshots for this article. Hope it helps.
In a follow-up to this blog post, I’ll add build information to the website, and finally add authentication.
-
Lazy Loading TreeView Sample with ASP.NET MVC and jqTree
I’ve been looking for a lightweight TreeView library to use with ASP.NET MVC, and I think I’ve found my “weapon of choice” – jqTree.
The code is available on https://github.com/mbraak/jqTree and the author mbraak (Marco Braak) is very active in the “issues” section answering questions from users.
The package is not available on Nuget at the moment though, but it’s easy enough to download and set up manually.
Download and unzip the code from Github, copy the files jqtree.css and jqtree-circle.png to your /Content folder, and copy the tree.jquery.js file to your /Scripts folder. Then open up your /App_Start/BundlesConfig.cs file and add the files to your bundles, something like this:
  bundles.Add(new ScriptBundle("~/bundles/bootstrap").Include(
                      "~/Scripts/bootstrap.js",
                      "~/Scripts/tree.jquery.js",
                      "~/Scripts/respond.js"));

  bundles.Add(new StyleBundle("~/Content/css").Include(
                      "~/Content/bootstrap.css",
                      "~/Content/jqtree.css",
                      "~/Content/font-awesome.min.css",
                      "~/Content/site.css"));
Add this viewmodel to hold the treeview node data:
public class Node
{
    public string label { get; set; }
    public string id { get; set; }
    public bool load_on_demand { get; set; }

    public Node(string label, string id, bool loadOnDemand = true)
    {
        this.label = label;
        this.id = id;
        this.load_on_demand = loadOnDemand;
    }
}
Then create a controller method in HomeController.cs which will be called on-demand/lazily by the TreeView control in your HTML-view. My action is called /Home/Nodes and takes and optional “node” parameter which holds the id of the treeview-node being “expanded”. This is some simple test-code using the local computer folder structure on the D-drive just to try it out. If it’s a folder I’m passing “true” to the load_on_demand property of the jqTree javascript model:
public ActionResult Nodes(string node)
{
    Debug.WriteLine("id=" + node);
    var list = new List<Node>();
    if (node == null)
    {
        var items = Directory.GetFileSystemEntries("D:/");
        foreach (var item in items)
        {
            list.Add(new Node(Path.GetFileName(item), item, Directory.Exists(item)));
        }
    }
    else
    {
        var items = Directory.GetFileSystemEntries(node);
        foreach (var item in items)
        {
            list.Add(new Node(Path.GetFileName(item), item, Directory.Exists(item)));
        }
    }
    return Json(list, JsonRequestBehavior.AllowGet);
}
In your Razor HTML-view, the base for the TreeView control is a simple <div> tag, with an data-url attribute pointing at the method it should call to get data:
<div id="tree1" data-url="/home/nodes"></div>
and finally some javascript/jquery to initialize the TreeView and add some handling, this code loads the treeview, sets the icons I would like to have (from font-awesome) and adds a click-handler which just writes out the selected node name to the console.
@section scripts {
    <script language="javascript" type="text/javascript">

        $(function () {
             $('#tree1').tree({
                closedIcon: $('<i class="fa fa-plus"></i>'),
                openedIcon: $('<i class="fa fa-minus"></i>'),
                dragAndDrop: false,
                selectable: false
            });

            // bind 'tree.click' event
            $('#tree1').bind(
                'tree.click',
                function (event) {
                    // The clicked node is 'event.node'
                    var node = event.node;
                    console.log('clicked ' + node.name );
                }
            );
        });

    </script>
}
This is all you need to do, and it’s possible (and quite easy too) to modify the look of the tree in the view, have your own icons and such. Ask questions in the “issues” section of the project and I’m sure you’ll get your answers - https://github.com/mbraak/jqTree/issues
Thanks to mbraak for cool stuff, me likes

-
Form Validation Formatting in ASP.NET MVC 5 and Bootstrap 3
When creating a new MVC project in ASP.NET MVC 5, Bootstrap is already included. For some reason proper formatting for form errors (the red colored error message and the red border around the controls) are not working. There are loads of articles and blog posts how to change this and that to enable this, but in ASP.NET MVC 5, the only thing you actually have to do is add a few classes to your Site.css file. Why they aren’t in there from the outset I don’t know.
Site.css
/* styles for validation helpers */
.field-validation-error {
    color: #b94a48;
}

.field-validation-valid {
    display: none;
}

input.input-validation-error {
    border: 1px solid #b94a48;
}


select.input-validation-error {
    border: 1px solid #b94a48;
}

input[type="checkbox"].input-validation-error {
    border: 0 none;
}

.validation-summary-errors {
    color: #b94a48;
}

.validation-summary-valid {
    display: none;
}
Sample form.cshtml
@model WebApplication6.Models.TestModel

@{
    ViewBag.Title = "Home Page";
}
<br /><br />

@using (Html.BeginForm("Index", "Home", FormMethod.Post, new { @class = "form-horizontal", role = "form" }))
{
    <div class="form-group">
        @Html.LabelFor(m => m.Name, new { @class = "col-md-2 control-label" })
        <div class="col-md-10">
            @Html.TextBoxFor(m => m.Name, new { @class = "form-control" })
            <br />
            @Html.ValidationMessageFor(m => m.Name)
        </div>
    </div>
    <div class="form-group">
        @Html.LabelFor(m => m.GenderId, new { @class = "col-md-2 control-label" })
        <div class="col-md-10">
            @Html.DropDownListFor(m => m.GenderId, new SelectList(Model.Genders, Model.GenderId), "", new { @class = "form-control" })
            <br />
            @Html.ValidationMessageFor(m => m.GenderId)
        </div>
    </div>


    <div class="form-group">
        <div class="col-md-offset-2 col-md-10">
            <input type="submit" class="btn btn-default" value="OK" />
        </div>
    </div>
}
Sample TestModel.cs
public class TestModel
{
   [Required(ErrorMessage = "Name is required")]
   [MinLength(3, ErrorMessage = "Name must be at least 3 letter")]
   public string Name { get; set; }
   [Display(Name= "Gender")]
   [Required(ErrorMessage = "Gender is required")]
   public string GenderId { get; set; }

   public string[] Genders = new[] {"Male", "Female"};
} -
Create Tag-Cloud from RSS Feed in ASP.NET MVC
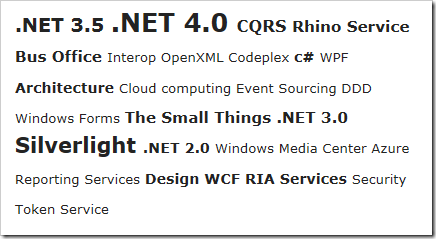
Say you want to generate your own tag-cloud from a list of categories or tags you pull from an RSS-feed or similar. This is one way to do it. I’m using ASP.NET MVC for this sample which creates a simple tag-cloud in a Razor-view with HTML looking something like this:
The controller-code to start out with looks like this, where you read in the RSS-feed into a SyndicationFeed class, then pull out and flatten all the categories you have in that feed. Then group all those categories and count them to build up this simple view-model which is a Dictionary of category and percentage:
public class HomeController : Controller
{
public ActionResult Index()
{
//get feed
var feed = SyndicationFeed.Load(XmlReader.Create("http://blog.irm.se/blogs/MainFeed.aspx"));
//get flat list of all categories/tags in the feed
var categoriesList = feed.Items.SelectMany(item => item.Categories).Select(category => category.Name);
var categoryGroups = categoriesList.GroupBy(category => category);
decimal maxNrOfACategory = categoryGroups.Max(w => w.Count());
//build a dictionary with category/percentage of all categories
var tagCloudDictionary = new Dictionary<string, int>();
foreach (var tag in categoryGroups)
{
var percent = (tag.Count() / maxNrOfACategory) * 100;
tagCloudDictionary.Add(tag.Key, (int)percent);
}
return View(tagCloudDictionary);
}
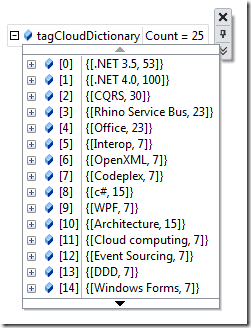
}So now we got this view-model which is a Dictionary<string,int> and contains category/percentage data like this:
So all we need to do is create some kind of cloud in HTML or similar in the view. One way of doing it is this, which creates the output shown at the top:
@model Dictionary<string, int>
@{
ViewBag.Title = "Index";
}
<h2>Tag cloud</h2>
<div style="width: 400px; font-size: 25px;">
@foreach (var tag in Model)
{
<span style="font-size: @(tag.Value / 2 + 50)%; ">
@if (tag.Value > 10)
{
<span style=" font-weight: bold;">@tag.Key </span>
}
else
{
<span>@tag.Key </span>
}
</span>
}
</div>Obviously, to be able to click on a tag and so on you need to create a richer view-model, I just wanted to show how I grab and count the tags from the feed

-
Compile ASP.NET MVC on TFS 2010 Build Server
Note to self: If you need to build ASP.NET MVC 2 applications on a fresh TFS 2010 Build Server without Visual Studio installed, copy the System.Web.Mvc.dll from your dev box to the build server and register it there.
-
Fill a Select/Option from Json with jQuery
 More jQuery and Json…
To fill a listbox (select) with items from a Json call.
I got this helper class to handle the options/items:
public class SelectOption
{
    public String Value { get; set; }
    public String Text { get; set; }
}
A sample action/method in ASP.NET MVC that returns Json:
public JsonResult GetJson()
{
    var list = new List<SelectOption>
                   {
                       new SelectOption { Value = "1", Text = "Aron" },
                       new SelectOption { Value = "2", Text = "Bob" },
                       new SelectOption { Value = "3", Text = "Charlie" },
                       new SelectOption { Value = "4", Text = "David" }
                   };
    return Json(list);
}
Some HTML and jQuery to fill the list at page load:
    <select id="MyList" />

    <script type="text/javascript">

        $(document).ready(function() {
            $.getJSON("/Json/GetJson", null, function(data) {
                $("#MyList").addItems(data);
            });
        });

        $.fn.addItems = function(data) {
            return this.each(function() {
                var list = this;
                $.each(data, function(index, itemData) {
                    var option = new Option(itemData.Text, itemData.Value);
                    list.add(option);
                });
            });
        };

        $("#MyList").change(function() {
            alert('you selected ' + $(this).val());
        });

    </script>
-
Json, jQuery and ASP.NET MVC
 I’m stacking a few things here related to Json, jQuery and ASP.NET MVC so that I can get to them later on.
JQuery to grab some Json when a web page is loaded:
$(document).ready(function() {
    $.getJSON("/MyController/MyJsonAction", null, function(data) {
        //do stuff with data here
    });
});
The smallish code in the ASP.NET MVC controller:
public JsonResult GetJson()
{
return Json(GetList());
}
It’s possible to use anonymous types with Json() as well, which is very useful but may be harder to unit test.
-
Running ASP.NET MVC on Your Windows Home Server
 Right, so I ran the new Web Platform Installer 2.0 Beta on my WHS and it seems (so far) to have worked out quite well. I created a new MVC website with File->New… and published it over to an MVC-directory on WHS (I have set that up earlier, with a file share and everything).
Now, the version of IIS on Windows Home Server is IIS 6 (because WHS runs on Windows 2003 kind of), so ASP.NET MVC won’t work right out of the box. I was hoping that the Web Platform Installer would have taken care of that, but apparently not.
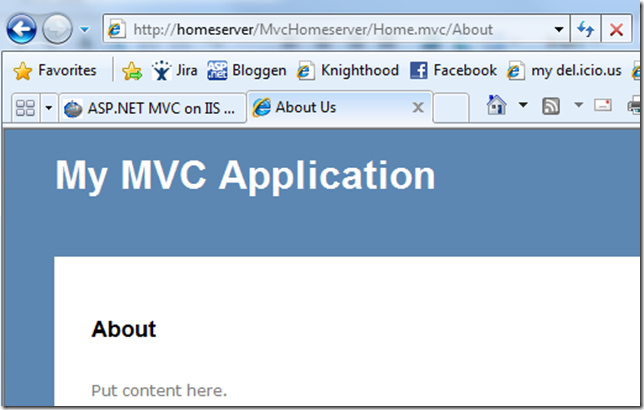
Phil Haack wrote a long, and very detailed blog post about how to set things up on IIS 6, so I’m following that, adding support for the .mvc extension, changing the routes in Global.asax and so on, and voila it works:
Now, I want to set up extension-less URL’s, which is prettier than having to have that .mvc extension in the URL. Phil cover this in his blog post as well, so I’m adding wildcard mappings, and here goes:
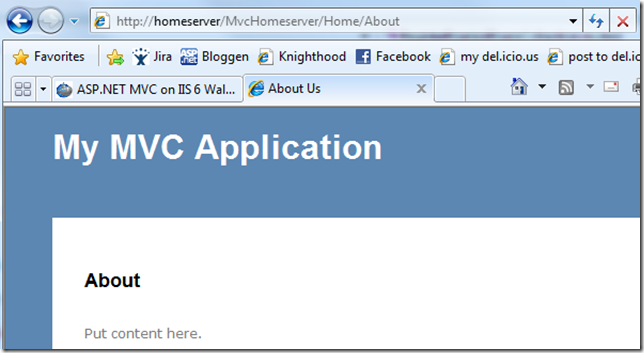
Isn’t that just great? I love my home server, maybe I can host my Writespace Clickonce installer on my own server? Not too worried about the load on the server :)
Watch this space for some sample stuff that will be located on my own server *big grin*
-
Web Platform Installer 2.0 Beta on Windows Home Server
 I’ve been thinking of setting up ASP.NET MVC 1.0 on my WHS and also start learning some Silverlight stuff, so I took a risk, went to the Microsoft Web Platform Installer page and clicked on the Beta 2.0 link. Downloaded the installer, marked ASP.NET MVC and the most necessary options and let it go. Should work, right?
It had to reboot once to get Windows Installer 4.5 in, but it continued to chew on and after a few minutes:
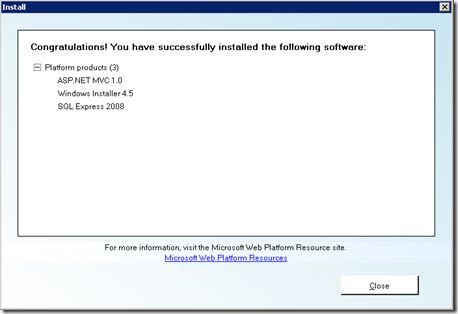
Yay! Now I just have to get an MVC test application on there somehow… brb.
