Mikael Söderström
-
Generate CSS Sprites in ASP.NET
Something that is very common on websites is small images that is used to make links and other things look better. These small images is either added as a background image for the link, or as a separate image. When you load these images, they are requested and downloaded separate. Since the browser only make a small number of requests at once, it can take a while before all images is loaded on the page. To solve this, you can use CSS Sprites.
-
Use Razor for T4 Templates
Razor, the new ASP.NET MVC View Engine from Microsoft, makes it possible to write much cleaner views for our ASP.NET MVC sites. But since the code is so clean, why not use it in other places? Gustavo Machado have written a great blog post where he uses the open APIs to write a console application that can compile Razor views without the need of IIS.
-
Add namespaces with Razor
When you are using ASP.NET with WebFormViewEngine and wants to call a method in a separate namespace, you can add a reference to the namespace in web.config to get a cleaner view.
-
Introducing ASP.NET MVC 3
In march, ASP.NET MVC 2 was released. It contains many new features such as data annotations, areas, validation and other things. These functions makes it easier to create larger projects where we easily can set annotations for the models, and also split the projects into different sections.
There are though some things that we want to change, and we often have to repeat ourselves, like when using ActionFilter for all controls and action methods We could solve this using ASP.NET MVC 2, but that requires extra work from us since there isn´t any kind of built-in support for that.
The solution for these and many other problems exists in ASP.NET MVC 3, which is released as a preview.
So, what are the biggest new features and changes in this firs preview of ASP.NET MVC 3?
- Razor, a new ViewEngine for ASP.NET MVC. Razor also works for ASP.NET Web Pages.
- ASP.NET MVC 3 requires .NET 4.0 and does not suport .NET 3.5 anymore.
- Global ActionFilters, which make it possible to register action filters for all controllers and method in one place.
- Dynamic View and ViewModel properties. In previous versions of ASP.NET we had to useViewData, which is a dictionary with strings and objects. Now we have dynamic properties instead.
- The possibility to choose View Engine when creating a new view.
- Support for injecting code using a built-in Service Locator.
- JsonValueProviderFactory which makes it possible to post Json directly to a page and retrieve it as a custom type.
- Support for new data annotations in .NET 4.0.
- Support for IValidateObject in our models, so we can use custom validation for the values directly from the model.
- New types of ActionResult.
I am going to talk about most of these new features here, and the other things will be published later in separate articles.
Create your first ASP.NET MVC 3 project
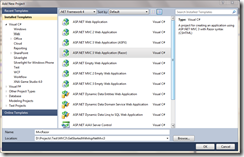
When ASP.NET MVC 3 is installed, we can see some new project types in Visual Studio 2010. When we choose to create a new project, it will look like this:
We can see three new project templates here: ”ASP.NET MVC 3 Web Application (ASPX)”, ”ASP.NET MVC 3 Web Application (Razor)” and ”ASP.NET MVC 3 Empty Web Application”. If we create a project using ASPX, we will get the same views as in earlier versions, which are using WebFormViewEngin, but if we choose to use Razor, we will use this new View Engines instead. In this case I choose to create a Razor project.
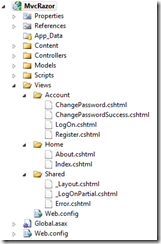
What we have now is an ordinary ASP.NET MVC project with folders for Models, Views and Controllers. There are some changes though, instead of aspx files in the views folder, we have cshtml files:
Cshtml is the file extension for views using the Razor vew engine. We can still use aspx files, but then the WebFormViewEngine will be used instead.
If we open View\Home\Index.cshtml we will see this:
@inherits System.Web.Mvc.WebViewPage
@{View.Title = "Home Page";
LayoutPage = "~/Views/Shared/_Layout.cshtml";
}
<h2>@View.Message</h2>
<p>
To learn more about ASP.NET MVC visit <a href="http://asp.net/mvc" title="ASP.NET MVC Website">http://asp.net/mvc</a>.
</p>
There is no intellisense or syntax highlighting for Razor in Preview 1, so if you want t use it, you will still havet o use aspx files until it´s there.
If we take a look at the code, we can find some interesting things. First, we have @inherits on the first line. We use that to declare which type the view uses. In ASP.NET MVC 2 we had ViewPage or ViewPage<T>, and with Razor we now have WebViewPage or WebViewPage<T>. If we use aspx files with ASP.NET MVC 3, they will still use ViewPage.
After that we have a code block with two lines of code. On the first line we set View.Title, and on the other we set LayoutPage. View is the dynamic type we use instead of ViewData, and LayoutPage is used to set the master page we want to use.
After the code block we display View.Message, wich is a ViewData object.
How come we set one View value, and then display another?
If we take a look at HomeController.cs, we can see this:
using System;using System.Collections.Generic;using System.Linq;using System.Web;using System.Web.Mvc;namespace MvcRazor.Controllers{public class HomeController : Controller
{public ActionResult Index(){ViewModel.Message = "Welcome to ASP.NET MVC!";return View();}
public ActionResult About(){return View();}
}
}
Here is ViewModel.Message set. ViewModel is exactly the same as View, which means we use it instead of ViewData. This is the value we use in the view.
But we also set View.Title without displaying the value in the view. What happens here is that the value is sent to the LayoutPage which looks like this:
@inherits System.Web.Mvc.WebViewPage
<!DOCTYPE html PUBLIC "-//W3C//DTD XHTML 1.0 Strict//EN" "http://www.w3.org/TR/xhtml1/DTD/xhtml1-strict.dtd">
<html xmlns="http://www.w3.org/1999/xhtml">
<head>
<title>@View.Title</title>
<link href="@Url.Content("~/Content/Site.css")" rel="stylesheet" type="text/css" />
</head>
<body>
<div class="page">
<div id="header">
<div id="title">
<h1>My MVC Application</h1>
</div>
<div id="logindisplay">
@Html.Partial("_LogOnPartial")</div>
<div id="menucontainer">
<ul id="menu">
<li>@Html.ActionLink("Home", "Index", "Home")</li>
<li>@Html.ActionLink("About", "About", "Home")</li>
</ul>
</div>
</div>
<div id="main">
@RenderBody()
<div id="footer">
</div>
</div>
</div>
</body>
</html>
Here are we reading the value from View.Title for the header in the page. The value have been sent from the view to the masterpage, just like we could do with a ContentPlaceHolder before.
In the LayoutPage we use standard helpers for ASP.NET MVC, just like we use to do before. There are some new things as well though, like the RenderBody() which is used to specify where the view should be rendered.
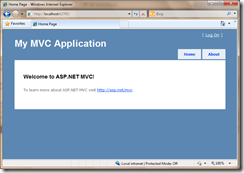
If we click on F5 to start the project, we will get this:
This site looks just like it dit in earlier versions of ASP.NET MVC, and we can now start buidling the page.
Create a guestbook
If we want to get feedback from our visitors, we could have a guestbook on the page. I am going to create a new guestbook from scratch, using ASP.NET MVC 3 with Razor, and store the values in a SQL Server Compact 4 database created with Entity Framework 4 CTP 4.
First we will need to create a model. We give the model the name GuestbookEntry and create it like this:
using System;using System.ComponentModel.DataAnnotations;namespace MvcRazor.Models{public class GuestbookEntry
{public int Id { get; set; }
[StringLength(25)]
[Required]
public string Name { get; set; }
[DataType(DataType.EmailAddress)]
[Required]
public string Email { get; set; }
[Required]
public string Message { get; set; }
public DateTime Posted { get; set; }}
}
To create a database I first create a new folder named Code, where I create a new class file with the name DataContext. I add the following code:
using System.Data.Entity;using MvcRazor.Models;namespace MvcRazor.Code{internal class DataContext : DbContext
{public DbSet<GuestbookEntry> Guestbook { get; set; }}
}
To use the new functions in Entity Framework 4 CTP 4, we need to add a reference to the dll for the CTP. Thanks to the new Code-First functionality, we will be able to use our model directly in our database without the need of writing custom SQL.
To create the database automatically if it´s not existing already, we will have to add this to Application_Start in global.asax:
Database.SetInitializer<DataContext>(new RecreateDatabaseIfModelChanges<DataContext>());The database will now be recreated everytime we change the model.
The last thing we need before using the model is to add a key in web.config with the connection string to the database.
<add name="DataContext" connectionString="Data Source=|DataDirectory|DataContext.sdf" providerName="System.Data.SqlServerCe.4.0" />
Since the database doesn´t exist yet, it will be created the first time we run the application.
How you can use DataContext to work with the database
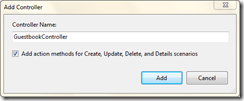
To work with the database we need to create controllers which sends the data between our database and views. I am now going to create a new GuestbookController where I check the box for creating additional action methods:
Since we don´t have all the functionality in our guestbook, I will remove unnecessary methods, and get this:
using System.Web.Mvc;using MvcRazor.Code;using MvcRazor.Models;namespace MvcRazor.Controllers{public class GuestbookController : Controller
{DataContext _ctx = new DataContext();// GET: /Guestbook/public ActionResult Index(){return View();}
// GET: /Guestbook/Createpublic ActionResult Create(){return View();}
// POST: /Guestbook/Create[HttpPost]
public ActionResult Create(GuestbookEntry entry){try{return RedirectToAction("Index");
}
catch{return View();}
}
}
}
Outside of the methods, I create a new instance of DataContext, which will be used by the different methods to work with the data.
In the index method we will have a list with all entries in the guestbook. Since we have a reference to an ObjectContext (in this case it´s DataContext), it will be really easy to accomplish this The index method will look like this:
public ActionResult Index(){return View(_ctx.Guestbook.ToList());}
We also updates the Create method so we can save new entries:
// POST: /Guestbook/Create[HttpPost]
public ActionResult Create(GuestbookEntry entry){try{entry.Posted = DateTime.Now;
_ctx.Guestbook.Add(entry);
_ctx.SaveChanges();
return RedirectToAction("Index");
}
catch{return View();}
}
It´s really easy to work with the data using our DataContext, and now we have everything we need to list and create entries in our guestbook.
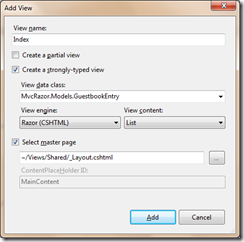
The next step is to create the views, so we start with the index view. It´s a generic view (GuestbookEntry), and it is going to list the entries using the Razor view engine. Right-click inside of the Index method and choose Add View. If you are familiar with ASP.NET MVC 2 or the previous version, you will see some changes here:
The new feature here is the ability to choose which view engine to use, and automatically use the corresponding T4 template to render it. If we click on Add, the view will be generated. There are though some properties we don´t want to show here, such the links and Id, so we delete them. The result is:
@inherits System.Web.Mvc.WebViewPage<IEnumerable<MvcRazor.Models.GuestbookEntry>>
@{View.Title = "Guestbook";
LayoutPage = "~/Views/Shared/_Layout.cshtml";
}
<h2>Index</h2>
<table>
<tr>
<th>
Name
</th>
<th>
Email
</th>
<th>
Message
</th>
<th>
Posted
</th>
</tr>
@foreach (var item in Model) {<tr>
<td>
@item.Name
</td>
<td>
@item.Email
</td>
<td>
@item.Message
</td>
<td>
@String.Format("{0:g}", item.Posted)</td>
</tr>
}
</table>
<p>
@Html.ActionLink("Create New", "Create")</p>
The view looks like the start page, but now we have a model, which we can see on the first line. We also use Razor instead of the old code blocks (<%%>).
We will now create a view for adding entries, so we choose Create instead of List for the new view.
We will remove the Id and Date fields for this new view, so it looks like this:
@inherits System.Web.Mvc.WebViewPage<MvcRazor.Models.GuestbookEntry>
@{View.Title = "Create";
LayoutPage = "~/Views/Shared/_Layout.cshtml";
}
<h2>Create</h2>
@using (Html.BeginForm()) {@Html.ValidationSummary(true)
<fieldset>
<legend>Fields</legend>
<div class="editor-label">
@Html.LabelFor(model => model.Name)</div>
<div class="editor-field">
@Html.TextBoxFor(model => model.Name)@Html.ValidationMessageFor(model => model.Name)</div>
<div class="editor-label">
@Html.LabelFor(model => model.Email)</div>
<div class="editor-field">
@Html.TextBoxFor(model => model.Email)@Html.ValidationMessageFor(model => model.Email)</div>
<div class="editor-label">
@Html.LabelFor(model => model.Message)</div>
<div class="editor-field">
@Html.TextBoxFor(model => model.Message)@Html.ValidationMessageFor(model => model.Message)</div>
<p>
<input type="submit" value="Create" />
</p>
</fieldset>
}
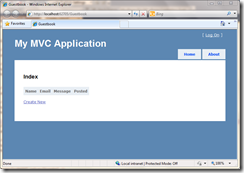
If we press F5, we will see this:
We have now created a very simple guestbook where the visitors can create new entries. The database is auto-generated, so we will not have to think about that.
If we go to the create view and posts the form without the correct values, we can see that we also got validation based on our data annotations for the model.
-
Code-First with Entity Framework 4 and ASP.NET Web Pages
Scott Guthrie and Scott Hanselman have written great blog posts about how to use the new Code-First functionality in the latest Entity Framework CTP. But what about ASP.NET Web Pages?
-
Routes with ASP.NET Web Pages
Det här finns att läsa på svenska här:
-
SQL Server Compact 4 Preview is released
When you install WebMatrix, SQL Server Compact 4 is automatically installed with it. If you only want to download just the database, you can do so here:
-
Change settings for you web site in WebMatrix
When we create new sites in WebMatrix, they are automatically being used by IIS Express for rendering them. To modify how IIS Express is used, we can use the Settings page in WebMatrix.
-
Run code automatically in ASP.NET Web Pages
Artikeln på svenska:
-
Show logs in Web Matrix
A very interesting feature in Web Matrix is the possibility to show logs. When we visit a page through IIS Express, Web Matrix stores the requests which makes it possible to see them afterwards.
