Jeff Widmer's Blog
ASP.NET, ASP.NET MVC, C#, VB.NET, IIS7, Windows Forms, VB6, ASP 3.0
-
Visual Studio Error: The project file ' ' has been renamed or is no longer in the solution.
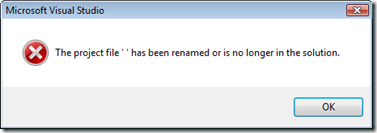
I received the vague error message “The project file ' ' has been renamed or is no longer in the solution” while building a Visual Studio solution. I was unable to build any projects in the solution. Rebuild and Clean were not working and were responding with the same message.
---------------------------
Microsoft Visual Studio
---------------------------
The project file ' ' has been renamed or is no longer in the solution.
---------------------------
OK
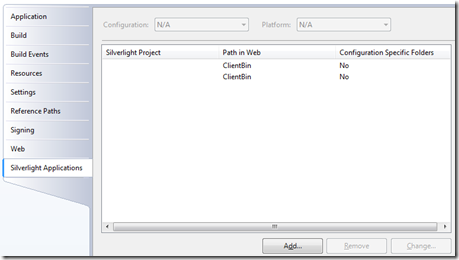
---------------------------After a bunch of searching around and hair pulling, I was able to narrow it down by removing all projects from my solution and slowly adding them back in one at a time and rebuilding between each one. Eventually I tracked it down to the web application project I had in my solution, specifically the Silverlight Applications tab in the Project Properties.
What had happened was I removed a Silverlight project from my solution that was no longer needed but the Web Application project still had a reference to it. Not sure why the name of the project got removed but it certainly made it difficult to understand the error message.
By removing these two project references from the Silverlight Applications tab, the error message went away and I was able to build the solution.
I hope this helps someone else out there.
Technorati Tags: Visual Studio,Silverlight Applications Project Properties Tab -
How to show white space in Visual Studio
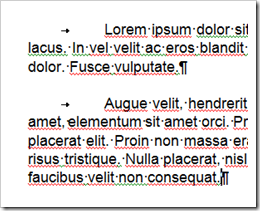
In Microsoft Word I usually have the paragraph symbol turned on to Show Hidden Formatting Symbols (white space) so that I can clearly see spaces, tabs, and other white space characters.
Up until recently I had no idea that Visual Studio had the same option to display white space. Jeff Atwood’s recent blog post Whitespace: The Silent Killer had a screen shot on some code showing white space characters, so I hunted around in the Visual Studio toolbars for a little bit and found the option under the Edit menu.
Edit > Advanced > View White Space
You can also use Ctrl+R, Ctrl+W to toggle it on and off.
Technorati Tags: Visual Studio,Visual Studio Tips and Tricks -
ISO 3166-1 Country Data SQL Script
I am creating a standard sign up form with one of the fields being a country drop down. So I created my Country database table and then needed to fill it with information. I found the ISO list of countries here, but then the issue was how to get that list into my Country database table. Luckily someone has already done that for me: http://vidmar.net/weblog/archive/2008/05/23/database-of-country-names-numeric-alpha-2-and-alpha-3-iso-codes.aspx
But I also like to be able to check a script like that into source control to be able to track changes to it. So I updated the insert script to be a rerunnable insert/update script. The script will check if a country id exists and if it does not exist, then it will insert the country otherwise it will just do an update. The insert sql script from http://vidmar.net/weblog/archive/2008/05/23/database-of-country-names-numeric-alpha-2-and-alpha-3-iso-codes.aspx really got me most of the way there so I need to give a lot of credit to him.
The link below will get you my updated version of the country data update sql script. I also updated it to 2010 from the ISO 3166 code lists plus any changes that they have posted so it is up to date as of May 15, 2010. I will try (but no promises) to keep it updated on a regular basis. Feel free to contact me if you want to try and keep it updated for me and I will post it here.
Click here for the country data update sql script (up-to-date as of May 15, 2010).
You can use this sql to create the Country table:
CREATE TABLE [dbo].[Country]
(
CountryId int NOT NULL,
Iso2 char(2) NOT NULL,
Iso3 char(3) NOT NULL,
Name nvarchar(64) NOT NULL,
DateCreated datetimeoffset(7) NOT NULL CONSTRAINT [df__Country__DateCreated] DEFAULT (sysdatetimeoffset()),
DateModified datetimeoffset(7) NOT NULL CONSTRAINT [df__Country__DateModified] DEFAULT (sysdatetimeoffset())
)ALTER TABLE dbo.Country ADD CONSTRAINT
pk__Country__CountryId PRIMARY KEY CLUSTERED
(
CountryId ASC
) WITH FILLFACTOR = 100 ON [PRIMARY]Technorati Tags: ISO 3166 Country Codes,SQL Scripts -
Generating a random strong password
You can use the ASP.NET Membership provider to generate a new random strong password.
In the past I have usually either rolled my own authentication system or integrated an asp.net authentication system into an existing application and therefore I did not use the ASP.NET Membership system. In the current application I am writing, I had a need to generate a random strong password for the customer.
The ASP.NET Membership system already has a static method built-in for this. You can use the GeneratePassword static method from the Membership class to create a new password:
String strongPassword = System.Web.Security.Membership.GeneratePassword(8, 1);
From the MSDN documentation, the two parameters are:
- length – Int32
- The number of characters in the generated password. The length must be between 1 and 128 characters.
- numberOfNonAlphanumericCharacters – Int32
- The minimum number of punctuation characters in the generated password.
Also from the documentation: the generated password will contain alphanumeric characters and the following punctuation marks: !@#$%^&*()_-+=[{]};:<>|./?.
But also not included in the documentation is that the returned password will not be a “dangerous string”; in other words it won’t look like a block of script.
The Membership.GeneratePassword checks the newly generated password string using an internal method called CrossSiteScriptingValidation.IsDangerousString() and will not return a password that does not pass this test. It will just loop and continue to generate a new one until it is not considered a dangerous string. Pretty cool stuff!
-
Canon Scanner – Unable to open TWAIN source
I have a Canon CanoScan 4400F Scanner and the other day I was unable to get it to work. I use the Canon software CanoScan Toolbox to operate the scanner and when trying to scan I was getting the following error message:
---------------------------
CanoScan Toolbox
---------------------------
Unable to open TWAIN source
Please check connection
Then re-start Toolbox
---------------------------
OK
---------------------------Searching the Internet for this problem turned up several people having the same problem and several solutions which looked like they may or may not work. One of the recommended solutions was to make sure a certain folder path is in your PATH environment variable. As it turned out this was the problem, so here is how to add that path back into your environment variables.
First, determine the correct path to add into the PATH environment variable. Look in C:\Windows\twain_32 and there should one other folder in there. In my case it was named CNQ4803.
This is the path that is needed to be added into the PATH environment variable.
C:\Windows\twain_32\CNQ4803
Now, follow these instructions to get to the dialog to modify the PATH environment variable.
Control Panel > System > and then choose Advanced System Settings in the left hand column.
This will bring up the System Properties dialog (it should already be on the Advanced tab).
At the bottom of this dialog is an Environment Variables button. Clicking this button will bring up the Environment Variables dialog.
In the bottom panel, scroll until you find the variable named Path. Select this one and then hit the Edit… button to bring up the Edit System Variable dialog.
In the Variable value text box, scroll all the way to the right and then add in the path C:\Windows\twain_32\CNQ4803 that was determined earlier. Make sure to separate this value with a preceding semi-colon. And also be careful not to make any other changes to this value.
Now OK your way out of all of the dialogs and CanoScan Toolbox will now work as expected.
Technorati Tags: Canon Scanner CanoScan Toolbox,Environment Variables
-
Machine Setup: Turn-off clicking sound when browsing folders
In the past I usually have had the sound turned off on my computer but recently I have been leaving it on. With the sound on, browsing folders in Explorer or navigating in Internet Explorer would play a clicking sound whenever changing folders or navigating to a new page. That gets annoying very quickly so here is how I shut it off on Windows Server 2008 (and probably Windows Vista too):
Start > Control Panel > Sound
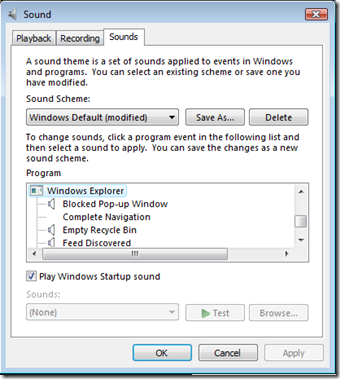
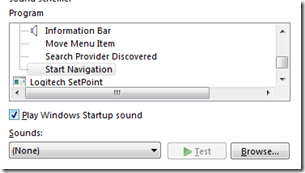
In the Sound Control Panel, select the Sounds tab and then in the Program panel scroll all the way down to the “Windows Explorer” program (it will be near the bottom).
Under the Windows Explorer program is a “Start Navigation” sound:
Select this one (you can use the Test Button to confirm that you have the correct sound) and then change the Sounds dropdown near the bottom to “(None)”.
Hit Apply and OK your way ok of the Sound Control Panel and now no more clicking sound while browsing folders in Explorer or while navigating in Internet Explorer.
This is getting added to my Machine Setup checklist for when I rebuild my development environment.
Technorati Tags: Windows Server 2008 Sounds,Machine Setup -
How to quickly comment or uncomment lines of code in Visual Studio
When I am developing I am always trying to reduce the amount of time that my hands come off of the keyboard and have to move to the mouse. One of the frequent functions that I noticed required me to move my hand off of the keyboard to the mouse is commenting or uncommenting lines of code.
Visual Studio has two buttons in the toolbar to comment or uncomment a line of code (they are part of the Text Editor or HTML Source Editing Toolbars):
You can also achieve the same result by using the key combination Ctrl-K, Ctrl-C to comment out the currently selected lines or Ctrl-K, Ctrl-U to uncomment the currently selected lines.
Ctrl-K, Ctrl-C means to hold down the Control key and then press K and then while still holding down the Control key press C. Ctrl-K, Ctrl-U means to hold down the Control key and then press K and then while still holding down the Control key press U.
I have found this key combination to be difficult at first to remember (in the past I tended to always just instinctively go for my mouse) but now I have remembered to use that key combination regularly and have found it very helpful.
-
How to send email when port 25 is blocked
I run Windows Server 2008 as my development environment and use the local SMTP service to send emails for any website or application that I am developing and that needs to send email. Recently I was working on a Billing Application that needed to send emails and I wanted to send several to myself for testing, but for some reason the emails were not being sent.
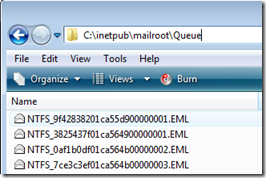
I followed this article from Scott Forsyth about how to debug smtp issues. After connecting using Telnet and manually sending a message, I saw the email message sitting there in my queue (C:\inetpub\mailroot\Queue) and not going out.
Next I checked the event log and found this message (I was sending to a gmail account for testing):
Message delivery to the host 'XXX.XX.XXX.XX' failed while delivering to the remote domain 'gmail.com' for the following reason: The remote server did not respond to a connection attempt.
This indicated that my local smtp server was not able to connect to gmail’s mail server. I use Verizon Residential DSL as my Internet Service Provider (ISP). Some time in 2009, Verizon Residential DSL began blocking port 25. This caused my local development machine SMTP server to not be able to send email.
An easy workaround that I found was to send using my Verizon DSL email account. To do this you need to specify port 587 and also your credentials for your Verizon account:
System.Net.Mail.SmtpClient smtpClient = null;
smtpClient = new System.Net.Mail.SmtpClient("outgoing.verizon.net", 587);
smtpClient.Credentials = new System.Net.NetworkCredential("account@verizon.net", "password");
smtpClient.Send(m);
Verizon lets you create multiple email accounts so it was easy to create a secondary account just for me to send through instead of using my primary account.
Technorati Tags: Verizon Residential DSL,Smtp Client -
Machine Setup: How to enable Line Numbers in Visual Studio and SQL Server Management Studio
I like to have line numbers visible when working in both Visual Studio and SQL Server Management Studio. By default, line numbers are turned off in both environments. One of the first things I do when setting up a new development machine is to open Visual Studio and SQL Server Management Studio, enable line numbers, and then close both of them so that the setting is saved for the future.
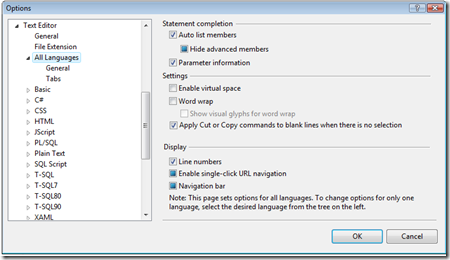
In Microsoft Visual Studio, to enable line numbers open the Options dialog by going to Tools > Options…
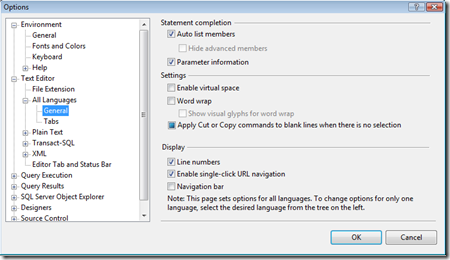
Then expand the Text Editor node and then the All Languages node. Now you will see a Line Number checkbox under the Display section on the right-hand side. Check this box to display line numbers.It is a nearly identical procedure to enable line numbers in Microsoft SQL Server Management Studio:
Tools > Options… > Text Editor > All Languages > Line Numbers checkboxTechnorati Tags: Visual Studio,SQL Server Management Studio -
How to quickly format a C# class file – Ctrl-K, Ctrl-D
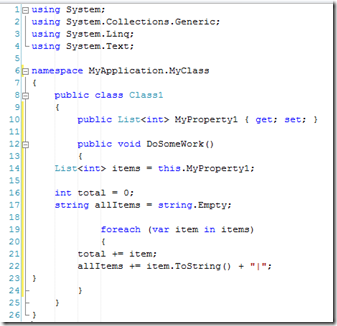
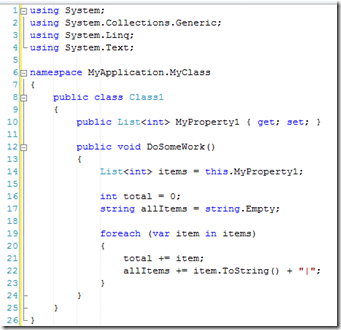
In C# as you are typing in a class file the indenting of your code can easily get out of alignment making the code hard to read. Where does your class, if block, or method begin and end??
You can manually go and fix each line but there is a much simpler way to correct the indenting. You can use Ctrl-K, Ctrl-D to format the entire document. Now your code will be reformatted to the correct indenting for your page.
Couple things to note:
- If there are errors in the structure of your code (missing closing brackets, missing semi-colon, etc.) then this will not work. This will still work with other errors such as undeclared variables.
- If you are working on legacy code (for example fixing a bug) and there is a different indenting structure, it is good practice to stick with the legacy indenting and not modify the indenting of the entire file just because you fixed a bug in one line of code. You should try to minimize your code change to only what was necessary to fix the bug (don’t reformat the entire file). The next person that does a diff on your check-in with the previous check-in will thank you.
- I also leave the Visual Studio indentation settings alone and stick with the defaults. If you have a different indentation style than a code file that was previously checked, this process could also cause the subsequent diff to show lots of red.
- You can use Ctrl-K, Ctrl-F on smaller blocks of text, so if you have a strange indenting style then highlighting only your change can correct the indentation on the selected lines and not the entire file.
- These can be found under the Edit > Advanced Menu:
- Cutting and Pasting is also another way to get the content formatted quickly:
- Ctrl-A, Ctrl-X, Ctrl-V
Technorati Tags: Visual Studio Tip and Tricks
