WCF RIA Services Silverlight Business Application – Using ASP.NET SiteMap for Navigation
Note: This blog post examples is based on the WCF RIA Services PDC Beta and WCF RIA Services VS 2010 Preview, changes to the framework may happen before it hits RTM.
This blog post will be about using the ASP.NET SiteMap together with WCF RIA Services and the Navigation feature added to Silverlight. I assume you are familiar to how the Navigation feature will work when reading this blog post, even if you don’t know you may find this blog post interesting.
The examples in this blog post uses the Silverlight Business Application template shipped with WCF RIA Services.
The Navigation feature in Silverlight uses by default the name of a View to show, so I decided to use the same in the web.sitemap file. The Business Application by default will have two hardcoded hyperlinks at the top of the screen, the Home and About. I decided to reuse the same Views and names. What I did first was to add a Site Map to the web project that hosts the Silverlight app. Here is the web.sitemap:
<?xml version="1.0" encoding="utf-8" ?>
<siteMap xmlns="http://schemas.microsoft.com/AspNet/SiteMap-File-1.0" >
    <siteMapNode url="Root" title="Root"  description="">
      <siteMapNode url="Home" title="Home"  description="">
        <siteMapNode url="Test" title="Test" description=""/>
      </siteMapNode>
        <siteMapNode url="About" title="About"  description="" />
    </siteMapNode>
</siteMap>
I decided to add two additional Views one for the SiteMap root node and a sub View to the Home View. The url attribute of the SiteMapNode is the name of the .xaml located in the View folder of the Silvelright Business Application project. I removed the Home and About Hyperlink from the MainPage.xaml’s LinkStackPanel. I also added a Grid and into it a TreeView control. Here is how the MainPage.xaml will look like now:
<UserControl ...>

  <Grid x:Name="LayoutRoot" Style="{StaticResource LayoutRootGridStyle}">

    <Border x:Name="ContentBorder" Style="{StaticResource ContentBorderStyle}">
            <Grid>
                <Grid.ColumnDefinitions>
                    <ColumnDefinition Width="0.25*"/>
                    <ColumnDefinition Width="*"/>
                </Grid.ColumnDefinitions>

                <controls:TreeView Grid.Column="0" x:Name="navigationTree"/>

                <navigation:Frame
                            Grid.Column="1"
                            x:Name="ContentFrame"
                            Style="{StaticResource ContentFrameStyle}"
                            Source="/Home"
                            Navigated="ContentFrame_Navigated"
                            NavigationFailed="ContentFrame_NavigationFailed">
                    <navigation:Frame.UriMapper>
                        <uriMapper:UriMapper>
                            <uriMapper:UriMapping Uri="" MappedUri="/Views/Home.xaml"/>
                            <uriMapper:UriMapping Uri="/{pageName}" MappedUri="/Views/{pageName}.xaml"/>
                        </uriMapper:UriMapper>
                    </navigation:Frame.UriMapper>
                </navigation:Frame>

            </Grid>
        </Border>

    <Grid Style="{StaticResource NavigationOuterGridStyle}">
      <Grid x:Name="NavigationGrid" Style="{StaticResource NavigationGridStyle}">

        <Border x:Name="BrandingBorder" Style="{StaticResource BrandingBorderStyle}">
          <StackPanel x:Name="BrandingStackPanel" Style="{StaticResource BrandingStackPanelStyle}">

            <ContentControl Style="{StaticResource LogoIcon}"/>
            <TextBlock x:Name="ApplicationNameTextBlock"
                       Style="{StaticResource ApplicationNameStyle}"
          Text="{Binding ApplicationStrings.ApplicationName, Source={StaticResource ResourceWrapper}}"/>
          </StackPanel>
        </Border>

        <Border x:Name="LinksBorder" Style="{StaticResource LinksBorderStyle}">
          <StackPanel x:Name="LinksStackPanel" Style="{StaticResource LinksStackPanelStyle}"/>
        </Border>

      </Grid>

      <Border x:Name="loginContainer" Style="{StaticResource LoginContainerStyle}"></Border>
    </Grid>

  </Grid>

</UserControl>
Note: I added a TreeView only to fill it with the whole SiteMap.

ASP.NET’s SiteMap feature uses SiteMapNode classes, the SiteMapNode class don’t have the KeyAttribute which WCF RIA Services needs, so I created my own SiteMapNode, I named it SiteMapData which holds the basic information of the SIteMap, like the Url, the Name to be displayed and ChildNodes:
public class SiteMapData
{
   private IEnumerable<SiteMapData> _childNodes = null;

   [Key]
   public string View { get; set; }

   public string ParentView { get; set; }

   public string Name { get; set; }

   [Include]
   [Association("SiteMap", "View", "ParentView")]
   public IEnumerable<SiteMapData> ChildNodes
   {
      get { return _childNodes; }
      set { _childNodes = value; }
    }
}
The following is the SiteMapService which has one single Query method returning a list of SiteMapData:
[EnableClientAccess()]
public class SiteMapService : DomainService
{
   public IEnumerable<SiteMapData> GetSiteMap()
   {
      var siteMapDataNodes = new List<SiteMapData>();

       var siteMapDataNode = new SiteMapData()
           { Name = SiteMap.RootNode.Title, View = SiteMap.RootNode.Url, ParentView = "/" };

       siteMapDataNode.ChildNodes = GetNodesRecursive(SiteMap.RootNode);

       siteMapDataNodes.Add(siteMapDataNode);

       return siteMapDataNodes;
   }

   private List<SiteMapData> GetNodesRecursive(SiteMapNode siteMapNode)
   {
      var siteMapNodes = new List<SiteMapData>();

       if (siteMapNode.HasChildNodes)
       {
          foreach (SiteMapNode node in siteMapNode.ChildNodes)
          {
             var siteMapDataNode = new SiteMapData()
                 { Name = node.Title, View = node.Url, ParentView = siteMapNode.Url };

             siteMapDataNode.ChildNodes = GetNodesRecursive(node);

             siteMapNodes.Add(siteMapDataNode);
           }
       }

       return siteMapNodes;
    }
}
I guess you can figure out what the code does, it uses the ASP.Net SiteMap API to get the SiteMap and map it to the SiteMapData entity.
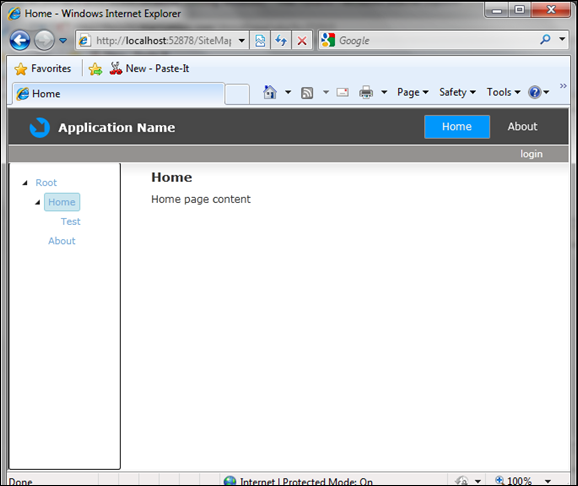
The following code is added to the MainPage.xaml.cs and will get the SiteMap from the SiteMapService and dynamically fill a TreeView and add the navigation hyperlinks to the page.
Note: I didn’t use any templates, just code to show the concept and not a perfect code. You can simply use templates and other controls instead.
public partial class MainPage : UserControl
{
    public MainPage()
    {
         InitializeComponent();
         this.loginContainer.Child = new LoginStatus();

         var siteMapContext = new SiteMapContext();

         siteMapContext.Load<SiteMapData>(siteMapContext.GetSiteMapQuery(), lo =>
                  {
                     if (!lo.HasError)
                     {
                         navigationTree.Items.Add(FillTreeView(lo.Entities).First());

                         foreach ( var link in GetNavigationBarHyperLinks(
                                                  lo.Entities.First().ChildNodes))
                            LinksStackPanel.Children.Add(link);
                     }
                  }, null);
    }

   private IEnumerable<TreeViewItem> FillTreeView(
                                        IEnumerable<SiteMapData> entities)
   {
      var treeViewItems = new List<TreeViewItem>();

      foreach (SiteMapData siteMapData in entities)
      {
         var treeViewItem = new TreeViewItem();

         treeViewItem.Header = CreateTreeViewItemLink(siteMapData);

          if (siteMapData.ChildNodes != null || siteMapData.ChildNodes.Count > 0)
             foreach (var node in FillTreeView(siteMapData.ChildNodes))
                treeViewItem.Items.Add(node);

           treeViewItems.Add(treeViewItem);
      }

      return treeViewItems;
   }

  private IEnumerable<HyperlinkButton> GetNavigationBarHyperLinks(
                                          IEnumerable<SiteMapData> entities)
  {
     var hyperLinks = new List<HyperlinkButton>();

     foreach (SiteMapData siteMapData in entities)
        hyperLinks.Add(CreateNavigationLink(siteMapData));

      return hyperLinks;
  }

  private static HyperlinkButton CreateTreeViewItemLink(SiteMapData siteMapData)
  {
     var hyperlinkButton = new HyperlinkButton();

     hyperlinkButton.NavigateUri = new Uri(siteMapData.View, UriKind.Relative);
     hyperlinkButton.TargetName = "ContentFrame";
     hyperlinkButton.Content = siteMapData.Name;

     return hyperlinkButton;
   }

   private static HyperlinkButton CreateNavigationLink(SiteMapData siteMapData)
   {
      var hyperlinkButton = new HyperlinkButton();

      hyperlinkButton.Style = App.Current.Resources["LinkStyle"] as Style;
      hyperlinkButton.NavigateUri = new Uri(siteMapData.View, UriKind.Relative);
      hyperlinkButton.TargetName = "ContentFrame";
      hyperlinkButton.Content = siteMapData.Name;

      return hyperlinkButton;
   }

  ...
}
I hope you find this blog post interesting.
If you want to know when I publish a new blog post, you can follow me on twitter: http://www.twitter.com/fredrikn