How to Embed a Visual WebGui Form in an ASP.Net application
Today, we are going to learn how easy it is to embed a Visual WebGui (VWG) form in an ASP.Net application. This capability allows you to quickly develop modules or port WinForms application to Web using VWG and then embed them in your currently working ASP.Net application.
For this I'm going to use a calculator application that I have and embed it in an ASP.Net application.
The Calculator application looks like this:
The first thing that we need to do would be to create an ASP.Net application.
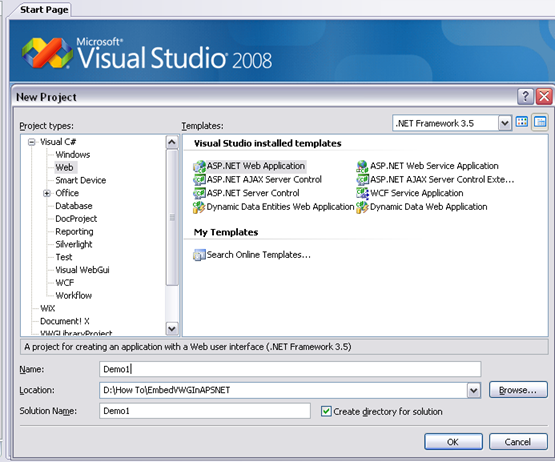
Open Visual Studio and add a new Web application project.
Now we are going to add a reference to VWG assemblies and set the DLL’s to copy local.
Add another reference to the VWG application by right clicking on the project and selecting Add Reference->Browse.
Next let’s open the WebForm and register the Gizmox.WebGUI.Forms assembly and add a FormBox control. This control is an ASP.Net control that inherits from System.Web.UI.Control and serves as an iFrame for VWG forms.
<%@ Register Assembly="Gizmox.WebGUI.Forms" Namespace="Gizmox.WebGUI.Forms.Hosts" TagPrefix="VWG"%>
<VWG:FormBox id="FormBox1" runat="server" Stateless="false" Height="300px"
Width="300px" Form="Form1" >
</VWG:FormBox>
I’ve set the height and width of the control and the form that I want to display which is the Form1 from the VWGCalc.dll.
Next we have to add to the Web.Config file the VWG configuration sections. The First is WebGui section declaration in the <configSections>
<section name="WebGUI" type="Gizmox.WebGUI.Common.Configuration.ConfigHandler, Gizmox.WebGUI.Common, Version=3.0.5701.0, Culture=neutral, PublicKeyToken=263fa4ef694acff6"/>
After the declaration we can add the WebGUI section. This section holds a few configurations that we will not handle at this point.
But let’s just focus on the applications section. the way Visual WebGui works is the same as WinForms we have to set a start up form like the main form. So I've added Form1 as the start up form and the VWG server will use it as an entry point to the application.
<WebGUI>
<Applications>
<Application Code="Form1" Type="VWGCalc.Form1, VWGCalc"/>
</Applications>
<Controls>
</Controls>
<Themes Selected="Default">
</Themes>
<Directories>
<Directory Code="Icons" Path="Resources\Icons"/>
<Directory Code="Images" Path="Resources\Images"/>
<Directory Code="Generated" Path="Resources\Generated"/>
<Directory Code="UserData" Path="Resources\UserData"/>
</Directories>
<StaticResources Mode="Off"/>
<PrivateVersion Value="1"/>
<IconsPreloading Mode="Off"/>
</WebGUI>
In the httpHandler section we will add a handler for VWG that will route requests with the .WGX extensions to the VWG server and will run the VWG application in the user’s session.
<httpHandlers>
<remove verb="*" path="*.asmx"/>
<add verb="*" path="*.asmx" validate="false" type="System.Web.Script.Services.ScriptHandlerFactory, System.Web.Extensions, Version=3.5.0.0, Culture=neutral, PublicKeyToken=31BF3856AD364E35"/>
<add verb="*" path="*_AppService.axd" validate="false" type="System.Web.Script.Services.ScriptHandlerFactory, System.Web.Extensions, Version=3.5.0.0, Culture=neutral, PublicKeyToken=31BF3856AD364E35"/>
<add verb="GET,HEAD" path="ScriptResource.axd" type="System.Web.Handlers.ScriptResourceHandler, System.Web.Extensions, Version=3.5.0.0, Culture=neutral, PublicKeyToken=31BF3856AD364E35" validate="false"/>
<!-- WebGUI ROUTER HANDLER
This http handler routes the requests to Modules/Icons/Images/Css/Xslt/Resoureces.
Client events are sinked through this router as well.
-->
<add verb="*" path="*.wgx" type="Gizmox.WebGUI.Server.Router,Gizmox.WebGUI.Server,Version=3.0.5701.0,Culture=neutral,PublicKeyToken=3de6eb684226c24d"/>
</httpHandlers>
Now we can run our application and see the VWG calculator application in a ASP.Net application. I’ve also added the source of the page.
Next we are going to add some interaction between the VWG application and the ASP.Net site.
Open Default.Aspx page in design mode and add a TextBox and a Button on it like this.
Select the FormBox1 Control and delete the value from the Form property so when the control loads it will show nothing.
Next we are going to create an on button click event by clicking the button. When the button is clicked we will check if we set the FormBox1 “Form” property to a value and if not we will set it and send an argument to the form.
If the Form property has a value we will clear it and read the same argument to textbox.
protected void Button1_Click(object sender, EventArgs e)
{
if (string.IsNullOrEmpty(FormBox1.Form))
{
FormBox1.Form = "Form1";
FormBox1.Arguments["Value"] = TextBox1.Text;
}
else
{
FormBox1.Form = string.Empty;
TextBox1.Text = FormBox1.Results["Value"] as string;
}
}
Now we can run the application. Enter a number in the text box and press the button to open the calculator.
Once the calculation is finished you can send the result back to the textbox and close the calculator by pressing the button.
To summarize:
We have seen how to embed a Visual WebGui (VWG) application in an ASP.Net application and how to communicate between these applications.
You can read the original how to here
-- Eyal Albert @ Eyal.Albert (at) Gizmox.com


