Drag-N-Drop, Right-Click Save As – Silverlight 4
It’s me again. I’ve made this small application where a user can drag-n-drop a few .jpg files on the Silverlight application and they’ll show up on a wrap panel. Then the user can right-click on any of the images and save them as .png on the disk. To make the blog writing more modular, I’ll divide the topic into three segments:
Drag-N-Drop (DND): This is where we’ll be talking about making an app which allows DND feature on UI elements. Just like capturing the mouse left button events, Silverlight now allows capturing mouse right button events as well. Below is the XAML:
1: <Canvas x:Name="LayoutRoot" Background="Black">
2: <ScrollViewer Height="400" VerticalAlignment="Top">
3: <ToolkitRef:WrapPanel Orientation="Horizontal"
4: Width="670"
5: Height="250"
6: AllowDrop="True"
7: Drop="WrapPanelDrop"
8: Name="ImageHolderPanel"
9: Background="Beige"
10: VerticalAlignment="Top">
11: </ToolkitRef:WrapPanel>
12: </ScrollViewer>
13: </Canvas>
I am using the WrapPanel from Silverlight toolkit (Nov 09 version), so that the dropped images align themselves horizontally. The lines 7 and 8 basically say ‘you can drop items on this control and the corresponding event will be handled’. That’s all I have for the XAML, we’ll be in the code-behind for the rest of the article. Let’s start with the WrapPanelDrop event first:
1: private void WrapPanelDrop(object sender, DragEventArgs e)
2: {
3: // get all the files that were dropped on the wrappanel
4: FileInfo[] fileInfos = e.Data.GetData(DataFormats.FileDrop) as FileInfo[];
5: int counter = 0;
6: foreach (FileInfo fileInfo in fileInfos)
7: {
8: // make sure only .jpg's are added on to the wrap panel
9: // this is not a restriction from Silveright
10: // just something I wanted to implement
11: if(IsJpg(fileInfo.Extension))
12: {
13: // convert the file to a System.Windows.Controls.Image type
14: Image newImage = ConvertFileAsImage(fileInfo);
15: // add image to wrap panel
16: ImageHolderPanel.Children.Add(newImage);
17: // keep track of how many files were added onto the wrappanel
18: counter++;
19: }
20: }
21:
22: // resize the WrapPanel's height depending
23: // on how many images were added to it.
24: ImageHolderPanel.Height = Math.Ceiling(counter / 2.0) * 250;
25: }
26:
27: private bool IsJpg(string fileExtension)
28: {
29: if (fileExtension.ToLower() == ".jpg")
30: {
31: return true;
32: }
33: else
34: {
35: return false;
36: }
37: }
38:
39: private Image ConvertFileAsImage(FileInfo fileInfo)
40: {
41: // this is pretty standard code
42: // available in the search sites.
43: using (FileStream fileStream = fileInfo.OpenRead())
44: {
45: BitmapImage bitmap = new BitmapImage();
46: bitmap.SetSource(fileStream);
47: Image image = new Image();
48: image.Source = bitmap;
49: image.Height = 250;
50: image.Stretch = Stretch.Uniform;
51: // wire up the MouseRightButtonDown and MouseRightButtonUp events
52: // needed to handle the right button click events
53: // not needed for DND itself.
54: image.MouseRightButtonDown += new MouseButtonEventHandler(image_MouseRightButtonDown);
55: image.MouseRightButtonUp += new MouseButtonEventHandler(image_MouseRightButtonUp);
56: return image;
57: }
58: }
That takes care of DND. Run the application and drop any number of jpgs on the beige area (the wrappanel) and you should see something like below:
Right-Click-ability: Currently, when you right-click anywhere in the Silverlight app, the default context menu with ‘Silverlight’ option pops up. If OOB is enabled, an second option to install/remove the app is shown. Of course we don’t want any of these. We need two new options to come up when user right-clicks on any of these images – Save Image and Cancel.
For this we’ll use some external code - Dave Relyea’s method of creating a popup dialog (thanks to Tim Heuer, I was able to find and use Dave’s code). I inherit from this class and override some of the key methods. One of them is ‘OnClickOutside’ – i.e., when the user clicks outside the control, you want to close the context menu (just like what happens in a browser). The second important method is the ‘GetContent’ method that returns a Framework element. This is where you define what UI appears when the user right clicks on the image.
The SaveAsMenu class inherits the Dialog class (from Dave’s article) and I pass it an instance of System.Windows.Controls.Image type (this is the image mouse right-click was performed on).
1: private Image _image;
2:
3: public SaveAsMenu(Image image)
4: {
5: _image = image;
6: }
7:
8: protected override void OnClickOutside()
9: {
10: // close this menu when the user clicks outside the control
11: Close();
12: }
13:
14: protected override FrameworkElement GetContent()
15: {
16: // every UI appears in a Grid control
17: // you can return any FrameworkElement
18: Grid grid = new Grid() { Width = 100, Height = 50 };
19: Border border = new Border()
20: {
21: BorderBrush = new SolidColorBrush(Colors.Black),
22: BorderThickness = new Thickness(1),
23: Background = new SolidColorBrush(Colors.LightGray)
24: };
25: grid.Children.Add(border);
26:
27: // Add a TextBlock for 'Save Image'
28: TextBlock saveImage = new TextBlock()
29: {
30: Text = "Save Image",
31: Width = 90
32: };
33: // capture the MouseLeftButtonUp event
34: saveImage.MouseLeftButtonUp += new MouseButtonEventHandler(SaveImageToDisk);
35:
36: TextBlock cancelSave = new TextBlock() { Text = "Cancel", Width = 90 };
37: cancelSave.MouseLeftButtonUp += new MouseButtonEventHandler(CancelSave);
38:
39: ListBox options = new ListBox();
40: options.Items.Add(saveImage);
41: options.Items.Add(cancelSave);
42:
43: grid.Children.Add(options);
44:
45: return grid;
46: }
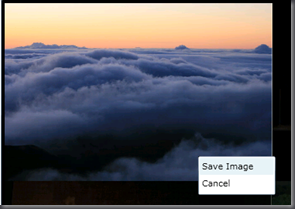
Run the application, drop a few images and right-click on any of them and you should get the context menu:
Save image to disk: Turns out using the PngEncoder is quite popular method of saving an image as a png (a quick search and this is the only one that comes up).
1: void CancelSave(object sender, MouseButtonEventArgs e)
2: {
3: Close();
4: }
5:
6: void SaveImageToDisk(object sender, MouseButtonEventArgs e)
7: {
8: WriteableBitmap writeableBitmap = new WriteableBitmap(_image, null);
9: SaveImageAsPng(writeableBitmap);
10: Close();
11: }
12:
13: private void SaveImageAsPng(WriteableBitmap writeableBitmap)
14: {
15: if (writeableBitmap != null)
16: {
17: SaveFileDialog sfd = new SaveFileDialog();
18: sfd.Filter = "PNG Files (*.png)|*.png|All Files (*.*)|*.*";
19: sfd.DefaultExt = ".png";
20: sfd.FilterIndex = 1;
21:
22: if ((bool)sfd.ShowDialog())
23: {
24: using (Stream fs = sfd.OpenFile())
25: {
26: int height = writeableBitmap.PixelHeight;
27: int width = writeableBitmap.PixelWidth;
28: // Create an EditableImage for encoding
29: EditableImage ei = new EditableImage(width, height);
30:
31: // Transfer pixels from the WriteableBitmap to the EditableImage
32: for (int i = 0; i < height; i++)
33: {
34: for (int j = 0; j < width; j++)
35: {
36: int pixel = writeableBitmap.Pixels[(i * width) + j];
37: ei.SetPixel(j, i,
38: (byte)((pixel >> 16) & 0xFF), // R
39: (byte)((pixel >> 8) & 0xFF), // G
40: (byte)(pixel & 0xFF), // B
41: (byte)((pixel >> 24) & 0xFF) // A
42: );
43: }
44: }
45:
46: // Generate a PNG stream from the EditableImage and convert to byte[]
47: Stream png = ei.GetStream();
48: int len = (int)png.Length;
49: byte[] bytes = new byte[len];
50: png.Read(bytes, 0, len);
51:
52: // Write the PNG to disk
53: fs.Write(bytes, 0, len);
54: }
55: }
56: }
57: }
When the user clicks on ‘Save Image’, a dialog box appears asking the location to save the file. Using the location and the file name (provided by user), the bytes are saved on to the disk.
Done. Your app is up and running. Hey wait a min, something just struck me. This app allows user to drop a jpg and save it as a png. So you can use this app to convert jpg’s to png’s. Wow, that’s just brilliant!!
Download the app here.
PS: If you’re seriously considering using this app for image conversion, you definitely need some help!

