Amazon S3 support in Sitefinity 3.6
Here at Telerik, Sitefinity team is preparing for the 3.6 release next week. 3.6 comes with lot of core level enhancements and cool new features. Of which , I can't but mention one feature that will make most ISV vendors who want the power of CMS but want to let go their pain of managing large content. As, the title suggests its external storage support via Amazon S3. The data plan for hosting and transferring data to/from S3 server is pretty cheap these days in return to world class service with almost zero downtime that it offers which of course makes the most of your money. If you are not familiar with Sitefinity to add it is a product by Telerik that comes with full content management features along with blogs, news, events, list and few other pre-made modules with easy setup and management via unique control designer.
In this post, I will show how to turn on S3 support in Sitefinity 3.6 that comes out of the box.In Sitefinity, files are kept in Library. Every file which can be audio, video, document or anything else is stored as Library entries, which are consumed by modules for example images in blog post. These library entries are dependant on data providers which can be extended from internal to cloud. S3 support is just a plugin to that extensibility.
Now, to configure S3 support let's start with a simple example. I want to create a personal blog and I want all the images and attachments go to Amazon S3 server. To do so , we need to ensure the following
- Turn on the S3 data provider in web.config (that comes with the installation)
- Add your S3 API and secret key to the specific place holder.
- Create your blog module
- Drag and drop your module over a page.
- Publish it
- Use Admin or Live writer to do your post with Images and attachments.
Steps 3- 6 are pretty basic and are beyond the scope of this post. I will deeply encourage you to grab a community version from the project's download page(link provided at the end) and see the step by step documentation that comes right with it.
To start setting up, first we need to navigate to the cmsEngine node. If amazon block is there then un-comment it and remove the default "Libraries" data provider or less add the following data provider.
<add name="Libraries" urlRewriteFormat="~/{LibraryName}/[Name].s3lb"
    thumbnailExtension=".tmb"
    urlDateTimeFormat="yy-MM-dd" urlWhitespaceChar="_" visible="False"
    defaultMetaField="Name" applicationName="/Libraries" allowVersioning="True"
    allowLocalization="False"
    localizationProviderName="" allowWorkflow="False"
    securityProviderName="" versioningProviderName=""
    connectionStringName="GenericContentConnection"
    type="Telerik.Libraries.Data.AmazonProvider, Telerik.Libraries.Data"
    tagEditorTemplate="~/Sitefinity/Admin/ControlTemplates/Libraries/BatchTagsEditor.ascx"/>
Now, inside the data provider you can do plenty of tweaks like, modify the URL format , turn on/off localization, have multiple providers of same type (with different name) and map it from admin, etc. The most important thing for libraries or any other module is the urlRewriteFormat. You can set up any format and the detail (permalink) url will generate accordingly. Here, [Name] = name of the file but you can change it to any meta fields that the module supports or add any constants you want.
The amazon data provider is different in two ways from local one
- It has different content extension(.s3lb).
- Separate data provider dedicated to communicate with S3. Default type = Telerik.Libraries.Data.DefaultProvider
As, we are pretty much done with the first step. Next, we have to put the right API and secret access key that we have purchased from Amazon. All the transfers will be made against the key associated to a user's account. Under the telerik node we have a section called storageSetting which looks like
<storageSetting defaultProvider="Amazon">
      <providers>
        <add name="Amazon"
          type="Telerik.Libraries.AmazonStorage.AmazonStorageProvider, Telerik.Libraries"
          downloadUrlPrefix="http://s3.amazonaws.com"
          accessKey="YOUR ACCESS KEY"
          secretAccessKey="YOUR SECRECT KEY"
          bucketName="Sitefinity" />
      </providers>
</storageSetting>
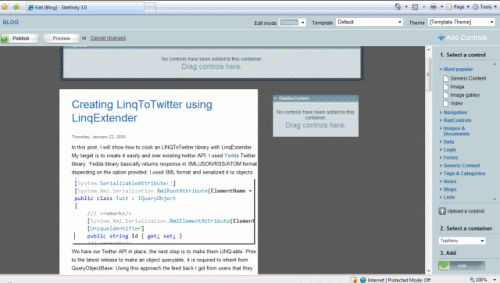
Just Fill in the gaps and you are through. In Sitefinity module is the heart of every content and a page can contain 1..N modules but each module can have its own specific settings like data provider, URL format, etc. As we have finished setting up the data provider and associated configuration to talk with S3 server. we can now play the way we like. We can create gallery with image library or setup a download list for providing documents and pdfs. Even we can setup a video site(which I will cover in later post) easily. But for now , let's create a blog, write a post, add some images and text and publish it.
The above is the snap of edit mode of the blog page along with the post that I have done using Live Writer. Now, to be more sure (we haven't done any wrong) if you monitor using firebug Net tab your list will look like the pasted
Down in the bottom there are two request for images posted by Live Writer which are directly forwarded to S3 server (302->200). Thus, the whole load goes to Amazon and gives you peaceful night sleep.
This is basically shortly all for now, I will cover more things from Sitefinity like creating video site , working with Sitefinity designers to configure your site without touching any of the html code and more that is interesting in my future posts.
Till then, you can get a free copy from http://www.sitefinity.com/product/community-edition.aspx (you need to create an account if you haven't. You can use it for other Telerik products and to log any issues as well.
Hope that helps


