Using IIS Rewriting with MVC Routes to Keep Your Routes Simple
I saw an interesting question this past week on how to set up MVC Routes to work with some ugly legacy URL’s. There was probably several way to get it to work with MVC routes, but I recommended using IIS Rewriting to map those legacy URL’s to clean MVC routes.
Using a combination of URL Rewrites and routing rules has worked really well for me in the past. It makes it a lot easier to follow what the MVC routes were doing since it kept them nice and tight. In other words, it lets me apply the KISS principle to my ASP.NET MVC Routes.
To be clear, routing and rewriting are fundamentally different features. Routing does a lot of things some things that rewriting doesn’t, since it exists to map URL’s to controller actions. For example, routing handles the full round-trip, constructing appropriate URL’s in responses and links.
Before we go any further, I should list some of the disclaimers:
- The IIS URL Rewriting module requires IIS7 (or higher)
- IIS Rewriting requires an installation on the server – you can’t /bin deploy it
- You do add some complexity to your application by running URL’s through two layers of indirection
So, let’s balance that with some features which are unique to rewriting:
- If the IIS URL Rewriting module is installed on your server, you don’t need any special access to configure it. You can manage it completely via web.config, which brings all the associated benefits (no-recompile changes, ability to have different rules between environments, simple tracking in version control, etc.).
- IIS Rewrite rules can also create permanent (HTTP 301) redirects, and that’s turned on or off via config setting as well. There are several ways to handle that in ASP.NET without the IIS Rewrite module (I’ll talk about that later), but they’re not quite as simple as flipping a config setting.
- The IIS Rewrite module has a graphical tool to help build and test rules.
- Rewrite rules are transparent to your application. As far as ASP.NET knows, the request it gets came from the rewritten URL.
That last point is key in deciding if you want to use rewriting or routing for a specific URL: Do you want your application to know about the original URL? If it’s a URL that you’re supporting due to legacy or integration support, but it doesn’t really map cleanly to a controller action, I’d consider using URL Rewriting.
Ruslan wrote a great article on using IIS URL Rewriting with ASP.NET Routing over on the IIS.NET site, and he summarized the decision process as follows:
- If you are developing a new ASP.NET Web application that uses either ASP.NET MVC or ASP.NET Dynamic Data technologies, use ASP.NET routing. Your application will benefit from native support for clean URLs, including generation of clean URLs for the links in your Web pages. Note that ASP.NET routing does not support standard Web Forms applications yet, although there are plans to support it in the future.
- If you already have a legacy ASP.NET Web application and do not want to change it, use the URL-rewrite module. The URL-rewrite module allows you to translate search-engine-friendly URLs into a format that your application currently uses. Also, it allows you to create redirect rules that can be used to redirect search-engine crawlers to clean URLs.
Creating a legacy rewrite rule
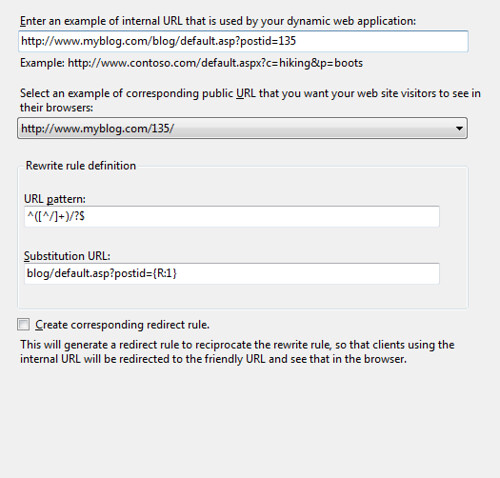
You can write the rules by hand, as they’re documented configuration settings, but it’s easier to get started by using the Rewrite module’s GUI tool. Here’s how it looks:
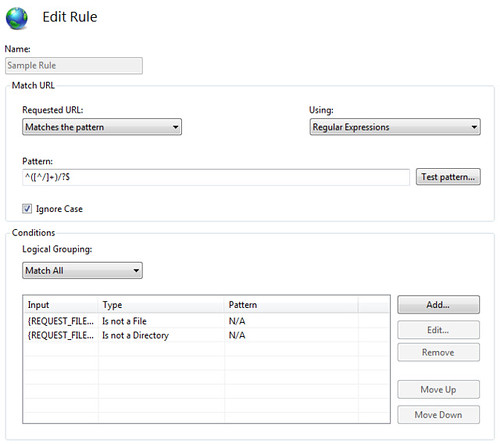
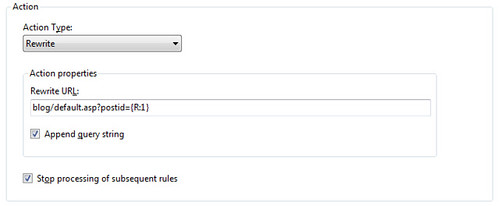
The dropdown list of rewrite rule suggestions updates as you change the example URL in the top textbox, so the suggestions are generally pretty useful. Once you’re created a rule, you can bring it up in the editor to work with both the Match rule and the Actions.
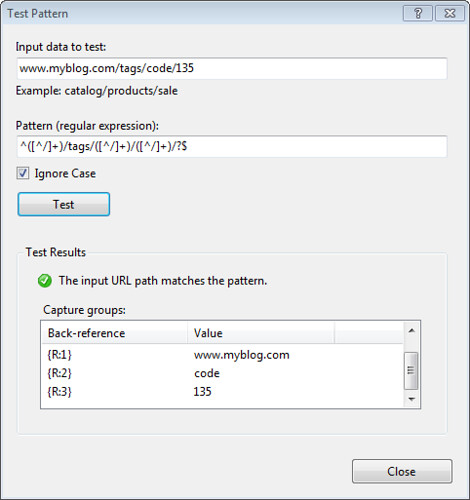
One feature you may have missed is the Match URL pattern tester. There are lots of RegEx testers out there, but it’s nice to work with one that’s directly integrated into the product so you can test how it will actually be used.
When you’ve created your rule, it’s saved into your site’s web.config:
<?xml version="1.0" encoding="UTF-8"?>
<configuration>
    <system.webServer>
        <rewrite>
            <rules>
                <rule name="RewriteUserFriendlyURL1" stopProcessing="true">
                    <match url="^([^/]+)/tags/([^/]+)/([^/]+)/?$" />
                    <conditions>
                        <add input="{REQUEST_FILENAME}" matchType="IsFile" negate="true" />
                        <add input="{REQUEST_FILENAME}" matchType="IsDirectory" negate="true" />
                    </conditions>
                    <action type="Rewrite" url="blog/default.asp?{R:1}={R:2}" />
                </rule>
            </rules>
        </rewrite>
    </system.webServer>
</configuration>
That’s just scratching the surface of how to use the Rewrite module; you can read more on the IIS.net site.
What if you can’t use the IIS Rewrite Module?
If the IIS Rewrite module isn’t installed on your webserver, you’ve got three options:
- Use another rewrite engine that can be /bin deployed, such as the urlrewriter.net.
- Just handle things in Routes. This isn’t ideal, but if you’ve only got a few legacy URL’s to handle, it may be worth the tradeoff to keep you application simple.
- Write some custom code to do permanent 301 redirects to your new routes.
There are a lot of good articles out there on the custom redirect approach. Matt Hawley wrote a Legacy Route system which uses a custom route and handler to issue 301 redirects, and Phil Haack tried to one-up him by using lambdas in his redirect handler.
If you are writing your own custom code and are using ASP.NET 4, remember that you can now use Response.RedirectPermanent to handle redirects and automatically send the 301 header.


