Subtext 2: OpenID Login Support
The recent Subtext 2 release includes a feature I worked on: OpenID login support. Let’s take a quick look at how you use it, then we’ll talk about the how the code works and why it’s a useful feature.
What’s OpenID?
I’m a big fan of digital identity, and could ramble on about OpenID for a while. But if I did that, this blog post would be published sometime after Windows 7 ships. Fortunately I pushed OpenID on some people who are a bit more prolific than I’ve been of late, so I’ll refer you to this post by Jeff Atwood (CodingHorror) and this webcast by Rob Conery. Scott Hanselman wrote a great overview of OpenID, as well.
The elevator pitch: Rather than being issued an account at every single website you login to, you issue them one. You establish an OpenID URL, which only you can login to, and then you give it as your account information to sites which support OpenID authentication. You’re in control of your account, you’ve got a central place to manage your password, etc.
OpenID is a generic account that you can reuse on other websites.
Too Hard! Couldn’t I Just Fax Someone My Birth Certificate?
If you haven’t used OpenID, this is going to look complex. That’s because I’m showing you the hard case – it’s like learning to play Stairway To Heaven when you don’t have a guitar or amp. The first time through, we’re going to have to run down to the pawn shop to get you a Fender knockoff and a thrasher amp, but the next time you’re ready to rock you’ll be all set. So hang with me while we get setup, and at the end I’ll show you how it will work when you log in to your site tomorrow.
Step 1: Get an OpenID
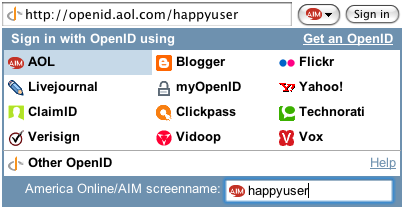
There’s a good chance you’ve already got an OpenID, since many popular services like Flickr, Yahoo, and Blogger are OpenID providers, meaning that you can user your account with those services as an OpenID identity:
If you don’t have an account with any of those services (or these on the OpenID public providers list), I recommend signing up with MyOpenID.com – they’ve got great support, and rich security features if you want to use them, such as InfoCard integration and phone verification.
Step 2: Tell Subtext What OpenID URL You’ll Be Using
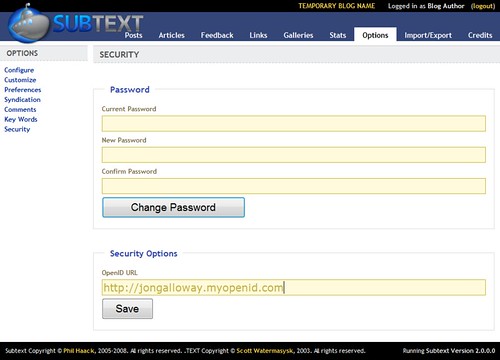
The Security / Options tab has a new location where you can enter an OpenID URL. It’s important that you get this right – we’ll try to clean this up for you, but I recommend you type this as exactly as possible. In my case, my OpenID URL is http://jongalloway.myopenid.com/, not jongalloway.myopenid.com. Even the trailing slash is important.
Note that to in order to make this setting, I’ve logged in to Subtext using my standard Subtext username and password. That login doesn’t go away when I setup OpenID authentication, I’ve just enabled an additional security feature – I’ve got two ways to login to my blog now.
Step 3: Login Using OpenID
Now that Subtext knows my OpenID URL, I can use it to login to the site. The login dialog includes an OpenID sign-in prompt at the bottom, so I enter my OpenID URL in the prompt and click Login.
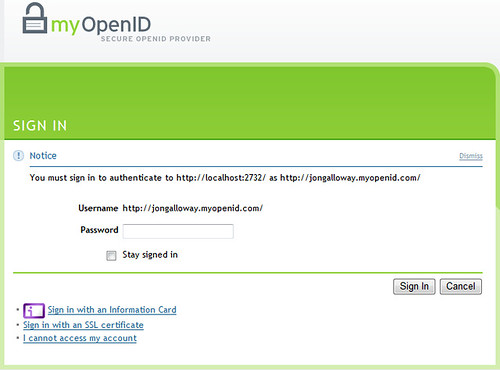
Now here’s the part you may not be expecting if you haven’t used OpenID – I need to login at my OpenID provider. That’s not such a big deal, though, because myOpenID (and many other providers) have a “Stay Signed In” option option, which is appropriate if you’re logging in from a computer which is in a secure location (your home, a work computer you keep locked, etc.). The Versisign Seatbelt Firefox Extension is a pretty handy way to sign in to your OpenID identity once for a browser session, too.
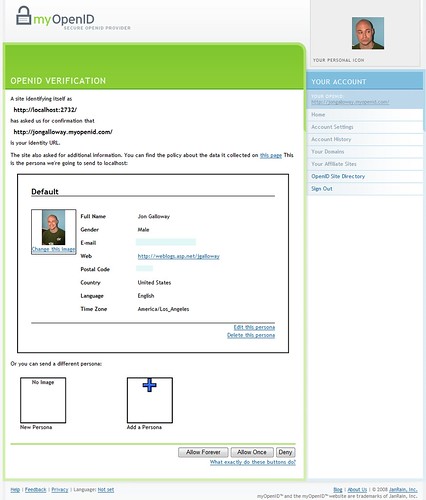
Now, the first time I log in to myOpenID from my Subtext blog, myOpenID is going to ask me if that’s cool. Again, a little unexpected if you haven’t used OpenID before, but this is a one time thing. We’re telling myOpenID that my Subtext blog is going
So, I type in my password and click the Sign Button, and my OpenID provider redirects me back to my Subtext instance (with an “authenticated” message), and Subtext logs me in:
Fine. Now Show Me Easy.
Thanks for hanging in there. Here’s how it looks tomorrow, providing you’ve checked that “Stay Signed In” checkbox. First, we browse to the login screen, enter our OpenID URL, and click Login:
Now, we’re automatically logged in and brought to our admin screen:
If you hadn’t checked that Stay Signed On checkbox, you’d get one screen in the middle – the login page for your OpenID provider’s page.
How’s It Work?
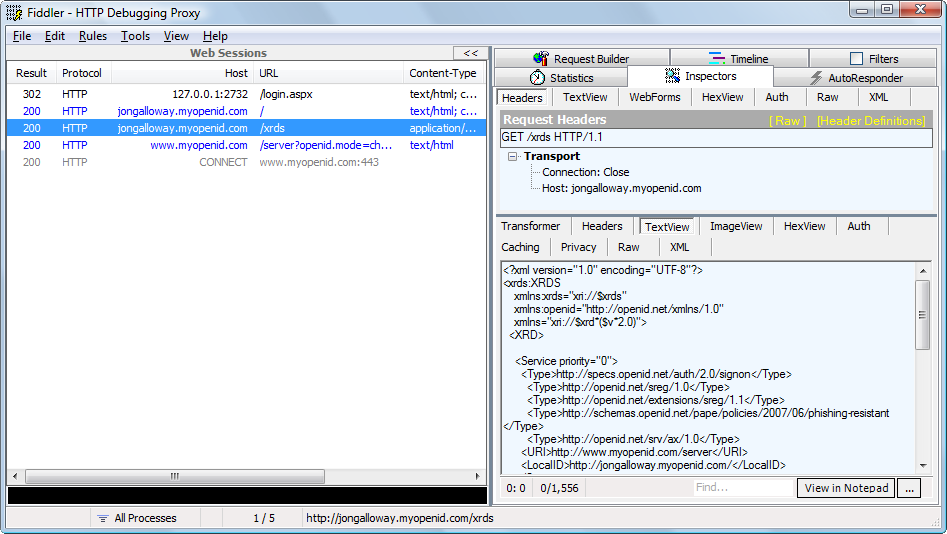
That’s the subject of another post, but let me show you one quick screenshot which shows the HTTP traffic during that last login.
That shows the general sequence of events:
- I requested the Login page (it’s running on my local machine – 127.0.0.1)
- The DotNetOpenID login control makes a request to the URL I provided, saying “Yo. My URL is 127.0.0.1:2732, can you authenticate the user and verify that I’m on their list of sites?”
- There’s a little negotiation between the two sites, after which myOpenID returns an “Okay” message via SSL.
Show Us Your Code
Sure. For this release, I just used the DotNetOpenID.OpenIdLogin control, which is as simple as dropping the control on the page and handling the LoggedIn event. Scott Hanselman wrote about this before when he set up OpenID on DasBlog. In the case of Subtext, here’s the code I added for that LoggedIn event:
protected void btnOpenIdLogin_LoggedIn(object sender, OpenIdEventArgs e)
 {
   e.Cancel = true; //required to prevent logging everyone in
   if (e.Response.Status == AuthenticationStatus.Authenticated &&
       SecurityHelper.Authenticate(e.ClaimedIdentifier, chkRememberMe.Checked))
    {
         ReturnToUrl(Config.CurrentBlog.AdminHomeVirtualUrl);
    }
}
You can see it in context in the Subtext SVN browser. Now that I’ve worked with it, I’d like to ditch the OpenIdLogin control for a future release. It works just fine, but it generates HTML that I’m not very happy with (table based markup, not CSS friendly). In the future, I’d probably write my own control and just use the libraries which are included in DotNetOpenID – they’ve been great.
OpenID Passthrough
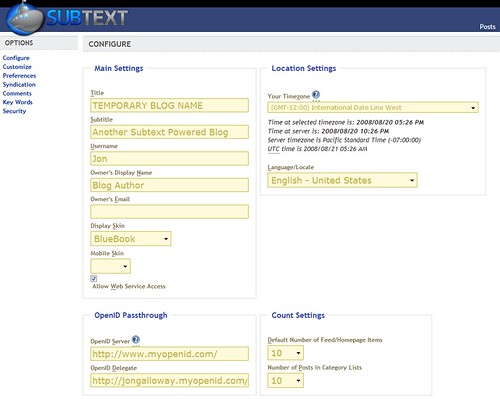
There’s another new OpenID feature in Subtext 2.0 – OpenID Passthrough. The idea there is that you can use your blog URL as your OpenID URL, and it just redirects over to your “real” OpenID provider. Let’s assume that my blog was deployed to http://jongalloway.com; in that case I could make the following OpenID Passthrough settings on the Subtext / Configure screen, after which I could use http://jongalloway.com as my OpenID URL.
