Jeff Widmer's Blog
ASP.NET, ASP.NET MVC, C#, VB.NET, IIS7, Windows Forms, VB6, ASP 3.0
-
Use Ctrl+. (period) to trigger Visual Studio’s automatic add using statement context menu
When you type class names that are missing the correct namespace reference, Visual Studio will help you out by giving you a context menu that you can use to automatically add the correct using statement to the top of your class.
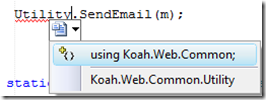
For instance, in the example below, the Utility class exists in a different namespace that is not currently referenced in the class. Visual Studio gives you the red squiggly to show there is an error but there also is a small little line at the end of the class name:
You can take your mouse and hover just over that line and you will get a little drop-down context menu:
Which is a very nice feature where Visual Studio will automatically add the using statement to the top of your file (or insert the full reference):
The feature to add the using statement to your class is great in itself but getting your mouse into just the right spot to click that little line is pretty tricky (and also can break your development train of thought).
As the tool tip says, you can hit Shift+Alt+F10 to get the context menu but Ctrl+. (period) will also pop up that menu and it is a much easier key combination to use.
-
All of Kramer’s entrances on Seinfeld
Every single Kramer entrance:
Thanks to the blog The Big Picture by Barry Ritholtz for pointing me there.
-
Timestamp string with milliseconds from a System.DateTime
You can easily convert a System.DateTime object into a string based on the current date and time by using the ToString() method of the DateTime object. For instance:
DateTime d = DateTime.Now;
String s = d.ToString("yyyyMMdd-HHmmss");Will produce a string with the value of “20091018-232013” assuming the date/time was 10/18/2009 11:20:13PM at the time the code was executed.
But did you know you can get the milliseconds of that System.DateTime object by using the “fff” format string:
DateTime d = DateTime.Now;
String s = d.ToString("yyyyMMdd-HHmmss.fff");Will produce a string with the value of “20091018-232013.456” assuming the date/time was 10/18/2009 11:20:13.456PM at the time the code was executed.
I use this all the time when I need to append a timestamp to a log, a log filename, or just anything else that needs a quick way to turn a System.DateTime object into a string with milliseconds too.
Technorati Tags: System.DateTime.ToString() -
Parse a non-standard date string into a System.DateTime object
The other day I had a date that was in the form of yyyyMMdd and I needed to parse that string into a System.DateTime object. Just trying to parse the string into a System.DateTime object would not work:
String dateString = "20091016";
DateTime d = DateTime.Parse(dateString);The above code results in an exception:
FormatException: String was not recognized as a valid DateTime.
I was guaranteed to have the date string in the form of yyyyMMdd so my initial thought was to use Substring to break it into the individual year, month, and day parts and create a new System.DateTime object from those pieces.
But then I discovered that you can use the DateTime.ParseExact method and a System.Globalization.DateTimeFormatInfo object to specify the pattern for the date that is being parsed.
Here is how I was able to parse a non-standard date string into a System.DateTime.
System.Globalization.DateTimeFormatInfo di;
di = new System.Globalization.DateTimeFormatInfo();
di.FullDateTimePattern = "yyyyMMdd";String dateString = "20091016";
DateTime d = DateTime.ParseExact(dateString, "F", di);By the way, this is also a great way to parse a credit card expiration date that is in the form of MMyy to a System.DateTime. Just use a pattern of MMyy for the FullDateTimePattern property.
Technorati Tags: System.DateTime.ParseExact,C# -
osql.exe and unicode files – how to save your sql scripts with encoding
osql.exe is a great application for running sql scripts in a batch. I use a batch file to execute multiple sql scripts that I use to rebuild my current application database from scratch. When developing a brand new application, deploying a database in this way makes it really easy to recreate the database just like it will be created on Day 1 when you build out the Production environment. This requires scripting out all of your sql objects and then also having a way to execute all of those sql scripts easily. That is where osql.exe comes in handy.
But osql.exe does have one issue that I ran into this week where it does not like UTF-8 (codepage 65001) or UTF-7 (codepage 65000) encoded files. And sometimes you need to include unicode characters in your sql scripts. At first I thought osql just did not support unicode but that is not the case… it just does not like the UTF-8 or UTF-7 encoding.
Trying to run a UTF-8 (codepage 65001) or UTF-7 (codepage 65000) encoded file with osql.exe will give you errors such as:
Incorrect syntax near '+'.
Incorrect syntax near ' '.
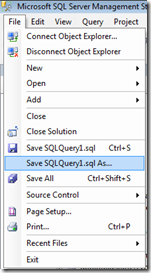
Incorrect syntax near 'ï'.Saving the same file with Unicode Encoding (codepage 1200) will work just fine. Here is how to save sql scripts in Microsoft SQL Server Management Studio with a particular encoding (you can also use this method to see what type of encoding the file is saved in in the first place). One other thing to note is that Visual Studio has this same type of Save As… functionality.
From the Microsoft SQL Server Management Studio (or Visual Studio) File menu choose Save [FILENAME] As…
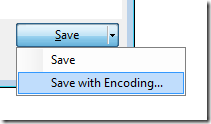
Then when the Save File As dialog appears you will see a little black arrow (inverted triangle) as part of the Save button.
Clicking the just the inverted triangle portion of the button will give you a menu.
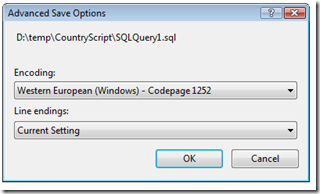
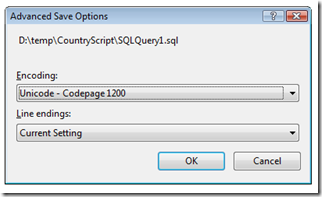
Choosing the Save with Encoding… option will then present you with an Advanced Save Options dialog.
Here is where you can specify the encoding to use for the file. For osql.exe make sure you specify either Western European (Windows) – Codepage 1252 or Unicode – Codepage 1200. Do not select UTF-8 (codepage 65001) or UTF-7 (codepage 65000) or osql.exe will give errors when trying to parse the file.
-
Asynchronously sending a System.Net.Mail.MailMessage in C#
When sending an email in your ASP.NET application there are times when you do not want the user experience to slow just to wait for an email to be sent. The code sample below is how to send a System.Net.Mail.MailMessage asynchronously so that the current thread can continue while a secondary thread sends the email.
public static void SendEmail(System.Net.Mail.MailMessage m)
{
SendEmail(m, true);
}public static void SendEmail(System.Net.Mail.MailMessage m, Boolean Async)
{System.Net.Mail.SmtpClient smtpClient = null;
smtpClient = new System.Net.Mail.SmtpClient("localhost");
if (Async)
{
SendEmailDelegate sd = new SendEmailDelegate(smtpClient.Send);
AsyncCallback cb = new AsyncCallback(SendEmailResponse);
sd.BeginInvoke(m, cb, sd);
}
else
{
smtpClient.Send(m);
}
}private delegate void SendEmailDelegate(System.Net.Mail.MailMessage m);
private static void SendEmailResponse(IAsyncResult ar)
{
SendEmailDelegate sd = (SendEmailDelegate)(ar.AsyncState);sd.EndInvoke(ar);
}To use this just call the SendEmail() method with System.Net.Mail.MailMessage object.
-
How to disable an ASP.NET button when clicked
Scenario: user clicks a button in your ASP.NET page and you want to disable it immediately using javascript so that the user cannot accidentally click it again.
Originally I thought this was going to be simple by using the onclientclick property of the ASP.NET button server control but although that worked to disable the button, it did not continue with the form postback. Eventually after quite a bit of Googling and some more failed attempts I figured out this solution:
MyButton.Attributes.Add("onclick", "this.disabled=true;" + Page.ClientScript.GetPostBackEventReference(MyButton, "").ToString());
Adding the javascript to disable the button to the onclick event by appending to the Attributes collection of the ASP.NET button control but then also calling the Post Back Event Reference for the button right after disabling the button. That is why my original try at adding the javascript failed, adding the this.disabled=true to the onclientclick event then overwrote the call to the post back event.
With the code above now the button onclick event will look something like this:
onclick="this.disabled=true;__doPostBack('MyContrl$MyButton','');"
The button is disabled AND then the button post back method is called.
-
How to programmatically connect to QuickBooks Online Edition (QBOE)
Here are all the steps to connect to QuickBooks Online Edition (QBOE) and retrieve some data. Special thanks to Keith Palmer for his comments, answers, and his Consolibyte Solutions Website which really helped me get this working. Originally posted on StackOverflow: Connecting an ASP.NET application to QuickBooks Online Edition.
- Register your application at http://appreg.quickbooks.com. This will give you your App ID and Application Name. Use these settings:
- Target Application: QBOE
- Environment: Production
- Application Type: Desktop
- (using Desktop made things much easier as far as not needing certificates)
- A verification key will be sent to your email address which you need to enter on page 2 of this wizard.
- Set up your QBOE Connection. Once you finish registering your application in Step 1, you will then have an Application ID. Use this ID in the url below to set up your QBOE Connection:
- https://login.quickbooks.com/j/qbn/sdkapp/confirm?serviceid=2004&appid=APP_ID
- NOTE: Make sure to replace APP_ID in the above url with the Application ID that was created when you registered your application.
- The wizard will take you through the following steps:
- Specifying a name for your connection.
- Granting Access Rights - I gave All Accounting rights since this was easiest.
- Specify Login Security - I turned Login Security Off. This is important since it makes submitting the xml to the QBOE much easier since you do not need to get a session ticket for each user.
- You will then be given a Connection Key.
- At this point you now have the 3 important pieces of information in order to gain access to your QuickBooks Online Edition (QBOE) account.
- Application Name
- Application ID
- Connection Key
- Post the XML to QBOE with the 3 pieces of access information and the actual request into your QBOE database. Here is sample c# code that will post to the QBOE gateway. This will return all customers in your QuickBooks database. Make sure to update the xml below with your Application Name, Application ID, and Connection Key.
string requestUrl = null;
requestUrl = "https://apps.quickbooks.com/j/AppGateway";HttpWebRequest WebRequestObject = null;
StreamReader sr = null;
HttpWebResponse WebResponseObject = null;
StreamWriter swr = null;try
{
WebRequestObject = (HttpWebRequest)WebRequest.Create(requestUrl);
WebRequestObject.Method = "POST";
WebRequestObject.ContentType = "application/x-qbxml";
WebRequestObject.AllowAutoRedirect = false;
string post = @"<?xml version=""1.0"" encoding=""utf-8"" ?>
<?qbxml version=""6.0""?>
<QBXML>
<SignonMsgsRq>
<SignonDesktopRq>
<ClientDateTime>%%CLIENT_DATE_TIME%%</ClientDateTime>
<ApplicationLogin>APPLICATION_LOGIN</ApplicationLogin>
<ConnectionTicket>CONNECTION_TICKET</ConnectionTicket>
<Language>English</Language>
<AppID>APP_ID</AppID>
<AppVer>1</AppVer>
</SignonDesktopRq>
</SignonMsgsRq>
<QBXMLMsgsRq onError=""continueOnError"">
<CustomerQueryRq requestID=""2"" />
</QBXMLMsgsRq>
</QBXML>";post = post.Replace("%%CLIENT_DATE_TIME%%", DateTime.Now.ToString("yyyy-MM-ddTHH:mm:ss"));
XmlDocument xmlDoc = new XmlDocument();
xmlDoc.LoadXml(post);
post = xmlDoc.InnerXml;
WebRequestObject.ContentLength = post.Length;
swr = new StreamWriter(WebRequestObject.GetRequestStream());
swr.Write(post);
swr.Close();
WebResponseObject = (HttpWebResponse)WebRequestObject.GetResponse();
sr = new StreamReader(WebResponseObject.GetResponseStream());
string Results = sr.ReadToEnd();
}
finally
{
try
{
sr.Close();
}
catch
{
}try
{
WebResponseObject.Close();
WebRequestObject.Abort();
}
catch
{
}
}- Couple things to note:
- The qbxml version needs to be 6.0 (even though the IDN Unified On-Screen Reference shows 7.0).
- The onError="continueOnError" attribute is required.
- Setting the WebRequestObject.ContentLength property is required.
- Content Type needs to be "application/x-qbxml".
- And finally I received many "The remote server returned an error: (400) Bad Request." exceptions which were not helpful at all but in the end I was able to trace them to something wrong with the xml. So if you get this exception look to your xml as the source of the problem.
Technorati Tags: QuickBooks Online Edition (QBOE) -
Version number of current application
The other day I was writing an application that posted Journal Entries to QuickBooks and I wanted to include a memo line in the Journal Entry that not only included a timestamp but also included the version number of the application that posted the Journal Entry.
To my surprise it was not very simple to do but after several failed attempts and some Googling I figured it out:
Assembly.GetExecutingAssembly().GetName().Version.ToString()
This is in the System.Reflection namespace.
Technorati Tags: Assembly Version Number -
Posting a deposit to QuickBooks Online Edition (QBOE)
When doing QuickBooks Online Edition (QBOE) development requests, you can do many tasks through the QuickBooks Online website that you cannot do through the QuickBooks SDK. Recently I ran into another one when trying to automatically insert a Deposit into a QBOE database. The DepositAddRq method is only supported in the standard QuickBooks US edition. This is the Intuit Developer Network Unified Onscreen Reference for the DepositAdd method:
Notice the US Flag icon in the implementation column. When working with QBOE you want to see the
 (online) icon.
This is the IDN Onscreen Reference for the JournalEntryAdd method:
Notice both the US and Online editions are both supported. And this is how we worked around not having the DepositAdd method available for our QBOE database. We just made a Journal Entry instead.
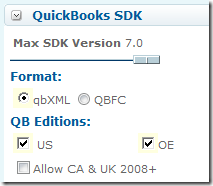
Just so you know you can also filter the IDN Onscreen Reference by the QuickBooks Edition. If you uncheck the “US” checkbox then only the methods that are available to QBOE are shown. This is nice way to filter the onscreen reference.
Technorati Tags: QuickBooks,QuickBooks Online Edition (QBOE)


