ASP.NET MVC: Validating objects using Enterprise Library validation application block
Data validation is important topic in applications. There are many validation frameworks available and there should be one that you are happy with. I am currently playing with Enterprise Library 4.1 Validation Application Block and I am integrating it to my ASP.NET MVC application. In this posting I will show you how to use validation block in your ASP.NET MVC application.
Note. This posting gives you first ideas about validation and shows you how to get things done quick and dirty. For production-ready validation there more steps to follow and I will introduce these steps in my future postings. Stay tuned!
Introduction
Shortly, you can create ASP.NET MVC views that craete and initialize objects for you. I assume you know this feature and you know how it works at basic level.
Here is how my application is layered.

Currently all external stuff is referenced by infrastructure layer. Infrastructure layer provides common interfaces for dependency injection and validation. These interfaces doesn’t change when implementations change. Presentation layer uses infrastructure resolver to get implementations of repositories.
Adding validation
I have Enteprise Library 4.1 downloaded and installed on my development machine. If you want to just test my solution you can also create one ASP.NET MVC web application project and put all stuff there. No problem at all. After installing Enterprise Library you need some references so your application can use validation block. Take these files:
- Microsoft.Practices.EnterpriseLibrary.Common.dll
- Microsoft.Practices.EnterpriseLibrary.Validation.dll
- Microsoft.Practices.EnterpriseLibrary.Validation.Configuration.Design.dll
These libraries should be enough. I added references to these libraries to my infrastructure library.
As a next thing we need facade for our validation feature. I created these three classes:
- ValidationError – represents one validation error and contains properties for invalid property name and validation message.
- ValidationException – exception type that contains array of validation errors (it is also possible to detect validation caused errors in code).
- Validator – this class has only one method called Validate<T> and it makes all the real work.
Let’s see those classes now.
ValidationError
public class ValidationError
{
public string PropertyName { get; set; }
public string Message { get; set; }
}
ValidationException
public class ValidationException : Exception
{
private readonly ValidationError[] _errors;
public ValidationException(ValidationError[] errors)
{
_errors = errors;
}
public ValidationError[] ValidationErrors
{
get
{
return _errors;
}
}
}
Validator
public static class Validator
{
public static ValidationError[] Validate<T>(T instance)
{
var errors = new List<ValidationError>();
var results = Validation.Validate<T>(instance);
foreach (var result in results)
{
var error = new ValidationError();
error.PropertyName = result.Key;
error.Message = result.Message;
errors.Add(error);
}
return errors.ToArray();
}
}
Now we are almost done and it is time to add some rules.
Adding validation rules
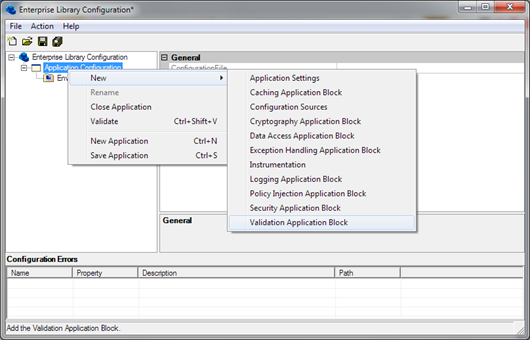
Make sure you have web.config file in your application because we are going to modify it. Run Enterprise Library configuration program from all programs menu and open your web.config file.

Add some validation rules for you classes and save configuration. Enterprise Library Configurator creates all required sections to your web.config file automatically.
Validating objects
As a first thing take a look at this simple form that let’s users insert new price enquiries.
<h2>Insert</h2>
<%= Html.ValidationMessage("_FORM") %>
<% using (Html.BeginForm()) {%>
<fieldset>
<legend>New price enquiry</legend>
<table>
<tr>
<td valign="top"><label for="Title">Title</label>:</td>
<td valign="top">
<%= Html.TextBox("Title") %><br />
<%= Html.ValidationMessage("Title")%>
</td>
</tr>
<tr>
<td valign="top">
<label for="From">From</label>:
</td>
<td valign="top">
<%= Html.TextBox("From") %><br />
<%= Html.ValidationMessage("From")%>
</td>
</tr>
<tr>
<td valign="top"><label for="DocNumber">Number</label>:</td>
<td valign="top">
<%= Html.TextBox("DocNumber") %><br />
<%= Html.ValidationMessage("DocNumber") %>
</td>
</tr>
<tr>
<td valign="top"><label for="Date">Date:</label>:</td>
<td valign="top">
<%= Html.TextBox("Date", DateTime.Now.ToShortDateString()) %><br />
<%= Html.ValidationMessage("Date") %>
</td>
</tr>
<tr>
<td valign="top">
<label for="DueName">Due date:</label>:
</td>
<td valign="top">
<%= Html.TextBox("DueDate", DateTime.Now.ToShortDateString()) %><br />
<%= Html.ValidationMessage("DueDate") %>
</td>
</tr>
</table>
<p>
<input type="submit" value="Save" />
</p>
</fieldset>
Let’s see one repository method that accepts object to be validated. Let’s assume we have repository that validates objects before saving them. If there are validation errors ValidationException will be thrown. Here is simplified save method of repository.
public void SavePriceEnquiry(PriceEnquiry instance)
{
var results = Validator.Validate<PriceEnquiry>(instance);
if (results.Length > 0)
throw new ValidationException(results);
Save<PriceEnquiry>(instance);
}
And let’s use this repositoy in ASP.NET MVC controller (if your version of ASP.NET MVC doesn’t support HttpPost sttribute you can use AcceptVerbs(HttpVerbs.Post) instead).
[HttpPost]
public ActionResult Insert(PriceEnquiry enquiry)
{
try
{
_repository.SavePriceEnquiry(enquiry);
}
catch (ValidationException vex)
{
Helper.BindErrorsToModel(vex.ValidationErrors, ModelState);
return Insert();
}
catch (Exception ex)
{
ModelState.AddModelError("_FORM", ex.ToString());
return Insert();
}
return RedirectToAction("Index");
}
You can see call to method called BindErrorsToModel(). This is helper method that steps through validation errors array and binds errors to current model. You can take this method and use it in your own projects if you like.
public static class Helper
{
public static void BindErrorsToModel(ValidationException exception, ModelStateDictionary modelState)
{
BindErrorsToModel(exception.ValidationErrors, modelState);
}
public static void BindErrorsToModel(ValidationError[] errors, ModelStateDictionary modelState)
{
if (errors == null)
return;
if (errors.Length == 0)
return;
foreach (var error in errors)
modelState.AddModelError(error.PropertyName, error.Message);
}
}
NB! Don’t forget that fields in your views must be named like properties of class you are expecting as a result of binding.
Now you can test your application and see if validation works. You should see correct error messages if everything went well and there are no bugs in code or configuration.
Conclusion
Although this example is long one it is not hard to add validation support to your applications. It takes you some time if it is your first time but if you are familiar with tools and you keep yourself from planning rocket sience level validation then everything goes fast and smooth.
There are some more nyances you should know before stating that you fully suppor validation through your application. I will introduce some more ideas in my future postings about validation.

|
|
|
|
|

|
|
|||