DotNetStories

In this post I would like to talk about the various ASP.Net projects types, the compilation process and finally how to deploy ASP.Net applications to a local and remote server.
Before we begin explaining the mechanism behind compiling ASP.Net projects we should talk about the different options/project types we can create with ASP.Net framework.
ASP.Net framework supports two different types of projects. We have
With this option we are allowed to work directly with folders.We point Visual Studio to a folder and open it up, the same way we could open it using windows explorer.All the files in that folder will show in the Solutions Explorer window. The way we create this type of project we launch Visual Studio and then go to File -> New Web Site. This type of project was introduced in VS 2005 and the purpose was to provide some new flexibility in creating and working with websites.There is no collective file like .vbproj,.csproj extension that keeps track of all the individual files in the website. This makes it very easy to create copies of the site, move them and share them with others because there are no dependencies with files on your local system.However, it is very difficult to work with source control systems.
With that option the web application is managed as a project with a single project file that keeps track of all the content of the web application.It is easier for developers who work in teams or those who need more control over the contents of the site and its compilation and deployment process.The way we create this type of project we launch Visual Studio and then go to File -> New Project ->ASP.Net Web Application. If you open the web application in a windows explorer window you will see a .sln file. This is a special file, that is more of a container that contains several several projects, like a web service project, a web application project. If you browse through the windows folder that is your web application you will see another file, a .csproj file.If you open this file, you will see links to all the files of your web application.When I build Web sites I always choose to create my application as a Web Application Project rather than the Web Site Project type.
Let's explain what happens when a web application or web site project compiles. Well, we do write our ASP.Net applications in VB.Net or C#. Both those languages are compiled languages.If you build an ASP.Net application or website project the code we write will eventually gets compiled so it can be executed. So we have our source code files, .cs or .vb files.Those are created automatically when we add web forms to our application.Then those files are compiled with the appropriate compiler.When using Visual Studio to compile our applications, Visual studio will launch the apropriate compiler because it knows the .Net language we used for implementing that particular web application/site.The end result of this compilation is not native/binary code.It is something else that is called IL or MSIL.MSIL contains code and metadata.The very first time we access a website , we do notice some sort of delay. That is because the CLR of .Net takes the MSIL code and runs it through a JIT Compiler (or Jitter) to create native code.All the subsequent requests will be serviced very fast.That is something that is happenning in the "black box" that is the managed code and the Common Language Runtime.
When we develop ASP.Net Web applications (the one with solution files and project files) we have to build/compile the application. The end result of building the application is a .DLL file (Assembly file) that contains the MSIL. That MSIL code+metadata will go through the Jitter and we will get the native code after that.Let's create a simple web application.
Launch Visual Studio 2010/2008 and create a new project, a new web application project. Launch Visual Studio and then go to File -> New Project ->ASP.Net Web Application
Give your web application a suitable name. When you press F5 or run your application in any way, we will have a build first and we will get a .dll.The whole compilation process takes place, as it was explained previously.
Obviously , you can build the web application explicitly by selecting the application, right-click and choose Build. You can select from the Solution Explorer , Show All Files, and then click on the bin folder and see the .dll file.
Have a look at the picture below, where we see the bin folder and the .dll file, when we compile the web application.

When we want to move our web application to the production server, we just need to move the bin folder and the .aspx files. We do not have to copy the .cs or .vb files. I will explain later how to deploy asp.net applications on the production server.
When we develop ASP.Net web sites, we do not have to explicitly build.We can change the .vb or .cs files and then just view (run) the pages through the web browser.In the background the page is compiled of course.Basically it follows the same compilation model with web applications but we do not have to explicitly build the site.When building websites we do copy all the files in the folder to the production server.Let's create a simple website.
Launch Visual Studio and then go to File -> New Web Site. Choose a suitable name for your website and save the site in the local File System.Run the default.aspx page by selecting it and then right-click and choose "View in Browser". The whole compilation process takes place and we see the page loading.We do not explicitly build the page but that happens on the background.You can see the .dll that was created and was used to load the page by adding this code in the default.aspx page.
 <h3>I was loaded from

    <%= GetType().Assembly.Location %>

 </h3>
View the default.aspx page again through the browser. In my case I get back this
I was loaded from C:\Users\fofo\AppData\Local\Temp\Temporary ASP.NET Files\website2\7f158331\fbecb64a\App_Web_vn0ypqxx.dll
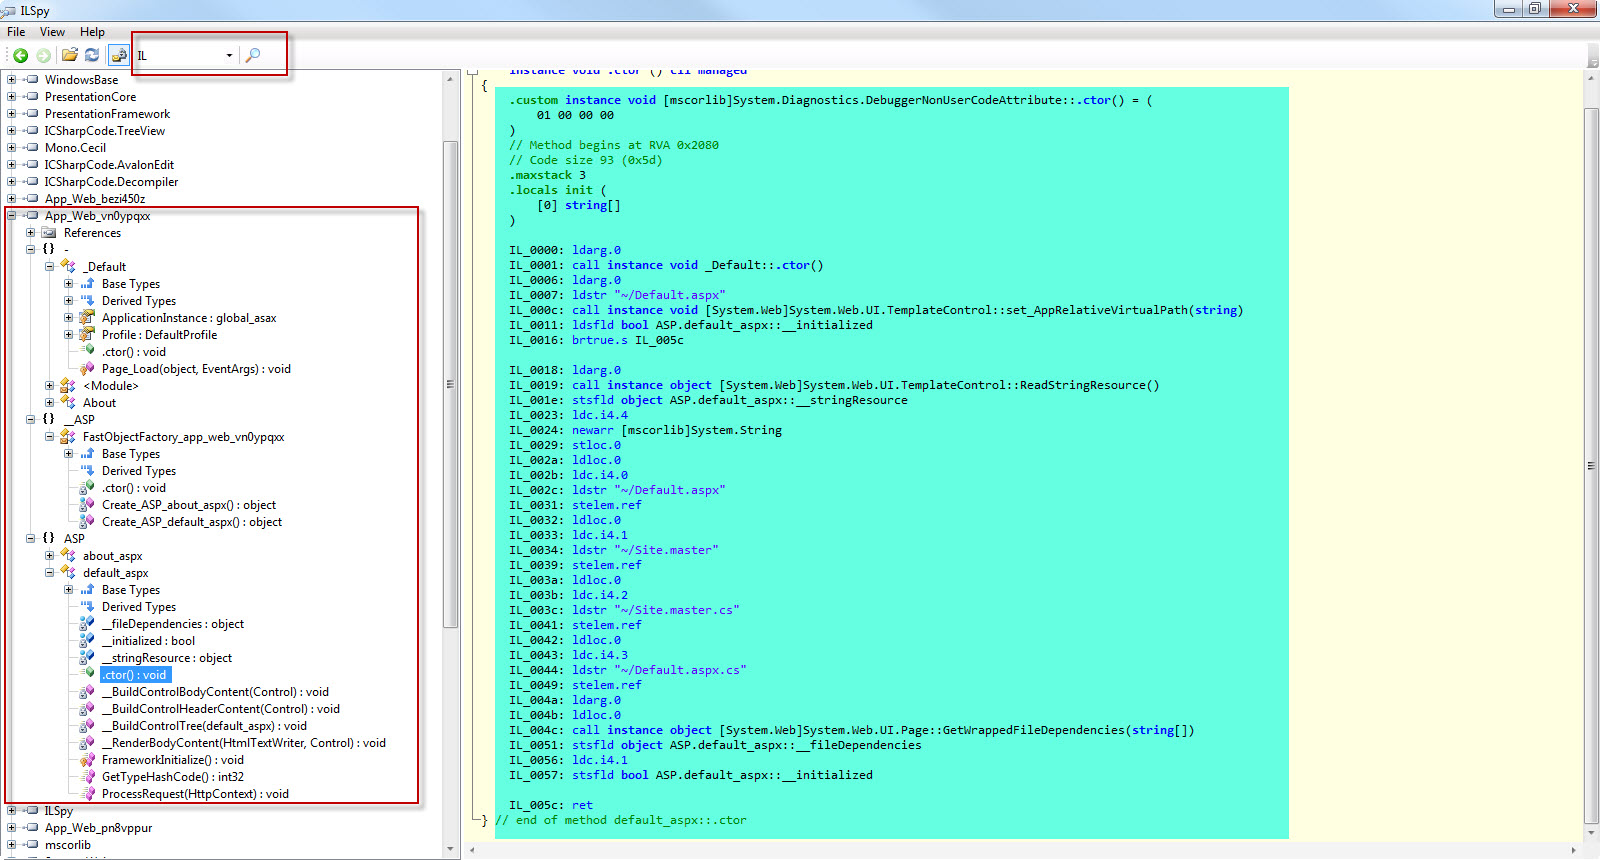
We can open this .dll file with a diassembler/decompiler.The most well known is Reflector from RedGate. But it is not available for free anymore, so the next best thing is ILSpy and you can download it here .
When I diassemble my .dll (App_Web_vn0ypqxx.dll) with ILSpy, I can see the MSIL code and you can have a look at the picture below
To recap,
So far we have seen, what ASP.Net project types are available and what happens when we compile web applications or website projects.
Obviously there is no point having a brilliant ASP.Net application "sitting" in local machine or development server. We want to show the world our work. We must deploy our web application to the live/production server.
Obviously in our local machine we have our web application hosted under IIS Express or the Visual Studio Development Server.We must host our web application in our production server under IIS. The best way is to install IIS (it is off by default) locally. You can see how to accomplish that by reading this post.
After you install it, make sure it works by browsing to the http://localhost/ You must see the IIS 7 logo.
Now let's see how to deploy a website project to the local IIS.We will deploy the website we created in the previous steps of this post.
Browse to the C:\inetpub\wwwroot and create a folder.Create a folder in there. Name it myfirstdeployment.
Copy all the files of your website (all the files in the website folder) to the myfirstdeployment folder.
Now let's configure this folder with IIS. Launch IIS admin panel, by going to Start -->Run -->inetmgr
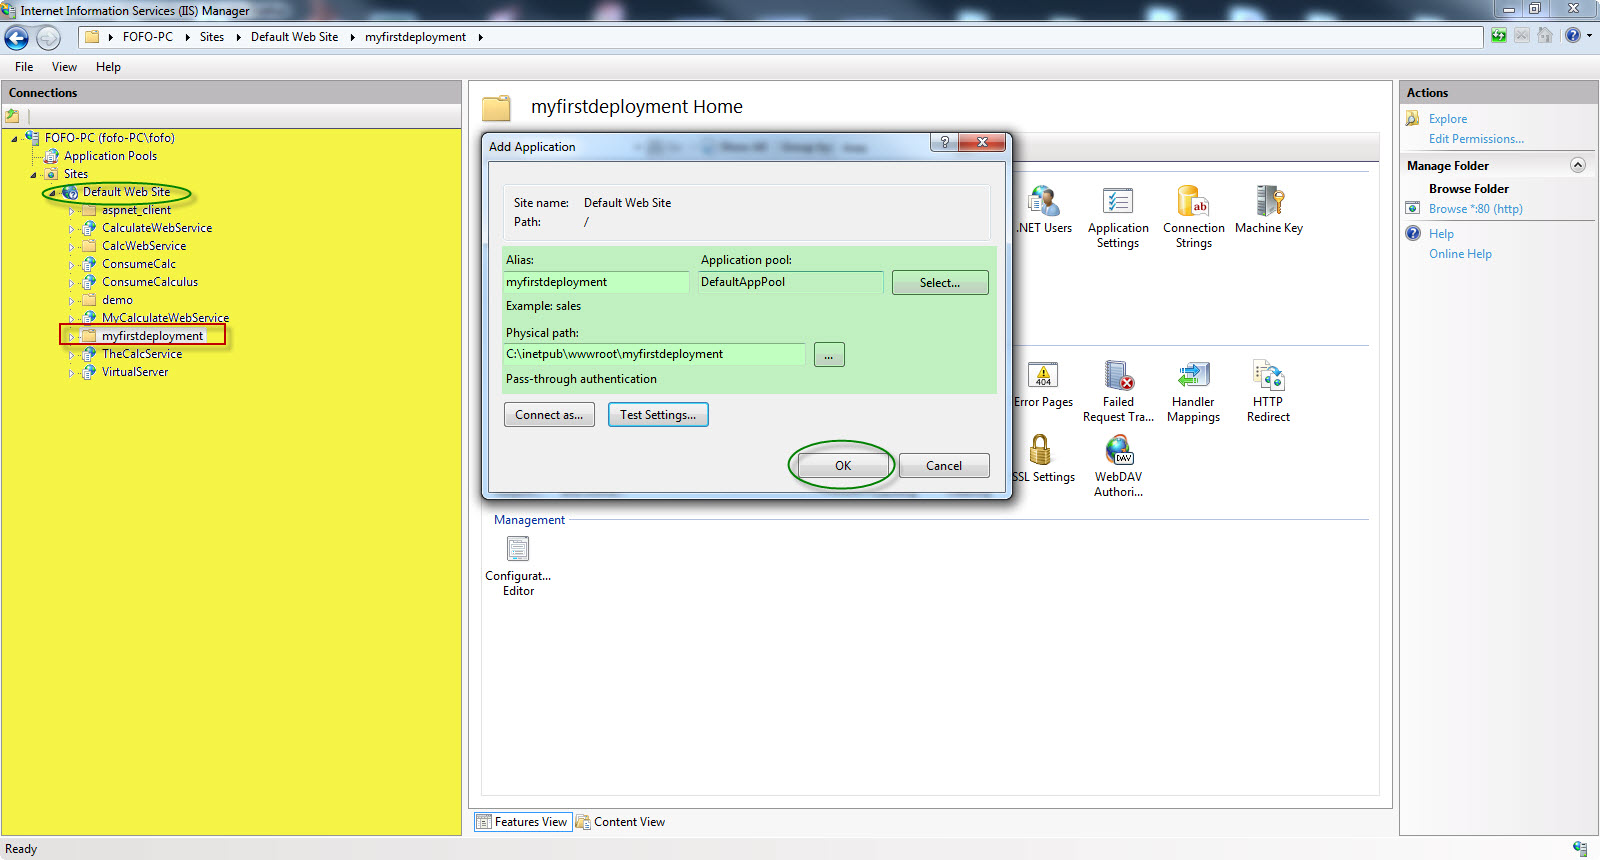
Go to the Default Web Site and add a new application. Have a look at the picture below to figure out the details you must fill.
Now, if you navigate to the http://localhost/myfirstdeployment/ you will see the website running under the full version of IIS 7.0.
If you followed all the steps correctly you will have the same result. There are certainly better ways to deploy a website/application to the production web server.
That process I just demonstrated is a manual process.Now I am going to show you how to deploy a web application using the WebDeploy tool (earlier known as MSDeploy), available in Visual Studio.
We will deploy the web application we created in earlier steps, to the local IIS.We will use first the so called, packaging deployment option. Launch Visual Studio 2010 and open the web application. Right-Click on the web application and then select Properties and the choose Package/Publish Web.Have a look at the picture below to see the options I have chosen.
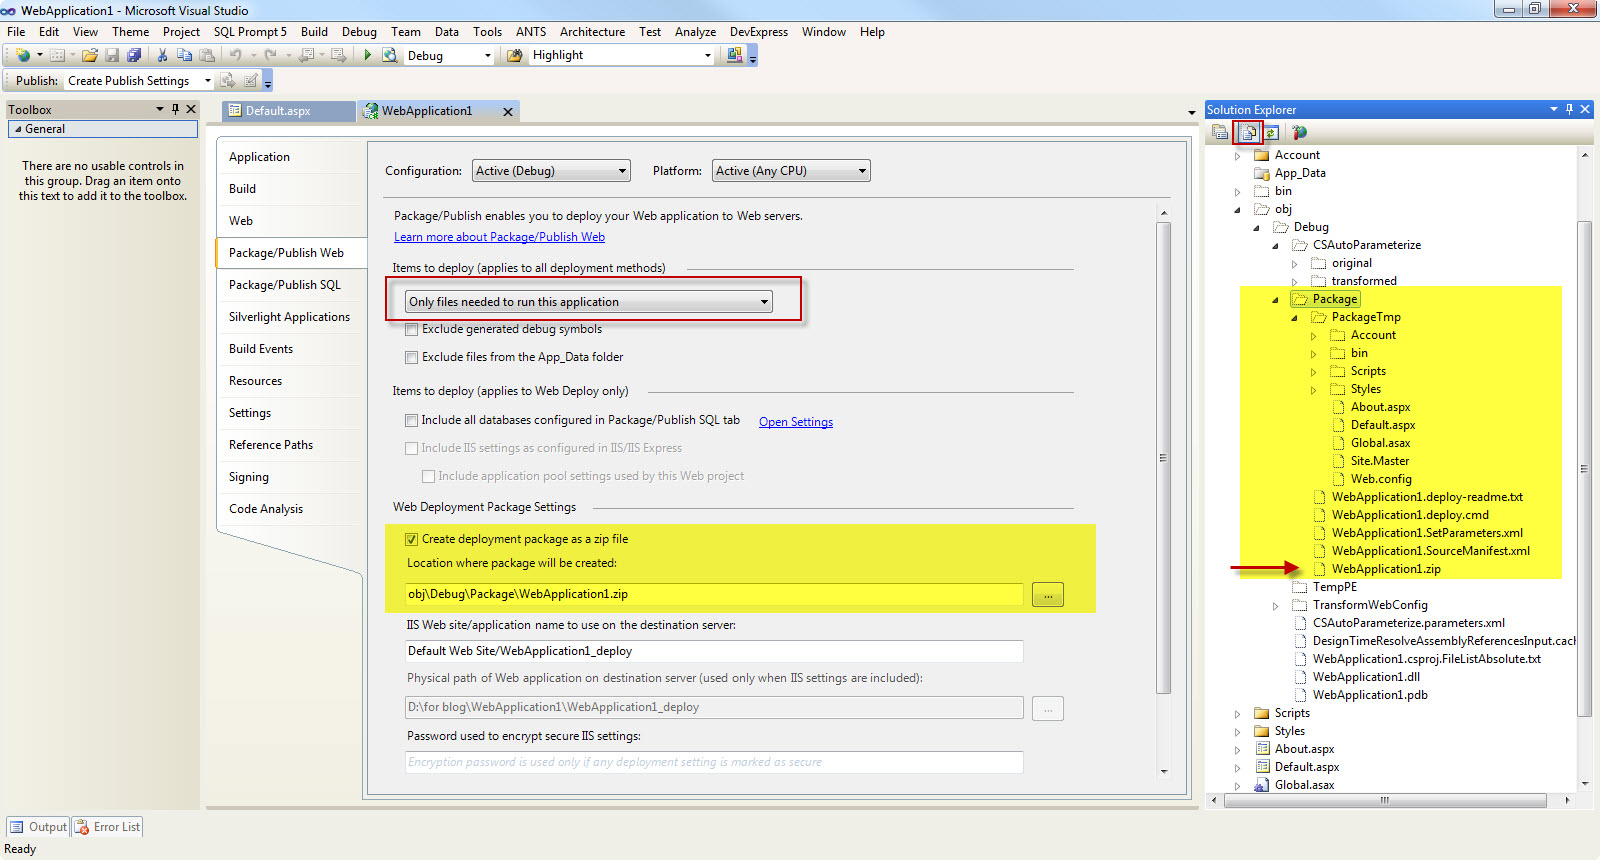
There are various options you can configure from that panel.When you build the web application then the output will be a .zip file.That contains all the contents of the application that must be deployed.You can now easily install it via the IIS Admin Tool or via a command-line/powershell script.
Another, easier way to deploy the web app is to use the One-Click Publish method.Locate the Publish toolbar from the toolbars and create a new profile with the appropraite settings.First close Visual Studio and open it with Administrator privileges.
Have a look at the picture below to get a feeling of what I mean.

I created a new profile (localmachine) and then I select the Publish method (Web Deploy) and the the Site/application - Default Web Site/MyFirstWebApp and then click the Publish button.
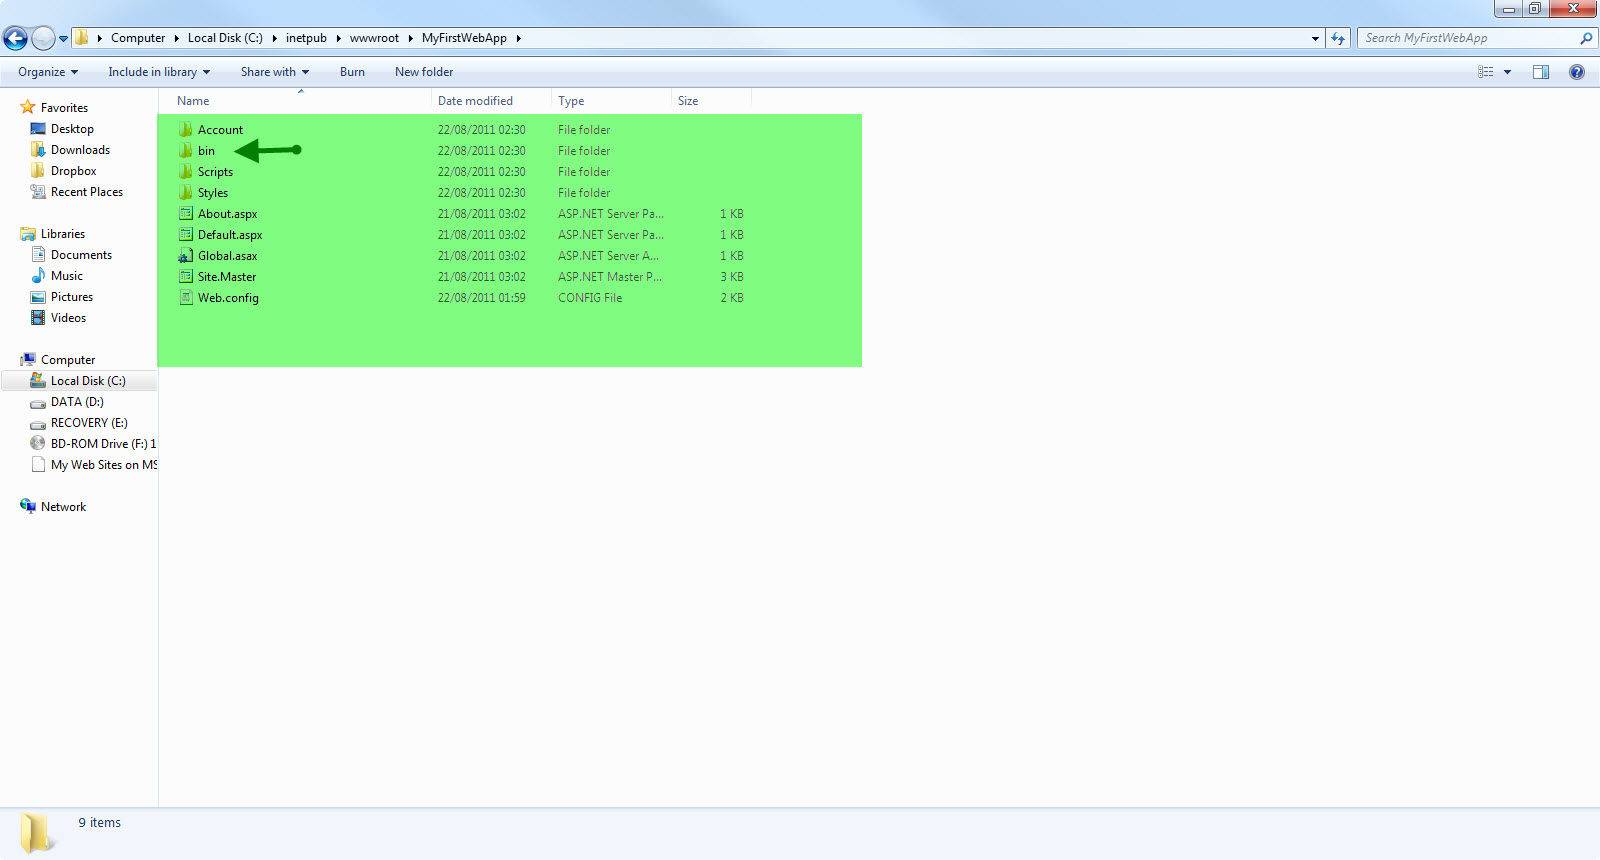
Now if you browse to http://localhost/myfirstwebapp/ you will see the web application deployed in your local IIS.If you launch IIS and go to Default Web Site and expand it , you will see the MyFirstWebApp application.If you browse to the actual folder in your local hard drive that the application lives, in my case it is (C:\inetpub\wwwroot\MyFirstWebApp) you will see only the bin folder and .aspx files being deployed. Also the Scripts folder (with the .js-jquery files) and the Styles folder (with the .css files) are deployed.Have a look at the picture below, to see what I mean.
That was very easy, wasn't it? It is a much more automated process.I am sure that you have appreciated how easy it to work with WebDeploy / Publish tool to deploy a web application.
Now we move to our last example/demonstration. I would like to show you how to deploy your web application to a hosting provider. I assume that you have an account with a hosting company. If not, you can have a look here, where you can find cheap and reliable web hosting services.
Any real application comes with a database. So far we have not added/created a database to the web application. Let's dp that and then we will deploy the application with the database to the live server.We will not create a new database. I will use the ASP.Net configuration tool to enable roles and create users.
1) Go to the Visual Studio and from the Solutions Explorer window choose the right-most icon - ASP.NET configuration
You will see a new web page loading. Refresh your solution in the Solution Explorerwindow. You will see the App_Data special folder added to your solution and inside the special folder you will see the ASPNETDB.MDF database.This is a SQL database.
2) Go back to your web configuration web page that was loaded when we clicked the ASP.NET configuration icon.Choose Forms Authetication
3) Choose Security and enable roles. When you do that you will see changes in the web.config file. A new line will be added.<roleManager enabled="true" />
4) Add a new role called e.g "admin".Now we must add some users to these roles.In the security tab (in the web environment), click "Create user". All this data is saved into the ASPNETDB.MDF database. So , now we have a sql database we need to deploy along with our application to the hosting provider.Let's move on the actual deployment process.Then select the web application from the Solutions Explorer,right-click and then select Package/Publish Settings. We must include the database in our deployment process.
Have a look at the picture below

Then click on the Package/Publish SQL tab.We have to configure some settings in this tab.
Have a look at the picture below

We need to push the data from our local database to a database in the production server.We have the connection string for the source database. We get this information from the web.config file.We have to specify the connection string for the destination database.We get these information from our hosting provider.We include both our data and schema.
We need to modify the connectionStrings section in the web.config file to point to the remote SQL database server instead of the local SQL Server Express database that we are using on our local machine.
In our web.config we have the following settings for the connection string
<connectionStrings>
    <add name="ApplicationServices"
connectionString="data source=.\SQLEXPRESS;Integrated Security=SSPI;
AttachDBFilename=|DataDirectory|\aspnetdb.mdf;User Instance=true"
         providerName="System.Data.SqlClient" />
</connectionStrings>
In our Web.Release.config (have a look at the example in the comments)
    <connectionStrings>
    <add name="ApplicationServices"
 connectionString="data source=(local),1512;Initial Catalog=myfirstwebapp;
 User Id=myfirstwebapp; Password=(enter your password)"
          xdt:Transform="SetAttributes" xdt:Locator="Match(name)" />
  </connectionStrings>
I am using some sort of transformation in the connectionStrings section.With the setup above we automate the changing of our connection string during deployment. Have a look here, if you want to find more about Web.config transformation syntax.
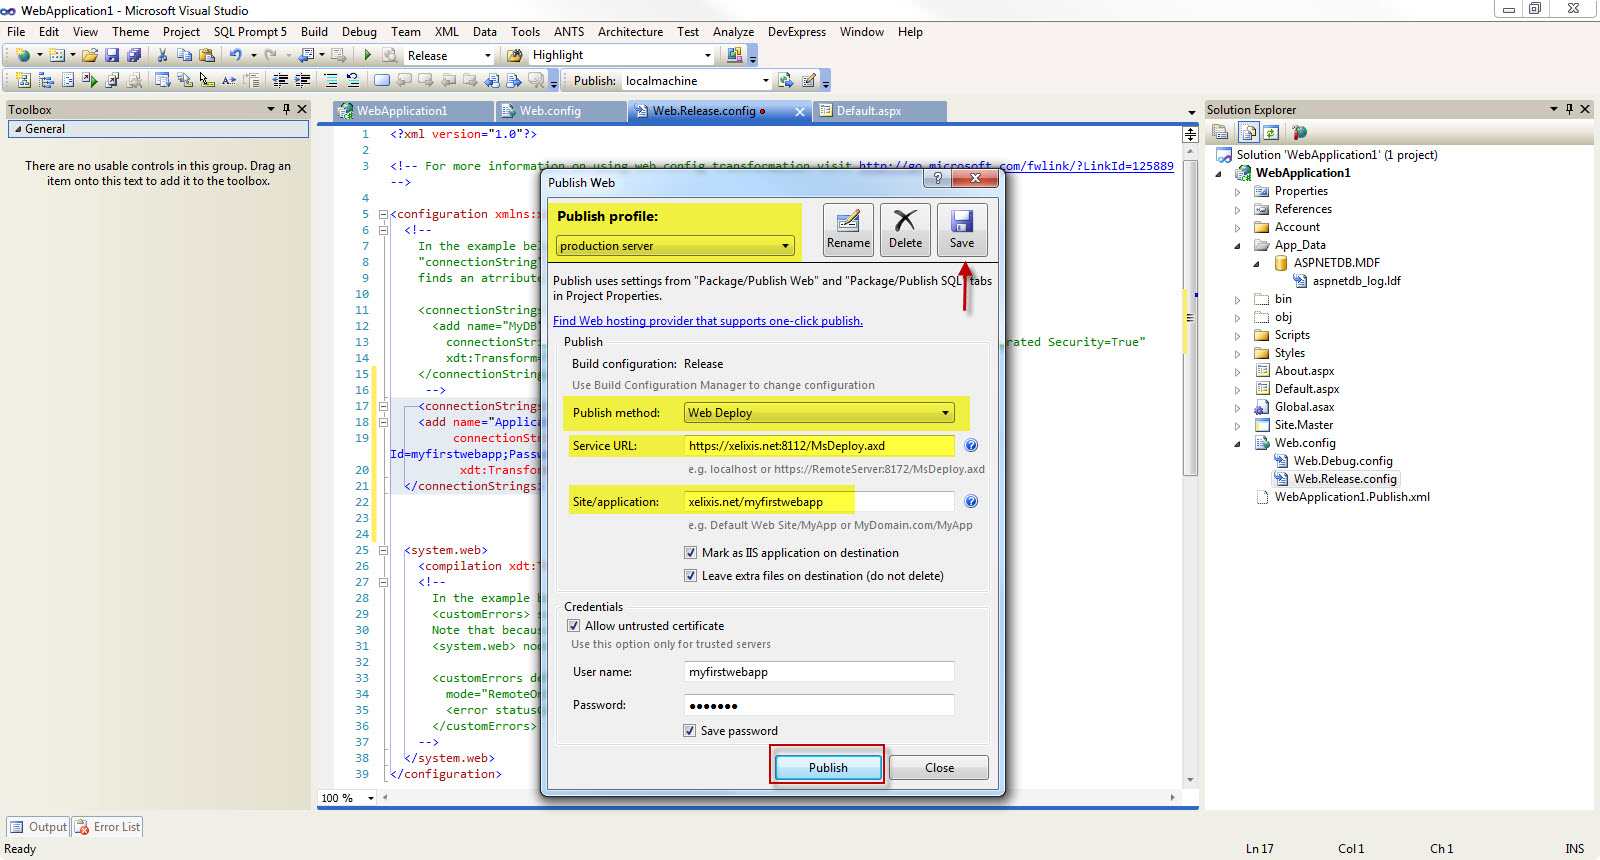
Finally I need to create another Publish Profile to deploy to the live server. Again some of the details you get them from your hosting provider.
From the Publish toolbar click <New...>. In my case I added the following settings.Finally I click Publish You can have a look at the picture below to see the settings for the production publish profile.
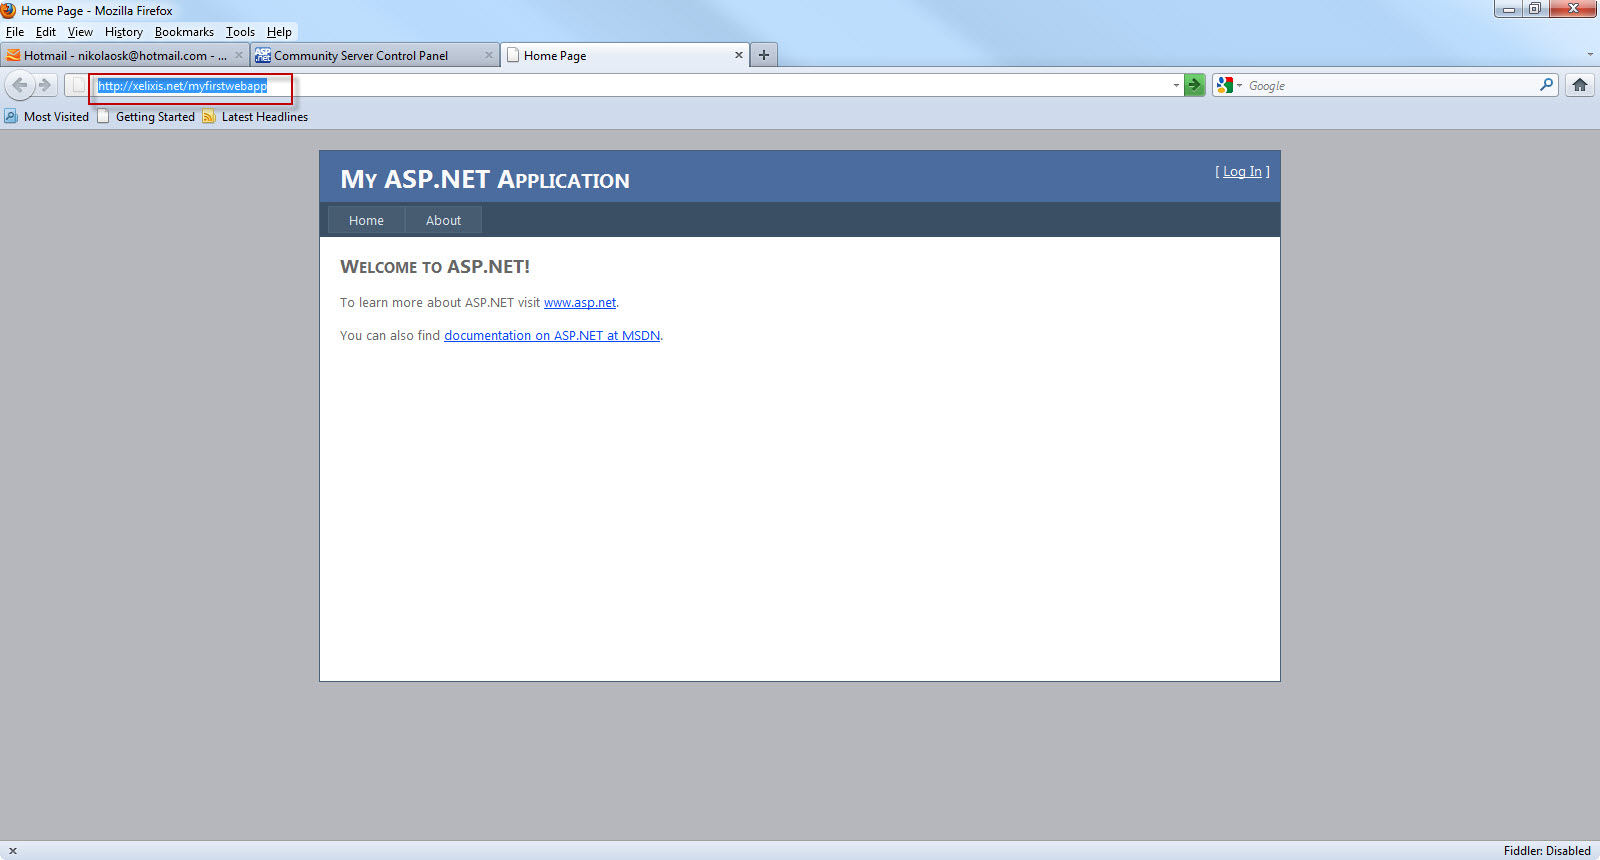
In my case everything was successful. If I browse to the http://www.xelixis.net/myfirstwebapp, I see my web application that was deployed to the production server.
I know that this was a rather long post but I hope you enjoyed it. You might find those posts useful. They are also from my blog.
Hope it helps!!!
Comments have been disabled for this content.