Introducing Windows Phone 7 Panoramic View
[Click here to download sample code for this article]
Introduction
One of the most acclaimed features of the new Windows Phone 7 is the Panorama View, which allows the users to browse an application by visualizing pages like if they were part of a whole panoramic view.
In this article, we will see how to work with a Panorama View, the pros and cons it presents, and a sample design intended to replace the standard navigation approach.
Creating a Panorama Application
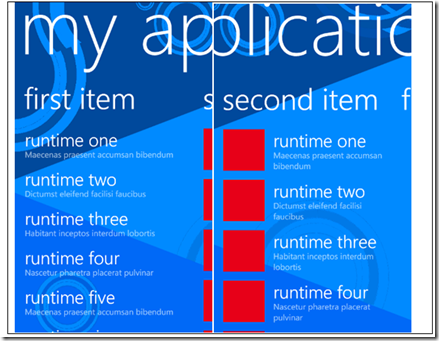
The development tools for Windows Phone (January 2011 update available here) automatically install a template to work with Panorama Applications, which are nothing but Silverlight applications, with a sample Panorama View in the main page, containing two pages in the view.
There are some important considerations about the Panorama View that I would like to share here:
· The user switches from one page to another by dragging the current page to the left or the right, much like a phone image viewer.
· The view is indeed panoramic, so there isn’t a first or last page. After browsing all the pages, the first visited page comes next.
· When visualizing a page, a small part of the next page can already be visualized at the right, so the data for that page must already be loaded. However, as we will see next, an event can be handled when switching from one page to another, in order to load data dynamically.
This is the XAML code for the previous view:
<controls:Panorama Title="my application">
    <controls:Panorama.Background>
        <ImageBrush ImageSource="PanoramaBackground.png"/>
    </controls:Panorama.Background>

    <!--Panorama item one-->
    <controls:PanoramaItem Header="first item">
        <!--Double line list with text wrapping-->
        <ListBox Margin="0,0,-12,0" ItemsSource="{Binding Items}">
            <ListBox.ItemTemplate>
                <DataTemplate>
                    <StackPanel Margin="0,0,0,17" Width="432">
                        <TextBlock Text="{Binding LineOne}" TextWrapping="Wrap" Style="{StaticResource PhoneTextExtraLargeStyle}"/>
                        <TextBlock Text="{Binding LineTwo}" TextWrapping="Wrap" Margin="12,-6,12,0" Style="{StaticResource PhoneTextSubtleStyle}"/>
                    </StackPanel>
                </DataTemplate>
            </ListBox.ItemTemplate>
        </ListBox>
    </controls:PanoramaItem>

    <!--Panorama item two-->
    <!--Use 'Orientation="Horizontal"' to enable a panel that lays out horizontally-->
    <controls:PanoramaItem Header="second item">
        <!--Double line list with image placeholder and text wrapping-->
        <ListBox Margin="0,0,-12,0" ItemsSource="{Binding Items}">
            <ListBox.ItemTemplate>
                <DataTemplate>
                    <StackPanel Orientation="Horizontal" Margin="0,0,0,17">
                        <!--Replace rectangle with image-->
                        <Rectangle Height="100" Width="100" Fill="#FFE5001b" Margin="12,0,9,0"/>
                        <StackPanel Width="311">
                            <TextBlock Text="{Binding LineOne}" TextWrapping="Wrap" Style="{StaticResource PhoneTextExtraLargeStyle}"/>
                            <TextBlock Text="{Binding LineTwo}" TextWrapping="Wrap" Margin="12,-6,12,0" Style="{StaticResource PhoneTextSubtleStyle}"/>
                        </StackPanel>
                    </StackPanel>
                </DataTemplate>
            </ListBox.ItemTemplate>
        </ListBox>
    </controls:PanoramaItem>
</controls:Panorama>
The control used for the view is Microsoft.Phone.Controls.Panorama, which is an Items control. The “Title” property holds the text used in the top of the view. This class has also a “Background” property, that holds the brush used as the background of the view. Each page is an instance of the PanoramaItem class, which is a Content control that shows the text of the “Header” property at the top, and the content below it.
Loading data dynamically within views
Having all the data pre-loaded can be a problem (and impossible) to several types of applications, and can also have a severe impact on the performance of an application because of the extended loading process at the beginning. Fortunately, there is a way to load the content for the pages dynamically.
When the user switches from one page to another, the SelectionChanged event of the Panorama view is triggered. The event args for this event contain the old PanoramaItem in the RemovedItems collection, and the new item in the AddedItems collection. Here’s an example:
void OnSelectionChanged(object sender, SelectionChangedEventArgs e)
{
    if (e.AddedItems.Count > 0)
    {
        PanoramaItem newPage = (e.AddedItems[0] as PanoramaItem);
        newPage.Content = new TextBlock() { Text = "Data loaded dynamically. You selected item #" + ItemsList.SelectedIndex.ToString() };
    }
}
Switching from one page to another programmatically
Another key requirement is to switch from one page to another programmatically, or after some user action, like pressing a button. The Panorama View is also prepared for these cases, using the DefaultItem property:
private void Button_Click(object sender, RoutedEventArgs e)
{
    // Switch to page #2:
    PanoramaView.DefaultItem = PanoramaView.Items[1];
}
Designing an application
We present here a basic design to use the Panorama View in order to replace the classic navigation controls, but trying to keep the design as close as possible. What we will do, is to create an abstract class that will be inherited by all of our panoramic pages. This is the PanoramaNavigationPage in the next diagram:
The Panorama View will then have our pages as items.
<controls:Panorama Title="my application" Name="PanoramaView">
    <controls:Panorama.Background>
        <ImageBrush ImageSource="PanoramaBackground.png"/>
    </controls:Panorama.Background>

    <pages:SamplePage1></pages:SamplePage1>
    <pages:SamplePageWithHeader></pages:SamplePageWithHeader>

</controls:Panorama>
Then in the MainPage, we handle the SelectionChanged event (OnPanoramaNavigation), calling the OnNavigatedFrom for the removed item, and the OnNavigatedTo for the added item.
Finally the MainPage exposes the Navigate method that switches the view from a page to another.
With this simple approach we have a restricted alternative to the classic navigation.
Sample application
Here is the full source code of an application featuring all of the topics of this article
This application contains a Panorama View and follows the previous design to separate each page’s implementation and handle the basic navigation events.
The first page overrides the OnNavigatedFrom method to show a MessageBox indicating the user that he is leaving that page.
The second page shows a header with the page title, and contains a button that programmatically navigates to the first page.
Conclusions
The Panorama View offers a user friendly way to browse through an application. However, there are some key behaviors to consider, like the piece of next page that is visible when the user is viewing the current one.
We saw that the Panorama has all the features to adapt to several kind of applications and can even replace the classic navigation approach, but at the price of requiring more design work to accomplish.
Alfonso Cora.
![clip_image002[4] clip_image002[4]](http://weblogs.asp.net/blogs/uruit/clip_image0024_thumb_6E745F56.gif)

![clip_image002[12] clip_image002[12]](http://weblogs.asp.net/blogs/uruit/clip_image00212_thumb_6AE25647.gif)
![clip_image002[16] clip_image002[16]](http://weblogs.asp.net/blogs/uruit/clip_image00216_thumb_392738F2.gif)
![clip_image004[14] clip_image004[14]](http://weblogs.asp.net/blogs/uruit/clip_image00414_thumb_42BF815B.gif)