How to set up a VPN with ISA Server 2006 and NPS in Windows 2008 Server – Step by Step
We all know the advantages of having a Virtual Private Network in a company. This implies that consultants can connect to the internal network and even to their own desktop machines while they are working at client offices (even in another country). ISA Server makes this task pretty simple.
One of the most challenging problems is how to authenticate users if your ISA Server is not a domain member. In this post we will explain how to solve this problem, using ISA Server 2006 (installed on Windows 2003 Server) and a Network Policy Server (NPS, installed on Windows 2008 Server) acting as a RADIUS server.
Network Policy Server in Windows 2008 is the replacement for the Internet Authentication Service. I will show you here how to install NPS as well.
In this post, I will guide you through the steps needed to configure our own VPN.
Before starting to configure the VPN, we will set up the NPS server, which will authenticate the VPN clients.
Setting up NPS
The Network Policy Server is only available for Windows 2008 Server, so it will not be in the same system with the ISA Server. It must be a domain member, or be in the domain controller.
The idea of having a RADIUS server is to allow the ISA Server to authenticate the users, through Active Directory. The problem is that the ISA Server is not a domain member, so it can’t connect directly to the AD. So, the RADIUS server acts as a bridge between ISA and AD.
Installation
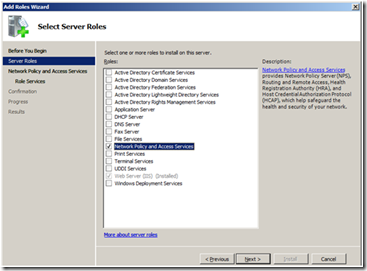
To install NPS, you must give the server the “Network Policy and Remote Access” role. To do this, click “Add roles” in the “Server Manager”.
Then, select the role from the list as shown in the following picture.
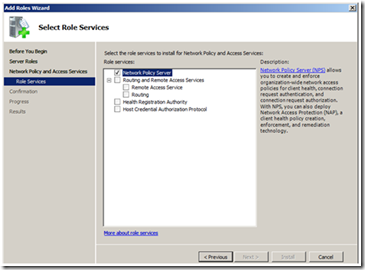
In the next step, select “Network Policy Server”, and click “Next”.
Configuration
As the NPS documentation says: “NPS performs authentication by comparing user credentials that it receives from network access servers with the credentials that are stored for the user account in Active Directory Domain Services (AD DS). In addition, NPS authorizes connection requests by using network policy and by checking user account dial-in properties in AD DS.”
Therefore, in order to allow NPS to access user information on AD, it must be registered in AD. This mean the NPS server belong to the “RAS and IAS Servers” AD group.
This is accomplished from the NPS Console. To launch it, go to Administrative tools. There you will see the NPS icon. From the left tree-view, select the root, and select Action à Register service in Active Directory.
Registering a RADIUS client
In order to allow the ISA Server to make requests to the NPS, ISA must be added as a client to the NPS. To do this, expand the root in the left pane tree-view, right click “RADIUS Clients” and then click on “New RADIUS client”.
Once the dialog is displayed, complete the ISA Server information. Give it a friendly name, followed by the NetBIOS name or internal IP. Ensure that the NetBIOS name is resolved to the internal network interface.
After that, select Microsoft as the Vendor.
You will also need a long password to encrypt messages to and from the ISA. You will need to type this very same password later, when we configure the ISA.
Finally, check the “Access-Request messages must contain the Message-Authenticator attribute”.
As you will see later, it is recommended to create an Active Directory group which will have permissions to use the VPN. This will allow you to easily assign permissions to the users, just making them members of that group.
Creating Network Policies
You must configure NPS to allow VPN connections. This is done creating a new network policy (formerly known in IAS as remote access policies).
To create the rule, follow these steps:
1. Open the NPS console
2. On the left tree-view, expand the Policies node
3. Right click “Network Policies”, and click on “New”
4. Type the rule name, something like “VPN Users Authentication”
5. On “Type of network access server” select “Remote Access Server (VPN-Dial In)”
6. Click add to specify a condition
7. We want to authenticate all the users that belong to the “VPN Users” group (previously created), so we need to select “User Groups”. Click “Add”.
8. Specify the group name and click “Ok”.
9. Click “Next”.
10. On the “Specify Access Permission” select “Access Granted”.
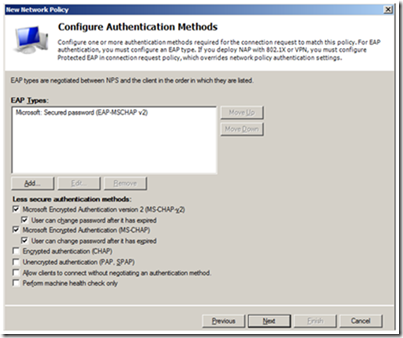
11. On the “Configure Authentication Methods”, click “Add” and select “EAP-MSCHAP v2” as shown in the following picture. Click “Next”.
12. You are now able to configure constraints, such as date and time restrictions, idle time and more. For the sake of keeping this post simple, we will not create any restrictions.
13. On the configure settings screen, click “Next”.
14. Review the configuration, and click “Finish”.
The RADIUS server is now ready to be used by the ISA Server. Keep reading to get the ISA set up properly.
Configuring the VPN
To create a VPN, first of all we must enable it on the ISA Server. To do this, open the Management Console, select then VPN node on the left-hand tree. Then, click “Enable VPN Client Access”.
This action will enable a network rule, which authorizes all the outbound traffic, from the VPN network to the internal network. You can edit this rule to suit your needs.
To see this rule, click on “Networks” on the left-hand tree.
IP address assignment
When the remote users connect to the VPN, they will need an IP. There are two ways to solve this.
1. Use a DHCP server.
2. Use the ISA Server Address Pool.
You must determine which solution is better for your company. We will use the ISA Server Address Pool.
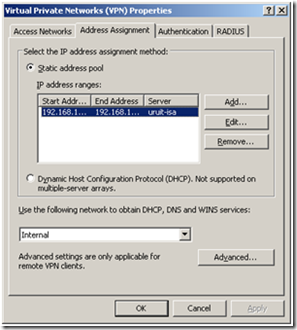
To configure it, from the left pane, expand the ISA Server in the tree-view, and then click on the Virtual Private Network node. Now, in the Tasks pane (on the right) click on “Configure address assignment”.
The following dialog will appear:
Click the “Add” button. Add the IP range for the VPN clients.
Configuring Authentication
As you already know, we are going to use the previously set up RADIUS server to authenticate the users. We have to tell ISA where the RADIUS server is.
1. Open the ISA Server Management Console and select VPN on the left-hand tree-view.
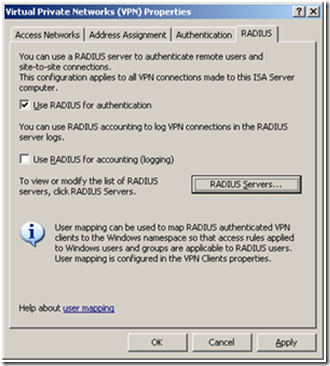
2. On the “Tasks” pane on the right, click on “Specify RADIUS configuration”. The following screen will show up.
3. Check the “Use RADIUS for authentication”.
4. Press the “RADIUS Servers…” button.
5. Click “Add” to insert a new server. Specify the IP Address and a description for the server. Ensure that you are using the internal network interface.
6. Click the “Change” button to specify the shared key. You must enter here the same key created when configuring the NPS server. If you make a mistake here, users will fail to authenticate.
7. Finally, check the “Always Use Message Authenticator”. Click “OK”.
8. Apply the configuration.
Enable VPN Access
On last step is required, so that the ISA Server will support VPN connections. Click Virtual Private Networks from the Scope pane (on the left).
On the right-hand pane click on “Configure VPN Client Access”. Check “Enable VPN client access” as shown in the picture below.
When you enable VPN client access, the Routing and Remote Access Server (RRAS) service is started, and is set to start automatically. To check the service status, click “Monitor” on the left pane, and then select the “Services” tab.
On the protocols tab on the same screen, verify that the “Enable PPTP” is checked.
That’s it! You have now a VPN configured, in a non domain member server, authenticating domain users, through NPS.
Considerations
When the user connects to the VPN, the default gateway is overridden, so that all the traffic goes through the ISA Server. This is a security setting. If you are interested in create custom routes (other than manually) you could use Connection Manager and the Administration Kit.
If you require some extra security on the connection, you should take a look at the L2TP protocol which uses IPSec.
Post written by Matias Delgado – Infrastructure and Development Tools Lead @ UruIT
