Creating a Roll animation effect in WPF
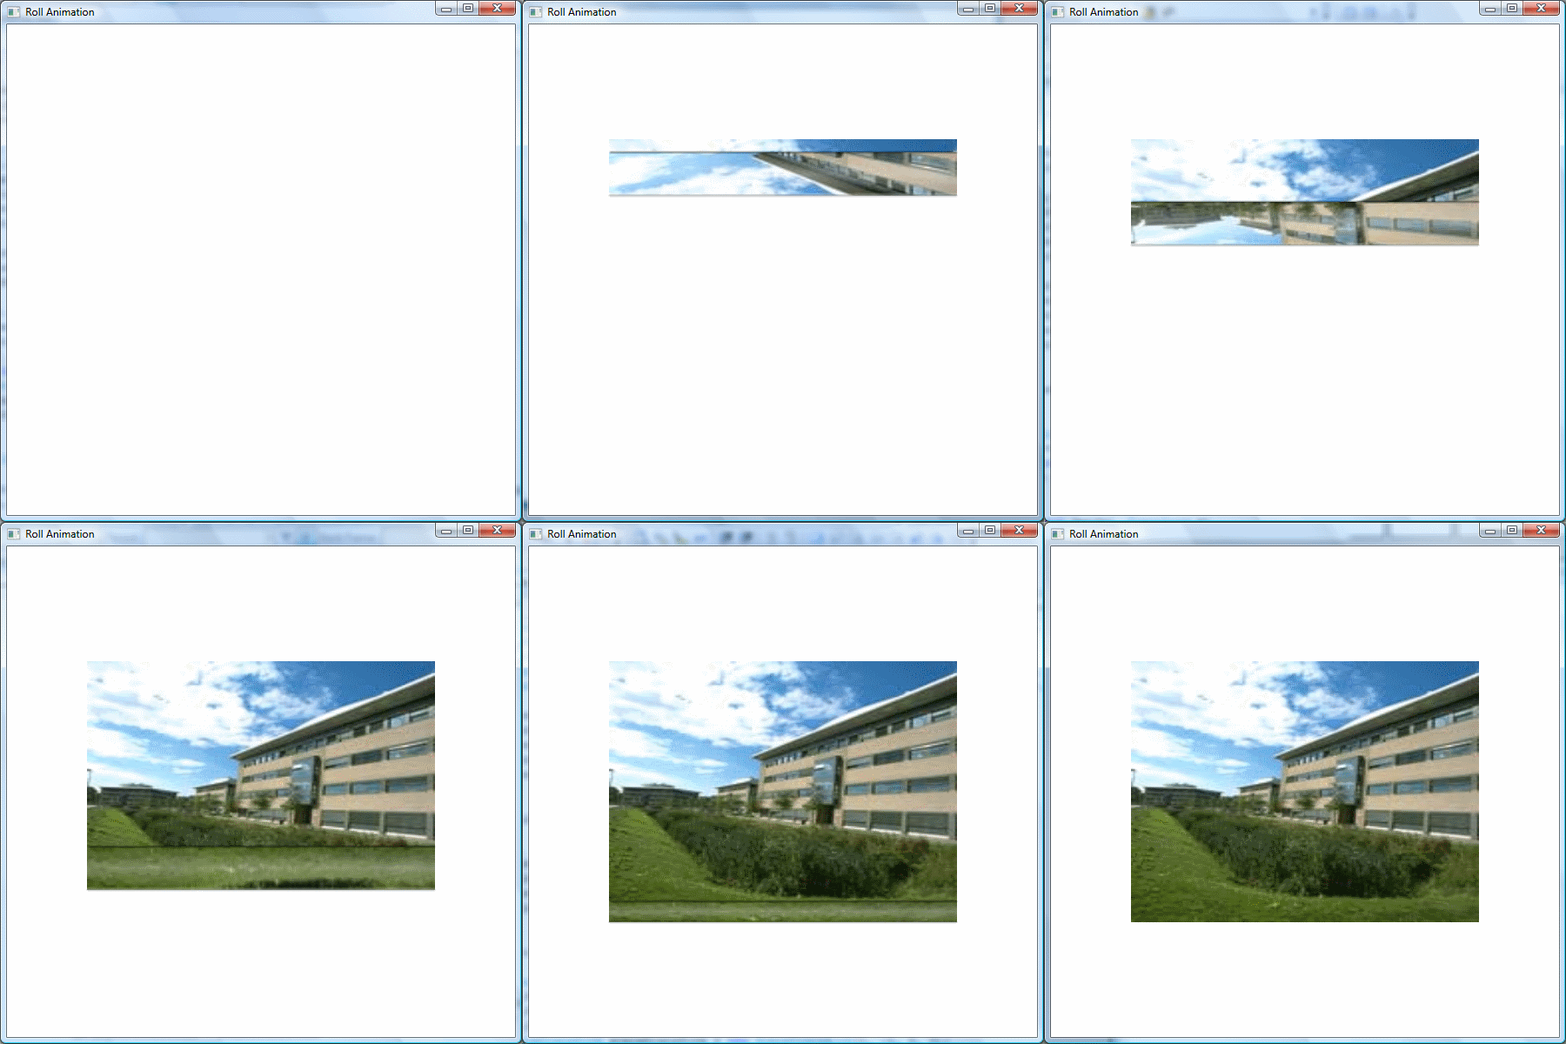
I know one picture can tell what the Roll animation looks like instead of writing many sentences. The animation looks like the following:
Opacity masks allow us to make portions of a UIelement or visual either transparent or partially transparent. To apply opacity mask, we can assign a brush to the Opacity Mask property of an element or Visual to provide a mask to the opacity. There is a variety of brushes in WPF: Solid Color Brush, Image Brush, Linear Gradient Brush, and Visual Brush. You can apply any of them you want. The regions, which are not covered by the mask, will remain transparent. The Alpha value of ARGB is used to specify the opacity of the color. An alpha value of 00 indicates completely transparent color and an alpha value of FF indicates fully opaque
How can we give an image 3D look in WPF?
We have used transparent Gradient Stop to give the image 3D look. We have made a Linear Gradient Brush with some gradient stops where centre, top, and bottom are transparent. Then we set the LinearGradientBrush as the opacity mask of Image.
How can we reverse the image?
To reverse the image here i have used scale transform. As we want to reverse the image in y Direction so the scale value for y-axis is -1 and scale value for x-axis is 1.
The used c# code for Roll animation is in the following
1: public partial class Window1 : Window
2: {
3: DispatcherTimer _timer = null;
4: double _rollTopLeft = 0;
5: double _imageWidth = 400;
6: double _imageHeight = 300;
7: double _offset = 3;
8: double _3DSize = 50;
9: public Window1()
10: {
11: InitializeComponent();
12: this.Loaded += new RoutedEventHandler(Window1_Loaded);
13: }
14: void Window1_Loaded(object sender, RoutedEventArgs e)
15: {
16: LinearGradientBrush maskBrush = new LinearGradientBrush();
17: maskBrush.StartPoint = new Point(0, 0);
18: maskBrush.EndPoint = new Point(0, 1);
19:
20: GradientStop BlackStop1 = new GradientStop(Color.FromArgb(30, 255, 255, 255), 0.0);
21: GradientStop BlackStop3 = new GradientStop(Colors.Black, 0.0);
22: GradientStop BlackStop4 = new GradientStop(Colors.Black, .9);
23: GradientStop transparentStop = new GradientStop(Color.FromArgb(175, 255, 255, 255), .5);
24: GradientStop BlackStop2 = new GradientStop(Color.FromArgb(100, 255, 255, 255), 1);
25:
26: maskBrush.GradientStops.Add(BlackStop1);
27: maskBrush.GradientStops.Add(transparentStop);
28: maskBrush.GradientStops.Add(BlackStop2);
29: maskBrush.GradientStops.Add(BlackStop3);
30: maskBrush.GradientStops.Add(BlackStop4);
31:
32: CanAni.OpacityMask = maskBrush;
33:
34: _timer = new DispatcherTimer();
35: _timer.Interval = TimeSpan.FromSeconds(.1);
36: _timer.Tick += new EventHandler(_timer_Tick);
37: _timer.IsEnabled = true;
38: }
39:
40: void _timer_Tick(object sender, EventArgs e)
41: {
42: Image im = new Image();
43: im.Width = _imageWidth;
44: im.Height = _imageHeight;
45: im.Source = loadBitmap(RollAnimation.Properties.Resources.bedrijven3);
46: ScaleTransform scaleTransform = new ScaleTransform(1, -1, 0, 0);
47: im.LayoutTransform = scaleTransform;
48:
49: _rollTopLeft = _rollTopLeft + _offset;
50: image.Source = loadBitmap(RollAnimation.Properties.Resources.bedrijven3);
51: image.Clip = new RectangleGeometry(new Rect(0, 0, _imageWidth, _rollTopLeft));
52:
53: double yPosition = _rollTopLeft + _3DSize;
54: double height = _3DSize;
55: if (Math.Abs((_imageHeight - _rollTopLeft)) < _3DSize)
56: {
57: height = Math.Abs(image.Height - _rollTopLeft);
58: CanAni.Height = height;
59: CanWrap.Height = height;
60: yPosition = _rollTopLeft;
61: Linetwo.Y1 = height;
62: Linetwo.Y2 = height;
63: }
64: Lineone.Visibility = Visibility.Visible;
65: Linetwo.Visibility = Visibility.Visible;
66: if (_imageHeight == _rollTopLeft)
67: {
68: _timer.IsEnabled = false;
69: Lineone.Visibility = Visibility.Collapsed;
70: Linetwo.Visibility = Visibility.Collapsed;
71: }
72: im.Clip = new RectangleGeometry(new Rect(0, yPosition, _imageWidth, height));
73: VisualBrush vb = new VisualBrush(im as Visual);
74: CanAni.Background = vb;
75: Canvas.SetTop(CanWrap, _rollTopLeft);
76: }
77: public static BitmapSource loadBitmap(System.Drawing.Bitmap source)
78: {
79: return System.Windows.Interop.Imaging.CreateBitmapSourceFromHBitmap(source.GetHbitmap(), IntPtr.Zero, Int32Rect.Empty,
80: System.Windows.Media.Imaging.BitmapSizeOptions.FromEmptyOptions());
81: }
82: }
Here four canvases are used here. The outer canvas is the main container for this application. The second canvas is used to wrap necessary UIelements to achieve this animation. The third canvas is used to make transparent portions while the fourth canvas is used to achieve 3D look. I have set an image background to the fourth canvas clipping certain portion of the image. To make this canvas moving, I am changing the top position of the canvas continuously.
This trick is applicable to any UIelement type. Here I have taken image as the UIelement type to implement the Roll animation. I have calculated the height and width of the image and started animation from (0,0) point. Every WPF UIelement type has a clip property and you can set any geometry object to clip. However, for this animation, we have used Rectangle geometry as clip geometry.
As I am changing the brush of animated canvas at runtime, property based animation does not work here. For that reason, I have used dispatcher timer based animation. I am using here dispatcher timer instead of classic Timer as dispatcher timer runs in UI thread and I do not need to write thread switching code
The used XAML for this is in the following
1: <Window x:Class="RollAnimation.Window1"
2: xmlns="http://schemas.microsoft.com/winfx/2006/xaml/presentation"
3: xmlns:x="http://schemas.microsoft.com/winfx/2006/xaml"
4: Title="Roll Animation" Height="600" Width="600">
5: <Canvas x:Name="CanOuter" Height="300" Width="400">
6: <Image Canvas.Left="0" Canvas.Top="0" Height="300" Width="400" Stretch="Fill" Name="image" />
7: <Canvas Canvas.Left="0" x:Name="CanWrap" Canvas.Top="0" Background="White" Margin="0,0" Height="50" Width="400" >
8: <Canvas x:Name="CanAni" Height="50" Width="400" >
9: <Line Visibility="Collapsed" X1="01" Y1="00" Name="Lineone" X2="400" Y2="0" Stroke="Black" StrokeThickness="1">
10: <Line.BitmapEffect>
11: <BlurBitmapEffect Radius="1" KernelType="Box" />
12: </Line.BitmapEffect>
13: </Line>
14: <Line Visibility="Collapsed" X1="00" Y1="50" X2="400" Y2="50" Name="Linetwo" Stroke="Black" StrokeThickness="1">
15: <Line.BitmapEffect>
16: <BlurBitmapEffect Radius="1" KernelType="Box" />
17: </Line.BitmapEffect>
18: </Line>
19: </Canvas>
20: </Canvas>
21: </Canvas>
22: </Window>
You can download the sample code from here. Hope this will save some of your time.
