Kenny Kerr
<span style="color:#4a67b1"><strong><em>This blog has moved to <a href="http://kennykerr.ca/"><span style="color:#4a67b1">kennykerr.ca</span></a></em></strong></span>
-
Security Kicks
James Kovacs just announced the launch of SecurityKicks, a new site for collecting and ranking security articles. Check it out!
-
Windows Vista for Developers – Part 4 – User Account Control
Since the release of Windows 2000, the developers working on Windows have been trying to create an environment where users can work safely and securely. Windows 2000 introduced techniques for creating restricted tokens that can effectively limit the permissions and privileges afforded to an application. Windows XP introduced further improvements but it has simply not been pervasive enough to make any real difference for the average user... until now. Whatever your initial reaction, User Account Control (UAC) is here to stay and really isn’t as bad as critics make it out to be. As developers we have a responsibility to embrace it so that the applications we develop don’t annoy and desensitize our users with needless prompts.
In this part 4 of the Windows Vista for Developers series, we are taking a practical look at UAC and specifically what can be done programmatically with respect to elevation and integrity control.
What is security context?
Security context refers to those things that define and constrain what a process or thread can do in terms of permissions and privileges. A security context on Windows is defined in terms of a logon session and these are manipulated via tokens. As its name suggests, a logon session represents a specific session on a single computer for a given user. Programmers interact with logon sessions by means of tokens. Any number of tokens can be created that refer to the same logon session. These tokens can offer different sets of permissions and privileges based on a subset of those provided by the logon session. This is really the key to how UAC works or at least a big part of it.
So how does UAC work?
On Windows Vista there are two predominant types of user accounts, standard users and administrators. The first user account that you can create will be an administrator at least initially and any subsequent user accounts will be standard users by default. Standard user accounts are for those people who you do not trust with complete control over the computer. Administrator accounts are for those users who also enjoy complete control over the computer. Unlike previous versions of Windows, you don’t have to logon as a standard user to protect yourself from malicious code that may find its way to your computer. The logon sessions created for standard users and administrators are equally capable of protecting from such threats.
When a standard user logs on to a computer a new logon session is created and they are presented with a shell application such as Windows Explorer that was created by the system and associated with the user’s newly created logon session by means of a token. This effectively limits what the user can do since Windows Explorer can only run those applications and access those resources that the user’s logon session permits based on the permissions and privileges specified by the token.
When an administrator logs on to a computer things are a little different and this is where Windows Vista differs dramatically from previous versions. Although the system creates a new logon session, it creates not one but two different tokens representing the same logon session. The first token grants all the permissions and privileges afforded to the administrator while the second token is a restricted token, sometimes called a filtered token, offering far fewer permissions and privileges. This restricted token offers practically the same capabilities and constraints as would be granted to a standard user. The system then creates the shell application using the restricted token. This means that although the user is logged on as an administrator, applications are by default run with limited permissions and privileges.
When the administrator needs to perform some task that requires additional permissions or privileges not granted to the restricted token, he or she can elect to run an application using the full security context provided by the unrestricted token. What protects the administrator from malicious code is that this elevation to the unrestricted token is only allowed after the administrator has confirmed the desire to use the unrestricted token by means of a secure prompt provided by the system. Malicious code cannot suppress this prompt and thereby gain complete control over the computer without the user’s knowledge.
As I hinted at before, restricted tokens are not new Windows Vista but it is in Windows Vista that they are finally being used in an integrated way in the shell to provide a more secure environment for users to work (and play).
Restricted tokens
Although you will typically not have to create restricted tokens yourself, it is useful to understand how it’s done so that you have a better idea of what is being done on your behalf and so that you can have more insight into the environment in which your application will run. As a developer you may also find yourself needing to create an even more restrictive environment than what is provided by UAC in which case knowing how to create restricted tokens is a must.
The aptly named CreateRestrictedToken function creates a new token that is a duplicate of an existing token with certain restrictions. This function can restrict the toke in a number of ways:
• By specifying deny-only security identifiers (SIDs) that can only be used to deny access to securable resources.
• By specifying restricting SIDs that will be used as an additional access check.
• By deleting privileges.
The restricted token used by UAC is created by adding deny-only SIDs and deleting privileges. Restricted SIDs are not used. Let’s walk through a simple example. The first thing we need is a token to duplicate and restrict. Let’s grab the process token:
CHandle processToken;
VERIFY(::OpenProcessToken(::GetCurrentProcess(),
TOKEN_DUPLICATE | TOKEN_ASSIGN_PRIMARY | TOKEN_QUERY,
&processToken.m_h));
Next we need an array of SIDs to disable. This ensures that they can never be used to allow access. The following code uses my handy WellKnownSid class to construct the SID for the built-in Administrators group. The WellKnownSid class is available with the download for this article.
WellKnownSid administratorsSid = WellKnownSid::Administrators();
SID_AND_ATTRIBUTES sidsToDisable[] =
{
&administratorsSid, 0
// add additional SIDs to disable here
};
Next we need an array of privileges to delete. We first need to look up the privilege’s LUID value:
LUID shutdownPrivilege = { 0 };
VERIFY(::LookupPrivilegeValue(0, // local system
SE_SHUTDOWN_NAME,
&shutdownPrivilege));
LUID_AND_ATTRIBUTES privilegesToDelete[] =
{
shutdownPrivilege, 0
// add additional privileges to delete here
};
Finally, we can call CreateRestrictedToken to create the restricted token:
CHandle restrictedToken;
VERIFY(::CreateRestrictedToken(processToken,
0, // flags
_countof(sidsToDisable),
sidsToDisable,
_countof(privilegesToDelete),
privilegesToDelete,
0, // number of SIDs to restrict,
0, // no SIDs to restrict,
&restrictedToken.m_h));
The resulting token’s group SIDs will have an entry for the built-in Administrators group with the SE_GROUP_USE_FOR_DENY_ONLY flag making sure that the SID is used to deny access but not allow access. The token will also be stripped of the SeShutdownPrivilege privilege ensuring that the token cannot be used to restart, sleep, or shutdown the computer.
If this sounds interesting you can try a quick experiment. Copy the code above to a console application and then add the following call to the CreateProcessAsUser function, updating the path to the Windows Explorer executable as appropriate:
STARTUPINFO startupInfo = { sizeof (STARTUPINFO) };
ProcessInfo processInfo;
VERIFY(::CreateProcessAsUser(restrictedToken,
L"C:\\Windows\\Explorer.exe",
0, // cmd line
0, // process attributes
0, // thread attributes
FALSE, // don't inherit handles
0, // flags
0, // inherit environment
0, // inherit current directory
&startupInfo,
&processInfo));
Now kill any existing Explorer.exe process on your computer and run the code. You should notice that you can no longer use Explorer to restart, sleep, or shutdown the computer. These options in the Start menu should be disabled.
Finally, there is a function called IsTokenRestricted. It does not however tell you whether the token was created using the CreateRestrictedToken function but merely reports on whether the token contains restricted SIDs. So unless you’re using restricted SIDs it is not a very useful function.
Integrity levels
One aspect of UAC that gets very little attention is a concept called Mandatory Integrity Control. This is a new authorization feature added to processes and security descriptors. Securable resources can specify an integrity level in their security descriptors. Each process on the system is also marked with an integrity level which is then validated against the integrity level of the resource as an added authorization step. Despite its relative simplicity, it is a surprisingly useful feature as it allows you to very simply and effectively partition what a particular process can access.
Imagine you are developing an application that must routinely deal with data from untrusted sources such as the Internet. Since it may be possible for malicious code to circumvent any steps you may have taken to protect the computer, it is helpful to add a certain amount of “defense in depth” as an added layer of protection. One extremely effective solution was described in the previous section using restricted tokens. It can however be complicated to figure out exactly what SIDs to allow and what SIDs to deny access to certain resources and specifically what permissions to grant each identity considering that the application itself still needs certain permissions to function. This is where integrity levels come in. Integrity levels are primarily used to prevent write access while allowing read and execute access. By allowing read and execute access you allow applications to continue to perform the majority of their functions but preventing write access limits the harm they can cause by overwriting system files or tainting the user’s search paths as an example. This is exactly what Internet Explorer 7 does. It runs portions of the browser in a separate process with low integrity and there are only a handful of file system locations that provide write access to low integrity applications.
There are four integrity levels available to user-mode processes:
• Low
• Medium
• High
• System
Standard user tokens as well as restricted (non-elevated) administrator tokens have an integrity level of Medium. Unrestricted (elevated) administrator tokens have an integrity level of High. Processes running under the Local System account have an integrity level of System. The Internet Explorer process token has an integrity level of Low. A simple way to see the integrity levels for various processes is to get the latest version of Process Explorer which includes an optional column to display the integrity level of each process.
A child process will by default inherit the integrity level of the parent. You can change the integrity level when a process is created but not once it has been created. Further, you cannot raise the integrity level of a child process to anything higher than that of the parent. This avoids code with lower integrity from gaining higher integrity.
Let’s first take a look at how to query and set the integrity level for a process and then we’ll examine how to set the integrity level for securable resources.
Process integrity levels
You can determine the integrity level for a process by examining the process token. The GetTokenInformation function returns different classes of information. For example, to determine the user account represented by the token you specify the TokenUser class. GetTokenInformation will then populate a TOKEN_USER structure based on the information in the token. Similarly the TokenIntegrityLevel class can be specified to query the integrity level of the process and a TOKEN_MANDATORY_LABEL structure will be produced. Most of the structures populated by GetTokenInformation are variable length structures and since only GetTokenInformation knows how much space is required you need to follow a rigid pattern for calling this function. Since most of the low-level security functions use LocalAlloc and LocalFree to allocate and release memory, I use a LocalMemory class template along with a GetTokenInformation function template to simplify matters dramatically. You can find these templates in the download that accompanies this article. Here we will simply focus on the subject at hand:
CHandle processToken;
VERIFY(::OpenProcessToken(::GetCurrentProcess(),
TOKEN_QUERY,
&processToken.m_h));
LocalMemory<PTOKEN_MANDATORY_LABEL>info;
COM_VERIFY(GetTokenInformation(processToken,
TokenIntegrityLevel,
info));
SID* sid = static_cast<SID*>(info->Label.Sid);
DWORD rid = sid->SubAuthority[0];
switch (rid)
{
case SECURITY_MANDATORY_LOW_RID:
{
// Low integrity process
break;
}
case SECURITY_MANDATORY_MEDIUM_RID:
{
// Medium integrity process
break;
}
case SECURITY_MANDATORY_HIGH_RID:
{
// High integrity process
break;
}
case SECURITY_MANDATORY_SYSTEM_RID:
{
// System integrity level
break;
}
default:
{
ASSERT(false);
}
}
Here OpenProcessToken is used again to get the process token to query. My GetTokenInformation function template is then called with the appropriate information class and LocalMemory class template specifying the information type. The populated TOKEN_MANDATORY_LABEL structure contains a SID that represents the integrity level. Dissecting it will give you the relative identifier (RID) representing the integrity level that you program against.
To set the integrity level for a child process is pretty straightforward. Start by creating a duplicate of the parent process token. Then simply set the integrity level using the same information class and data structure used to query the integrity level in the previous example. The SetTokenInformation function comes in handy for this. Finally you can call CreateProcessAsUser to create the child process using the modified token. Here’s an example:
CHandle processToken;
VERIFY(::OpenProcessToken(::GetCurrentProcess(),
TOKEN_DUPLICATE,
&processToken.m_h));
CHandle duplicateToken;
VERIFY(::DuplicateTokenEx(processToken,
MAXIMUM_ALLOWED,
0, // token attributes
SecurityAnonymous,
TokenPrimary,
&duplicateToken.m_h));
WellKnownSid integrityLevelSid(WellKnownSid::MandatoryLabelAuthority,
SECURITY_MANDATORY_LOW_RID);
TOKEN_MANDATORY_LABEL tokenIntegrityLevel = { 0 };
tokenIntegrityLevel.Label.Attributes = SE_GROUP_INTEGRITY;
tokenIntegrityLevel.Label.Sid = &integrityLevelSid;
VERIFY(::SetTokenInformation(duplicateToken,
TokenIntegrityLevel,
&tokenIntegrityLevel,
sizeof (TOKEN_MANDATORY_LABEL) + ::GetLengthSid(&integrityLevelSid)));
STARTUPINFO startupInfo = { sizeof (STARTUPINFO) };
ProcessInfo processInfo;
VERIFY(::CreateProcessAsUser(duplicateToken,
L"C:\\Windows\\Notepad.exe",
0, // cmd line
0, // process attributes
0, // thread attributes
FALSE, // don't inherit handles
0, // flags
0, // inherit environment
0, // inherit current directory
&startupInfo,
&processInfo));
This example launches Notepad. Give it a try. You should notice that although Notepad can open text files in most locations, it cannot save to any location that is not marked with a low integrity level.
Finally, you can get a display name for integrity levels using the LookupAccountSid function, but they’re not all that user friendly so you’re better off using a string table with values like “Low”, “Medium”, “High”, and “System”.
The token created by the system for standard users has an integrity level of Medium. The restricted, or filtered, token created by the system for administrators also has an integrity level of Medium, but the unrestricted administrator token has an integrity level of High.
Now let’s examine how to set the integrity level for a particular resource.
Resource integrity levels
The integrity level for a resource is stored in a special access control entry (ACE) in the system access control list (SACL) of the resource’s security descriptor. The simplest way to set or update this value for system resources is using the SetNamedSecurityInfo function. AddMandatoryAce is a new function provided by Windows Vista to add the special ACE, known as a mandatory ACE, to an ACL. Remember, security is all about confusing people with acronyms…
Seriously, the code is quite simple if you’re familiar with programming security descriptors. Start off by preparing an ACL pointing to a buffer that is just large enough to hold a single ACE. This is achieved using the InitializeAcl function. Next the SID representing the integrity level is created and added to the ACL using the AddMandatoryAce function. Finally the integrity level is updated using the SetNamedSecurityInfo function. Notice the new LABEL_SECURITY_INFORMATION flag being used in the sample below:
LocalMemory<PACL> acl;
const DWORD bufferSize = 64;
COM_VERIFY(acl.Allocate(bufferSize));
VERIFY(::InitializeAcl(acl.m_p,
bufferSize,
ACL_REVISION));
WellKnownSid sid(WellKnownSid::MandatoryLabelAuthority,
SECURITY_MANDATORY_LOW_RID);
COM_VERIFY(Kerr::AddMandatoryAce(acl.m_p,
&sid));
CString path = L"C:\\SampleFolder";
DWORD result = ::SetNamedSecurityInfo(const_cast<PWSTR>(path.GetString()),
SE_FILE_OBJECT,
LABEL_SECURITY_INFORMATION,
0, // owner
0, // group
0, // dacl
acl.m_p); // sacl
ASSERT(ERROR_SUCCESS == result);
Retrieving the integrity level of a resource is equally simple provided you realize that most resources won’t have an integrity level set explicitly. Rather the system interprets the absence of an integrity label as if the resource were marked with “Medium” integrity. Start by calling GetNamedSecurityInfo with the same security information flag namely LABEL_SECURITY_INFORMATION. If a valid ACL pointer is returned and contains an ACE then you know the integrity level is set explicitly. Now simply call the GetAce function to retrieve a pointer to the ACE storing the integrity level SID and read the RID value to determine the integrity level. Here is an example:
CString path = L"C:\\SampleFolder";
LocalMemory<PSECURITY_DESCRIPTOR>descriptor;
PACL acl = 0;
DWORD result = ::GetNamedSecurityInfo(const_cast<PWSTR>(path.GetString()),
SE_FILE_OBJECT,
LABEL_SECURITY_INFORMATION,
0,
0,
0,
&acl,
&descriptor.m_p);
ASSERT(ERROR_SUCCESS == result);
DWORD integrityLevel = SECURITY_MANDATORY_MEDIUM_RID;
if (0 != acl && 0 < acl->AceCount)
{
ASSERT(1 == acl->AceCount);
SYSTEM_MANDATORY_LABEL_ACE* ace = 0;
VERIFY(::GetAce(acl,
0,
reinterpret_cast<void**>(&ace)));
ASSERT(0 != ace);
SID* sid = reinterpret_cast<SID*>(&ace->SidStart);
integrityLevel = sid->SubAuthority[0];
}
ASSERT(SECURITY_MANDATORY_LOW_RID == integrityLevel);
Run as administrator
So far we’ve looked at some of the individual building blocks that make up UAC such as restricted tokens and integrity levels. Let’s now take a look at what it means to “Run as administrator” and how this can be done programmatically. You have probably noticed that you can right-click an application or shortcut and select a context menu option entitled “Run as administrator”. This is available for both standard users and administrators. The concept of running as an administrator is more commonly referred to simply as elevation or creating an elevated process. Standard users are prompted for administrator credentials while administrators are simply prompted for permission to elevate. Either way the end result is a new process running with an unrestricted administrator token and all the permissions and privileges it affords.
The process of elevation is a bit complicated but fortunately much of the complexity is hidden behind an updated ShellExecute(Ex) function. ShellExecute on Windows Vista makes use of the new Application Information (appinfo) service to perform elevation through an undocumented COM interface. ShellExecute first calls CreateProcess to attempt to create the new process. CreateProcess does all the work of checking application compatibility settings, application manifests, runtime loaders, etc. If it determines that the application requires elevation but the calling process is not elevated then CreateProcess fails with ERROR_ELEVATION_REQUIRED. ShellExecute then calls the Application Information service to handle the elevation prompt and creation of the elevated process since the calling process obviously doesn’t have the necessary permissions to perform such a task. The Application Information service ultimately calls CreateProcessAsUser with an unrestricted administrator token.
If on the other hand you want to create an elevated process regardless of what application information is available then you can specify the little-known “runas” verb with ShellExecute. This has the effect of requesting elevation regardless of what an application’s manifest and compatibility information might prescribe. The runas verb is not actually new to Windows Vista. It was available on Windows XP and Windows 2003 and was often used to create a restricted token directly from the shell. This behavior has however changed. Here is a simple example:
::ShellExecute(0, // owner window
L"runas",
L"C:\\Windows\\Notepad.exe",
0, // params
0, // directory
SW_SHOWNORMAL);
Considering how much is going on behind the scenes, aren’t you glad this is all the code you need to write? Although creating a new elevated process is reasonable, it’s not always the most appropriate solution if you only need to elevate temporarily. Enter elevated COM objects.
Creating an elevated COM object
If you invested heavily in the COM era you’ll know that COM supports creating COM servers hosted in a surrogate process. Well this technique has been augmented to allow COM servers to be created in an elevated surrogate process. This is extremely useful since you can simply create the COM object on the fly in your application without having to create a whole new process directly.
The hardest part about using this technique is registering the COM server correctly to indicate that it should be loaded in a surrogate process and support elevation since the COM object needs to specifically declare its cooperation.
This first thing to do is update the COM registration to declare that your library (DLL) server can be run in a surrogate process. All you need to do is add the “DllSurrogate” named value under your server’s AppID registry key. In ATL you simply update the project’s main RGS file to look something like this:
HKCR
{
NoRemove AppID
{
'%APPID%' = s 'SampleServer'
{
val DllSurrogate = s ''
}
'SampleServer.DLL'
{
val AppID = s '%APPID%'
}
}
}
An empty value for DllSurrogate indicates that the system-supplied surrogate is to be used. The COM client can now specify the CLSCTX_LOCAL_SERVER execution context to create the COM server in the surrogate process:
CComPtr<ISampleServer>server;
COM_VERIFY(server.CoCreateInstance(__uuidof(SampleServer),
0,
CLSCTX_LOCAL_SERVER));
The next step is to enable elevated launch of the COM class. This involves adding entries to the COM class registration script. An elevation key is added to indicate that elevation is supported for this particular COM class and a “LocalizedString” named value is also required and provides the display name used by the UAC prompt. An ATL COM class registration script should look something like this:
HKCR
{
SampleServer.SampleServer.1 = s 'SampleServer Class'
{
CLSID = s '{91C5423A-CF90-4E62-93AD-E5B922AE8681}'
}
SampleServer.SampleServer = s 'SampleServer Class'
{
CLSID = s '{91C5423A-CF90-4E62-93AD-E5B922AE8681}'
CurVer = s 'SampleServer.SampleServer.1'
}
NoRemove CLSID
{
ForceRemove {91C5423A-CF90-4E62-93AD-E5B922AE8681} = s 'SampleServer Class'
{
ProgID = s 'SampleServer.SampleServer.1'
VersionIndependentProgID = s 'SampleServer.SampleServer'
InprocServer32 = s '%MODULE%'
{
val ThreadingModel = s 'Neutral'
}
val AppID = s '%APPID%'
'TypeLib' = s '{A43B074B-0452-4FF4-8308-6B0BF641C3AE}'
Elevation
{
val Enabled = d 1
}
val LocalizedString = s '@%MODULE%,-101'
}
}
}
Don’t forget to add a string to your string table for the localized name. The COM client can now launch the elevated COM server. As with CreateProcess, the CoCreateInstance function won’t create an elevated COM object directly. Instead you need to use the COM elevation moniker. This is most easily achieved using the CoGetObject function to build the moniker and return a proxy to the object that is ultimately created:
template <typename T>
HRESULT CreateElevatedInstance(HWND window,
REFCLSID classId,
T** object)
{
BIND_OPTS3 bindOptions;
::ZeroMemory(&bindOptions, sizeof (BIND_OPTS3));
bindOptions.cbStruct = sizeof (BIND_OPTS3);
bindOptions.hwnd = window;
bindOptions.dwClassContext = CLSCTX_LOCAL_SERVER;
CString string;
const int guidLength = 39;
COM_VERIFY(::StringFromGUID2(classId,
string.GetBufferSetLength(guidLength),
guidLength));
string.ReleaseBuffer();
string.Insert(0, L"Elevation:Administrator!new:");
return ::CoGetObject(string,
&bindOptions,
__uuidof(T),
reinterpret_cast<void**>(object));
}
Using the function template is just as simple as calling CoCreateInstance:
CComPtr<ISampleServer>server;
COM_VERIFY(CreateElevatedInstance(0, // window
__uuidof(SampleServer),
&server);
As with ShellExecute, the window handle is used by UAC to determine whether the prompt will steal the focus or whether it will be waiting for the user in the background.
Using application manifests
Remember when I said that CreateProcess checks application compatibility settings and application manifests among other things? As it turns out, Windows Vista goes to great lengths to ensure that legacy 32-bit applications run properly. This involves a tremendous amount of plumbing to virtualize areas of the file system and registry that applications traditionally had full access to but no longer do under the more restrictive environment imposed by UAC. As impressive as all this virtualization is, the key is to avoid it if at all possible. It’s meant for legacy applications. If you’re writing an application today make sure to provide an application manifest which is the surest way to make sure that virtualization is not applied to your application. Indeed Microsoft is planning on removing the virtualization capabilities in a future version of Windows.
The application manifest schemas have received an upgrade in Windows Vista to allow them to express the application’s requested security context. What makes it a little more complicated is that Visual C++ by default automatically generates an application manifest. This is actually a very good thing. The linker is keenly aware of the dependencies of your application and the manifest is used to define dependencies on side-by-side assemblies. Fortunately it also provides an option for merging in additional manifest files into the manifest that is ultimately embedded into the application executable. The Visual C++ project’s “Additional Manifest Files” setting is just the thing. Here’s a simple manifest file that declares a dependency on Common Controls 6.0 and specifies a desired security context:
<?xml version="1.0" encoding="UTF-8" standalone="yes"?>
<assembly xmlns="urn:schemas-microsoft-com:asm.v1" manifestVersion="1.0">
<dependency>
<dependentAssembly>
<assemblyIdentity
type="win32"
name="Microsoft.Windows.Common-Controls"
version="6.0.0.0"
processorArchitecture="*"
publicKeyToken="6595b64144ccf1df"
language="*"
/>
</dependentAssembly>
</dependency>
<v3:trustInfo xmlns:v3="urn:schemas-microsoft-com:asm.v3">
<v3:security>
<v3:requestedPrivileges>
<!-- level can be "asInvoker", "highestAvailable", or "requireAdministrator" -->
<v3:requestedExecutionLevel level="highestAvailable" />
</v3:requestedPrivileges>
</v3:security>
</v3:trustInfo>
</assembly>
The requested execution level can specify one of three values. “asInvoker” is the default and a new process will simply inherit the token of the parent process. “highestAvailable” indicates that the application is requesting the most unrestictive security context available to the user. For standard users this is the same as “asInvoker” but for administrators this is a demand for the unrestricted token. “requireAdministrator” indicates that a unrestricted administrator token is needed. Standard users will be prompted for administrator credentials and administrators will be prompted for consent to elevate.
Remember, CreateProcess will check the manifest and fail to create the process if the requested execution level does not match that of the parent process. Only ShellExecute makes use of the Application Information service to perform elevation.
Am I already elevated?
Finally, if all you need is to determine whether or not you are currently elevated you can simply call the IsUserAnAdmin function. If you need more precision you can also use GetTokenInformation but in most cases that is overkill.
Conclusion
That’s it for UAC. I hope you’ve found this helpful. Very little of what I’ve described is currently documented. Hopefully that will change.
I should add that all the samples I present typically use assertions and similar macros to check for errors. I do this to identify where error handling is necessary. If you use some of the code in your own applications, be sure to replace these macros with whatever error handling strategy you use, whether its exceptions, HRESULTs or something else.
The download for this article include some helpful class templates and functions that you may find helpful. -
Vista and Cambridge
So I’m sitting in Starbucks in Cambridge UK. I can’t believe I have to pay 5 pounds for wireless! :) I hardly ever go to Starbucks but it’s the only place I could find offering wireless Internet access. I haven’t been in England in quite a few years and just met my nephew for the first time. My sister has been living in England for a few years and just settled in Cambridge after living in the country for a while.
-
Windows Vista for Developers – Part 3 – The Desktop Window Manager
Although Windows 95 (and Window NT 3.51) introduced Windows developers to non-rectangular windows, through the ability to set the window region for a given window using the SetWindowRgn function, this did not provide transparency since the window was still completely opaque and merely afforded the developer some control over the window’s shape. Windows 2000 introduced layered windows by means of the WS_EX_LAYERED extended window style and developers were finally able to control not only the shape but also the level of transparency within the window region. Windows Vista introduces yet another twist on the road away from non-rectangular windows by allowing developers to apply translucency to portions of a window.
In this part 3 of the Windows Vista for Developers series, we are looking at the Desktop Window Manager (DWM) API. The DWM is responsible for the composition of windows on the desktop and the DWM API allows developers to control how composition affects a particular window. As you will see, the DWM is responsible for much more than just “glass”. We will also look at the existing functionality for transparency that Windows Vista inherited from Windows 2000 and see how it complements the new DWM functionality.
Terminology
When it comes to graphics, the terminology can be confusing. Here are some common terms you should be familiar with when working with transparency and translucency in Windows.
Transparency – Refers to the ability to see through something clearly and without obstruction. Think of it as clear glass. Some applications and APIs use the term transparency to refer to a scale that ranges from “completely” transparent to “completely” opaque.
Translucency – People often use translucency and transparency interchangeably but they actually mean very different things. Translucency refers to the ability to see through something where the background appears unclear whether it is out-of-focus or simply blurry in some way. Windows Vista refers to the glass effect as “transparent glass” when it technically should be called translucent glass.
Opacity – Opacity refers to the state of being opaque and opaque refers to something that is neither transparent nor translucent. Some applications and APIs use the term opacity to refer to a scale that ranges from completely opaque to completely transparent.
Alpha Channel – An alpha channel provides additional information for each pixel in an image that facilitates compositing images together.
Window Regions – A window’s region determines the area within the window where system permits painting. Although Windows 95 supported window regions, it was not until Windows XP that the default theme used regions to present windows with rounded corners. Although the default Windows Vista theme also presents windows with rounded corners, regions are no longer used unless you resort to the Windows Vista Basic theme.
Glass – Glass is the catchy marketing terms that Windows Vista uses to refer to translucency.
Blur – Some of the DWM APIs refer to blur and again this indicates translucency. Presumably, the Windows developers felt it was easier to spell and comprehend.
Desktop Composition – The DWM performs desktop composition, enabling visual effects on the desktop such as glass, 3D window transitions, etc.
RGB – RGB is short for Red, Green and Blue. RGB values are typically packed into a COLORREF (which is just a DWORD) as follows: 0x00BBGGRR. As you can see, the first byte is always zero and the remaining three bytes store the individual red, green and blue values in reverse order. Each color value ranges from zero through 255. If all three values are zero then the result is black. If all three values are 255 then the result is white. For example, to represent red specify 0x000000FF. You can also use the RGB macro as follows: RGB(255, 0, 0). As you can see, RGB does not provide an alpha channel.
ARGB – ARGB is short for Alpha, Red, Green and Blue. ARGB values are typically packed into an ARGB (which is just a DWORD) as follows: 0xAARRGGBB. The first byte stores the alpha value and the remaining three bytes store the red, green and blue values. Note that the color values are stored in the opposite order to RGB.
GDI – The Windows Graphics Device Interface (GDI) API is the original graphics interface used for 2D drawing in Windows. With the exception of a few newer functions, the GDI API does not honor the alpha channel in images. GDI uses RGB values to represent color.
GDI+ – GDI+ was introduced with Windows XP (and Windows Server 2003) to provide a more capable programming model for 2D drawing, imaging and typography and fully supports alpha blending. GDI+ uses ARGB values to represent color. Incidentally, GDI+ powers the the System.Drawing library in the .NET Framework.
Is Composition Enabled?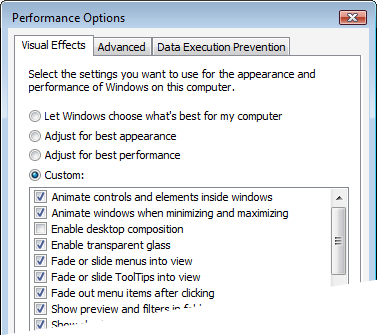 With the terminology out of the way, we can now dive into the guts of desktop composition. Of course, to take advantage of it we need to make sure that it is actually available at runtime. The user may have disabled desktop composition for performance reasons. This can be done as follows:
1. Open the System Properties window using the following command:
%windir%\system32\SystemPropertiesAdvanced.exe
2. Click the Performance Settings button.
3. Either check or clear the “Enabled desktop composition” check box.
Keep in mind that desktop composition is independent of “glass”. Although glass requires desktop composition, you can use desktop composition while disabling glass.
Windows Vista provides the DwmIsCompositionEnabled function to determine whether composition is currently enabled. Consider the following example:
BOOL enabled = FALSE;
HRESULT result = ::DwmIsCompositionEnabled(&enabled);
Of course, this is not especially useful if you are targeting older platforms as your application will fail to load since it will be linked to a library that is not available. One solution is to use a blend of delay loading and runtime dynamic linking. The DWM API is provided by the dwmapi.dll library and to ensure that your application will load on older platforms you can use Visual C++’s Delay Load facility to only load the DWM library if it is actually used. The first step is to instruct the linker to delay load the DWM library. This can be done as follows:
1. Open the project’s property pages.
2. Navigate to the Linker > Input section.
3. Add dwmapi.dll to the list of Delay Load DLLs. You should already have dwmapi.lib in the list of Additional Dependencies to allow the linker to find the various DWM API functions that you make use of.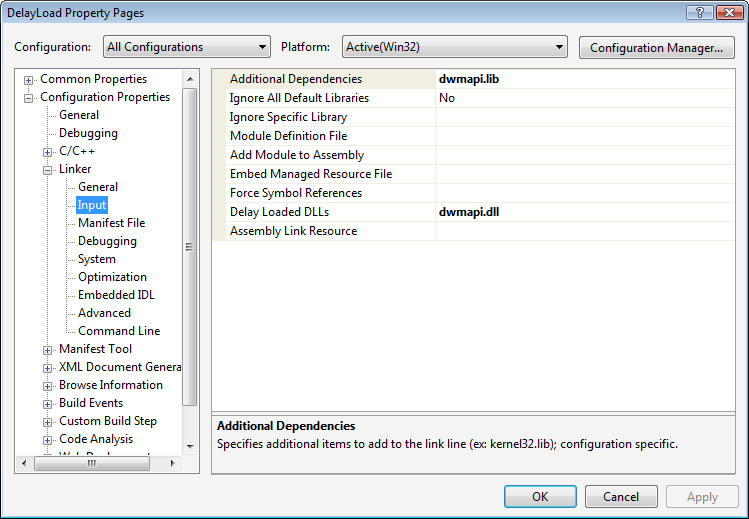
With this in place, the DWM library will only be loaded the first time you call any of its functions, but how do you know whether it is safe to do so? After all, calling DwmIsCompositionEnabled will attempt to load the DWM library and crash your application on older versions of Windows. The solution is to manually attempt to load the DWM library and for good measure attempt to retrieve the address of a DWM function. Consider the following wrapper function:
bool IsCompositionEnabled()
{
HMODULE library = ::LoadLibrary(L"dwmapi.dll");
bool result = false;
if (0 != library)
{
if (0 != ::GetProcAddress(library,
"DwmIsCompositionEnabled"))
{
BOOL enabled = FALSE;
result = SUCCEEDED(::DwmIsCompositionEnabled(&enabled)) && enabled;
}
VERIFY(::FreeLibrary(library));
}
return result;
}
The IsCompositionEnabled function attempts to load the DWM library and retrieve the address of the DwmIsCompositionEnabled function. If this is successful, you can assume it is running on Windows Vista or later. It then simply calls the DwmIsCompositionEnabled function, which will actually load the DWM library, to determine whether composition is enabled. Now you simply have to ensure that you do not call any other DWM functions if IsCompositionEnabled returns false.
The other thing to keep in mind is that since the user, and other applications for that matter (more on this in a moment), can enable and disable desktop composition at any time, your application needs to be able to cope with changes in the availability of desktop composition. The system will send your window the WM_DWMCOMPOSITIONCHANGED message to indicate that the availability of desktop composition has changed. The WPARAM and LPARAM values are not used so you must call the DwmIsCompositionEnabled function again to determine the current state of desktop composition.
As I hinted at, it is possible for applications to temporarily disable desktop composition for the lifetime of the application or for some subset thereof. The DwmEnableComposition function allows you to disable desktop composition for the entire desktop. Desktop composition will be disabled until you call DwmEnableComposition again to enable it. If you fail to re-enable desktop composition, the system will automatically enable it when the application exits.
The following code disables composition:
HRESULT result = ::DwmEnableComposition(DWM_EC_DISABLECOMPOSITION);
And the following code will enable it again:
HRESULT result = ::DwmEnableComposition(DWM_EC_ENABLECOMPOSITION);
Assuming you are using the default Windows Vista theme, these calls will toggle between the new “Window Vista” and “Windows Vista Basic” themes. Just remember, when you application exits, composition will be reset regardless of whether you re-enabled it.
Is Composition Translucent?
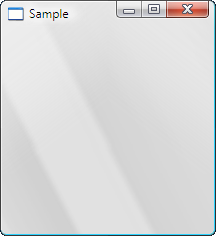
As I mentioned in the previous section, the fact that desktop composition is enabled does not necessarily mean that the “glass” is translucent. I took the following two window clippings of the exact same window. The one on the left was taken with translucent glass and the one of the right with opaque glass. As you can see, the translucent glass provides a hint of the desktop background color as well as the recycle bin hiding underneath the window whereas the opaque glass only offers the aurora effect provided by the DWM.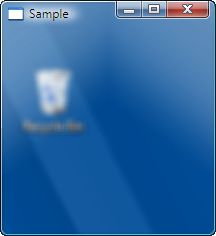
-
Vista and Camping
I was hoping to post part 3 of the Windows Vista for Developers series tonight, covering the Desktop Window Manager API (the provider of "glass"). Unfortunately I still need another evening to finish up the writing and since I’m going camping tomorrow with Karin and the kids I won’t be able to post it till I get back around the 5th of August. Sorry for the delay but it will be well worth the wait – it’s turning into the most interesting topic of the series thus far and it’s going to be another “in depth” article covering advancements in the translucency and transparency features provided by Windows Vista.
-
Windows Vista for Developers – Part 2 – Task Dialogs in Depth
Just as Aero wizards enable a better user experience compared to traditional wizards, so task dialogs enable a better user experience compared to the age-old message box. Task dialogs however offer so much more than the lowly message box ever did with a long list of features and customizability. Along with all this power comes a certain degree of complexity. In part 2 of the Windows Vista for Developers series, I will show you how to use the task dialog API effectively to build all manner of dialog boxes simply and easily using native C++. If you are in a hurry, you can skip to the end of this article where you can find a download with the source code for a complete C++ wrapper for the task dialog API.
An internal C++ class called CTaskDialog hidden inside the comctl32.dll library takes care of implementing all the functionality provided by task dialogs. The TaskDialog and TaskDialogIndirect functions exported by comctl32.dll call it on your behalf. The TaskDialog function is just a simpler version of TaskDialogIndirect providing much less functionality while being a little simpler to use. Since neither is very useable directly, this article focuses on TaskDialogIndirect and then demonstrates how a little help from C++ can make it quite simple to use.
The following code creates a minimal task dialog:
TASKDIALOGCONFIG config = { sizeof (TASKDIALOGCONFIG) };
int selectedButtonId = 0;
int selectedRadioButtonId = 0;
BOOL verificationChecked = FALSE;
HRESULT result = ::TaskDialogIndirect(&config,
&selectedButtonId,
&selectedRadioButtonId,
&verificationChecked);
The TASKDIALOGCONFIG structure provides a host of fields and flags that you can populate as well as a callback function you can provide to respond to events raised by the task dialog:
struct TASKDIALOGCONFIG
{
UINT cbSize;
HWND hwndParent;
HINSTANCE hInstance;
TASKDIALOG_FLAGS dwFlags;
TASKDIALOG_COMMON_BUTTON_FLAGS dwCommonButtons;
PCWSTR pszWindowTitle;
union
{
HICON hMainIcon;
PCWSTR pszMainIcon;
};
PCWSTR pszMainInstruction;
PCWSTR pszContent;
UINT cButtons;
const TASKDIALOG_BUTTON* pButtons;
int nDefaultButton;
UINT cRadioButtons;
const TASKDIALOG_BUTTON* pRadioButtons;
int nDefaultRadioButton;
PCWSTR pszVerificationText;
PCWSTR pszExpandedInformation;
PCWSTR pszExpandedControlText;
PCWSTR pszCollapsedControlText;
union
{
HICON hFooterIcon;
PCWSTR pszFooterIcon;
};
PCWSTR pszFooter;
PFTASKDIALOGCALLBACK pfCallback;
LONG_PTR lpCallbackData;
UINT cxWidth;
};
As you can imagine, populating this structure just right can be a challenge and the room for error is significant. Although many of the fields can be zeroed-out, the following fields generally need to be set in order to get expected behavior:
The cbSize field specifies the size of the structure at compile-time and is a common technique used to version data structures in C. It lets the operating system know which version of the structure the application was compiled against and thus can make certain assumptions about the fields and functionality that the application expects.
The hwndParent field stores a handle to the parent window. This allows the resulting dialog to behave as a modal window and optionally lets you position the window relative to the parent.
The hInstance field is useful for C++ developers as it allows you to specify strings and icon resources using their identifiers from your resource file instead of having to manually load or create them in your code.
The dwFlags field stores various flags allowing to you control the behavior and appearance of the dialog box. Subsequent sections in this article will explore the various flags as appropriate.
Text Captions
The TASKDIALOGCONFIG structure provides the following fields for setting the various text captions on a task dialog:
pszWindowTitle
pszMainInstruction
pszContent
pszVerificationText
pszExpandedInformation
pszExpandedControlText
pszCollapsedControlText
pszFooter
All of these fields can be initialized either with a pointer to a string or with a resource identifier created using the MAKEINTRESOURCE macro. In addition to these, you can also set the captions for custom buttons but we will deal with that in the next section.
The following window clipping illustrates the various text captions: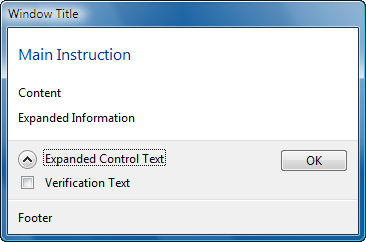
The “window title” can be specified with the pszWindowTitle field before the dialog is created. Once created, you can update the caption using the regular SetWindowText function.
The “main instruction” can be specified with the pszMainInstruction field before the dialog is created. Once created, you must use the TDM_SET_ELEMENT_TEXT message to update the text. Set WPARAM to TDE_MAIN_INSTRUCTION and LPARAM to either a pointer to a string or a resource identifier created using the MAKEINTRESOURCE macro. The same approach is used for the “content”, “verification text”, “expanded information” and “footer” text captions just by passing different values for WPARAM to identify the control whose text needs to be updated.
The “expanded control text” and “collapsed control text” can only be specified prior to creating the dialog with the pszExpandedControlText and pszCollapsedControlText fields respectively. Build 5456 of Windows Vista also includes a bug in the control that expands and collapses the expanded information. If the control loses focus, the text reverts to the value specified for the collapsed state.
Setting the text captions can be a challenge depending on where the text comes from and when you wish to set it. Later in this article, we look at how C++ can be used to simplify this dramatically.
Buttons
Task dialogs support any combination of common as well as custom buttons. The following common buttons are currently defined:
TDCBF_OK_BUTTON (IDOK)
TDCBF_YES_BUTTON (IDYES)
TDCBF_NO_BUTTON (IDNO)
TDCBF_CANCEL_BUTTON (IDCANCEL)
TDCBF_RETRY_BUTTON (IDRETRY)
TDCBF_CLOSE_BUTTON (IDCLOSE)
You can specify any combination of these button flags for the dwCommonButtons field. The constants in brackets indicate the button identifier used to identify the button when a particular button is clicked.
The Common Buttons Sample in the download that you can find at the end of this article demonstrates the common buttons at work: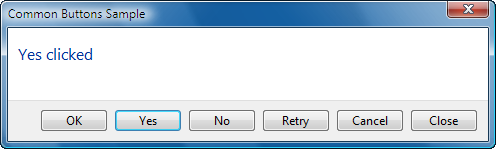
One thing that you cannot do directly with common buttons is reorder them or change their captions. For complete control over the buttons, you can provide an array of TASKDIALOG_BUTTON structures. Here is a simple example specifying two custom buttons:
TASKDIALOGCONFIG config = { sizeof (TASKDIALOGCONFIG) };
TASKDIALOG_BUTTON buttons[] =
{
{ 101, L"First Button" },
{ 102, L"Second Button" }
};
config.pButtons = buttons;
config.cButtons = _countof(buttons);
You can also use the MAKEINTRESOURCE macro to specify a resource identifier for a string in your string table for use by the buttons.
In addition to buttons, task dialogs can also host a set of radio buttons. These are also described using an array of TASKDIALOG_BUTTON structures:
TASKDIALOG_BUTTON radioButtons[] =
{
{ 201, L"First Radio Button" },
{ 202, L"Second Radio Button" }
};
config.pRadioButtons = radioButtons;
config.cRadioButtons = _countof(radioButtons);
Here are the results for the code above: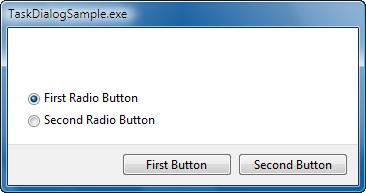
You can also specify the TDF_USE_COMMAND_LINKS flag to display the custom buttons as command links instead. Use the TDF_USE_COMMAND_LINKS_NO_ICON flag if you do not wish to see the icons next to the captions.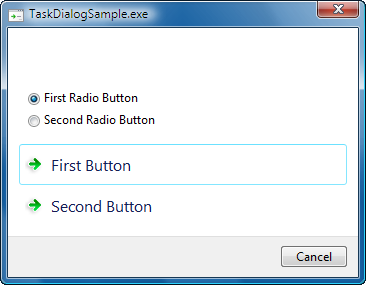
As you can see, these flags only affect custom buttons. Any common buttons you specify will still be displayed as regular buttons.
You can also display the infamous User Account Control shield next to your button caption by sending the TDM_SET_BUTTON_ELEVATION_REQUIRED_STATE message to the window. The WPARAM specifies the button identifier and the LPARAM specifies a BOOL indicating whether to display or hide the shield.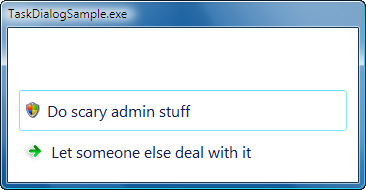
This works whether or not your custom buttons are command links or regular buttons. Incidentally, it also works for common buttons like OK and Cancel although it would not in general provide for a good user experience to require an elevation of permissions for such a button.
Icons
Task dialogs can optionally display a “main” icon as well as a “footer” icon. The main icon appears next to the main instruction text and optionally in the title bar if the TDF_CAN_BE_MINIMIZED flag is specified. The footer icon is display next to the footer text if present.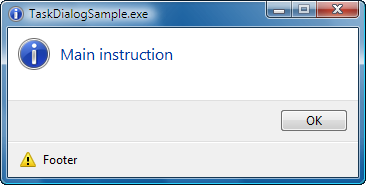
Specifying the icons can be tricky. The pszMainIcon field can be used to specify an icon resource identifier using the MAKEINTRESOURCE macro before the dialog is created. If you use this approach, make sure the TDF_USE_HICON_MAIN flag is not set. Alternatively, you can specify an icon handle in the hMainIcon field and in this case, you need to ensure that the TDF_USE_HICON_MAIN flag is specified.
The footer icon works in the same way. The pszFooterIcon field can be used to specify an icon resource identifier before the dialog is created. Alternatively, you can specify an icon handle in the hFooterIcon field. For the footer icon, you indicate your preference to use a handle with the TDF_USE_HICON_FOOTER flag.
After the dialog is created, you can send the TDM_UPDATE_ICON message to update the icons. Set the WPARAM to TDIE_ICON_MAIN to update the main icon and TDIE_ICON_FOOTER to update the footer icon. The LPARAM is set to either an icon resource identifier or an icon handle depending on whether you specified the TDF_USE_HICON_MAIN or TDF_USE_HICON_FOOTER flags respectively at creation time.
As with the text captions, getting all this right can be challenging and the C++ solution presented a little later in this article will also simplify this considerably.
Progress Bar
One of the notable features of a task dialog is that it offers a progress bar. Simply specify the TDF_SHOW_PROGRESS_BAR flag and your task dialog will include a progress bar. If you would like the progress bar to appear as a marquee then use the TDF_SHOW_MARQUEE_PROGRESS_BAR flag instead. You can also switch between a regular progress bar and a marquee progress bar after the dialog is created using the TDM_SET_PROGRESS_BAR_MARQUEE message. Set WPARAM to TRUE to display a marquee progress bar or FALSE to display a regular progress bar. The LPARAM controls the delay used by the marquee animation and is specified in milliseconds.
You can specify the range for the progress bar using the TDM_SET_PROGRESS_BAR_RANGE message. The LPARAM specifies both values with the loword indicating the minimum range and the hiword specifying the maximum range. The TDM_SET_PROGRESS_BAR_POS message sets the position of the progress bar within the range. The WPARAM specifies the position value.
You can also change the state of the progress bar with the TDM_SET_PROGRESS_BAR_STATE message. The WPARAM can specify either PBST_NORMAL, PBST_PAUSED, or PBST_ERROR.
The Progress Sample and Progress Effects Sample in the download for this article demonstrate all the progress bar functionality.
Notifications
Task dialogs provide a number of notifications to allow you to add behavior and respond to events that may occur. These notifications are relayed through a callback function that you can specify through the pfCallback field. The callback function is prototyped as follows:
HRESULT __stdcall Callback(HWND handle,
UINT notification,
WPARAM wParam,
LPARAM lParam,
LONG_PTR data);
The prototype is misleading however since none of the messages return an HRESULT. The only messages that return anything at all return a Boolean value of TRUE or FALSE. I expect this to be cleaned up before the release. The handle parameter provides the handle for the task dialog window that you can then store for use at any time until the TDN_DESTROYED notification arrives. The data parameter provides the pointer that you specified in the lpCallbackData field. This is typically used to pass a pointer to a C++ window object to the static callback function. Let us now look at the various notifications.
TDN_DIALOG_CONSTRUCTED is the first notification to arrive. Along with providing the task dialog’s window handle, it signals that the dialog is created and about to be displayed. At this point, you can send any messages that you might need to modify the appearance of the dialog before it is displayed. This notification is followed by the TDN_CREATED notification but you do not usually need to worry about the latter unless you need to perform some window-specific initialization. Both notifications are equally valid for performing initialization although TDN_CREATED is not provided when a page navigation occurs whereas TDN_DIALOG_CONSTRUCTED is provided in either case. Navigations are discussed in the next section.
The TDN_BUTTON_CLICKED notification indicates unsurprisingly that a button has been clicked. This includes the common buttons as well as custom buttons. This notification is also used if the dialog box is cancelled by clicking the X in the top-right corner or by hitting the Escape key although this functionality is only provided if the TDF_ALLOW_DIALOG_CANCELLATION flag was provided prior to creation. The WPARAM indicates the button identifier indicating which button was clicked. Earlier in this article, I discussed buttons and button identifiers. To close the dialog the callback for this notification should return FALSE. To prevent the dialog from closing return TRUE.
The TDN_RADIO_BUTTON_CLICKED notification indicates that one of the radio buttons has been clicked. The WPARAM indicates the radio button identifier indicating which radio button was clicked. The return value from the callback for this notification is ignored.
The TDN_HELP notification indicates that the user pressed the F1 (Help) key on the keyboard. Try to be helpful.
The TDN_VERIFICATION_CLICKED notification indicates that the verification check box state has changed. The WPARAM is FALSE if it is unchecked or TRUE it is checked.
The TDN_EXPANDO_BUTTON_CLICKED notification indicates that the control to expand or collapse the “expanded information” area has been clicked. The WPARAM is FALSE if it is collapsed or TRUE if it is expanded.
The TDN_HYPERLINK_CLICKED notification indicates that a hyperlink in one of the text fields in the task dialog has been clicked. Hyperlinks are only supported in the “content”, “expanded information” and “footer” text captions and only if the TDF_ENABLE_HYPERLINKS flag was specified. Hyperlinks are defined using the HTML A(nchor) element as follows:
<a href="uri">text</a>
Only double-quotes are supported so you will have to escape them as necessary. The link can also appear within a larger string. The value provided for the href attribute is provided through the LPARAM and it is up to you to do anything interesting with it such as opening a web page. Task dialogs do not provide any default behavior and wisely so. The MainWindow class in the download for this article demonstrates hyperlinks.
The TDN_TIMER notification provides a timer that your dialog can use for a variety of things from updating dialog controls to automatically closing the dialog box after a certain period. Timer notifications are provided roughly every 200 milliseconds if the TDF_CALLBACK_TIMER flag was specified. The Timer Sample in the download for this article demonstrates the timer functionality at work: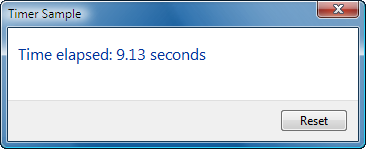
Messages
Task dialogs respond to a number of messages allowing you to affect certain behavior as needed.
The TDM_CLICK_BUTTON and TDM_CLICK_RADIO_BUTTON messages simulate a button and radio button click respectively. The WPARAM specifies the button identifier and the LPARAM is ignored.
The TDM_CLICK_VERIFICATION message simulates a click of the verification check box. The WPARAM indicates whether it should be checked (TRUE) or cleared (FALSE). The LPARAM indicates whether it should receive the focus (TRUE) or not (FALSE).
The TDM_ENABLE_BUTTON and TDM_ENABLE_RADIO_BUTTON messages enable or disable a button and radio button respectively. The WPARAM specifies the button identifier and the LPARAM indicates whether it should be enabled (TRUE) or disabled (FALSE).
The last notification I avoided mentioning in the previous section is TDN_NAVIGATED, which as of this writing has no documentation whatsoever. It is directly related to the TDM_NAVIGATE_PAGE message so I thought I would discuss it here. As it turns out, the TDM_NAVIGATE_PAGE message is also without documentation of any kind. After a few minutes in the debugger stepping through the assembler (with OS symbols of course), I was able to figure it out. These messages allow you to transition, or navigate from one task dialog to another, like a forward-only wizard. The “new” task dialog effectively takes ownership of the previous dialog’s window so a new window is not created for the new task dialog. Once I tracked down the comctl32.dll code inside the disassembler I figured out that the TDM_NAVIGATE_PAGE message handler does not read the WPARAM but expects the LPARAM to specify a pointer to a TASKDIALOGCONFIG structure describing the appearance and behavior for the next task dialog to navigate to. The TDN_NAVIGATED notification is then relayed to the callback function for the new task dialog. The Error Sample for this article demonstrates this functionality.
C++ to the Rescue
Task dialogs certainly are powerful but that power comes at the expense of usability. The task dialog C API is complex despite the fact that only two functions are exposed. To solve this problem I wrote the TaskDialog C++ class to simplify the use of task dialogs in native C++ code. The TaskDialog class inherits from ATL’s CWindow class and wraps most if not all of the task dialog functionality, abstracting away much of the complexity of preparing the TASKDIALOGCONFIG structure, sending messages and responding to notifications. All the samples in the download for this article use my TaskDialog class so you should have ample examples to rely on.
Here is the source code for one of the sample task dialogs included with the download for this article:
class TimerDialog : public Kerr::TaskDialog
{
public:
TimerDialog() :
m_reset(false)
{
SetWindowTitle(L"Timer Sample");
SetMainInstruction(L"Time elapsed: 0 seconds");
AddButton(L"Reset", Button_Reset);
m_config.dwFlags |= TDF_ALLOW_DIALOG_CANCELLATION |
TDF_CALLBACK_TIMER;
}
private:
enum
{
Button_Reset = 101
};
virtual void OnTimer(DWORD milliseconds,
bool&reset)
{
CString text;
text.Format(L"Time elapsed: %.2f seconds",
static_cast<double>(milliseconds) / 1000);
SetMainInstruction(text.GetString());
reset = m_reset;
m_reset = false;
}
virtual void OnButtonClicked(int buttonId,
bool&closeDialog)
{
switch (buttonId)
{
case Button_Reset:
{
m_reset = true;
break;
}
case IDCANCEL:
{
closeDialog = true;
break;
}
default:
{
ASSERT(false);
}
}
}
bool m_reset;
};
As you can see, it provides a simple, object-oriented model for programming task dialogs. You do not need to directly populate the various structures or manage arrays of button definitions. The TaskDialog base class takes care of all the details. Methods are provided for setting (and updating) the various text captions and icons. Methods are also provided for adding buttons and sending various messages. Finally, virtual methods are provided for responding to notifications.
Using the task dialog defined above could not be simpler:
TimerDialog dialog;
Dialog.DoModal();
Once the DoModal method returns, you can use the GetSelectedButtonId, GetSelectedRadioButtonId and VerificiationChecked methods to retrieve the various buttons selected by the user.
To give you an idea of the complexity hidden by the TaskDialog class, look at the implementation of the SetWindowTitle method:
void Kerr::TaskDialog::SetWindowTitle(ATL::_U_STRINGorID text)
{
if (0 == m_hWnd)
{
m_config.pszWindowTitle = text.m_lpstr;
}
else if (IS_INTRESOURCE(text.m_lpstr))
{
CString string;
// Since we know that text is actually a resource Id we can ignore the pointer truncation warning.
#pragma warning(push)
#pragma warning(disable: 4311)
VERIFY(string.LoadString(m_config.hInstance,
reinterpret_cast<UINT>(text.m_lpstr)));
#pragma warning(pop)
VERIFY(SetWindowText(string));
}
else
{
VERIFY(SetWindowText(text.m_lpstr));
}
}
ATL’s _U_STRINGorID class is used to allow you to easily specify either a string pointer or a resource identifier. If the task dialog has not yet been created, the internal TASKDIALOGCONFIG structure is simply updated. Alternatively, the SetWindowText function is used to update the window title. In this way, the developer can call the SetWindowTitle method at any point without needing different code depending on when or with what data the window title is to be populated.
Sample
Samples provided in the download for this article demonstrate virtually all of the features described in this article.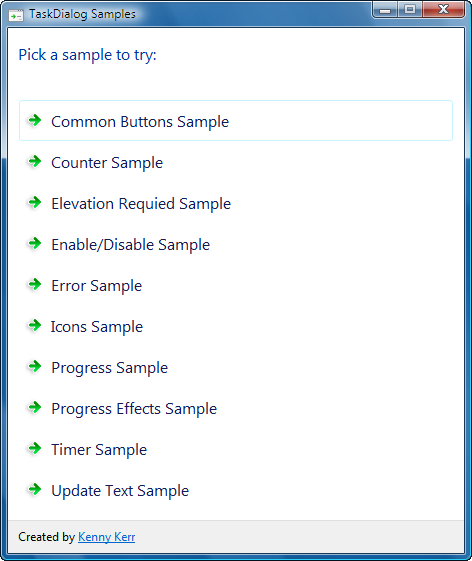
Well this turned out to be quite a bit longer than I had planned. The Windows Vista task dialog API just provides so much functionality that I could not have done it justice any other way. This is also the only complete documentation for the task dialog that I am aware of. I hope it will benefit many readers. -
Windows Vista for Developers – Part 1 – Aero Wizards
Aero wizards represent the evolution of the wizard interface first popularized by the Windows 95 family of operating systems. They provide a fresh new look to the common wizard interface and are designed to provide a more focused experience for users. In this first part of the Windows Vista for Developers series, I will show you how you can take a simple wizard and turn it into an Aero wizard with a minimal amount of code.
-
Windows Vista for Developers – A New Series
The July 2006 issue of MSDN Magazine featured an article I wrote about some new native APIs introduced with Windows Vista. Unfortunately due to the severe space constraints (due to print publication) the article was trimmed down and the sample code in particular was negatively affected to the point where the article provided little more than a light introduction without the level of detail I usually like to provide. So I decided to write a new series of articles on my blog to focus on many of the new APIs introduced in Windows Vista in far more detail. As I’m publishing it online, there will be no space constraints and readers will hopefully find it much more valuable as a resource for development information for Windows Vista.
-
Nish on the C++/CLI Support Library
I was just going to write about the C++/CLI Support Library included with Visual C++ 2005 when I noticed my friend Nish has already written a nice piece on the topic. Go check it out:
-
Avoid dynamic disks if…
…you’re setting up Windows Media Center Edition. This is one of those little tidbits you only learn after it’s too late. Although Windows Media Center Edition doesn’t have a problem with dynamic disks, the extender software (both first generation extenders and the Xbox 360) can’t tolerate them for some reason.