Contents tagged with General Software Development
-
Day-to-day with Subversion
How many times have you said "What version is in production?" or "Can we rebuild production to fix a bug and release an update?"
Better yet my favourite:
"We're working on Feature Y so we can't fix the bug for Feature X. Doing so would mean we deploy part of Feature X and Y with the patch!"
These are typical problems with source control, patching, and keeping your working flowing. Often it's hard to keep track of what's being worked on vs. what was already deployed. Sometimes you end up deploying something not tested or "ready for primetime". For example, at one point I was deploying screens and we had to pass along explicit instructions to the QA folks to "not touch that button!" because we hadn't finished the backend or our own testing. Of course, they touched it and logged a bug. Still, we often run into the problem of working on one set of features while testing another.
Recently we've switched over (not fully yet, but most of the projects are going there) from TFS to Subversion. TFS is just a bloody nightmare when it comes to trying to keep the trunk revision stable while performing updates on branches and not getting into a merge from hell scenario, which is sometimes typical when you have branches.
In doing the switch, we landed on a solution around branching code for new features and keeping the trunk clean. Branching is a hot topic in source control circles and has been known to start holy wars. In my past life (like a month ago) I avoided branches like the plague. This is probably due to the fact that branching (and more importantly the merge back) in TFS and VSS was like a live enema. Not something you want to do every day.
However in working through the process in a few projects and experiencing the daily merge routine first-hand, it's become my friend and makes for building systems along a feature driven development stream much easier. Here's how the process goes and all the details on each step.
Revision 1
Code and screenshots are always the best way to work through a process. While the code here is trivial (just a WinForms app with a few custom forms and dialogs) the principles are the same no matter how big your project is.
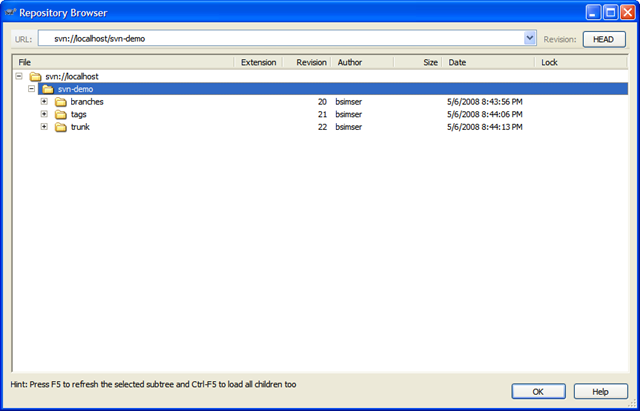
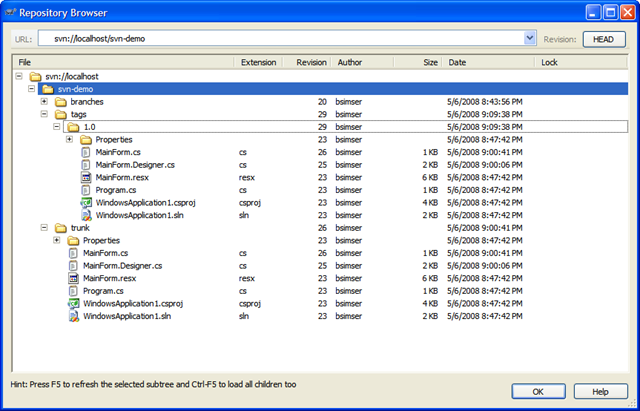
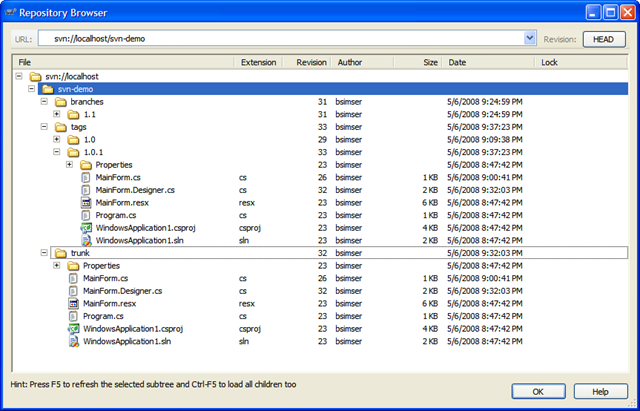
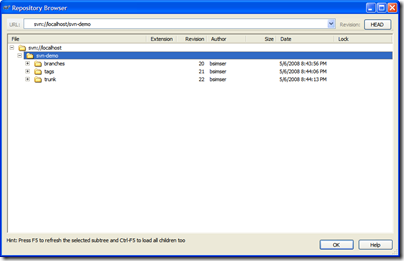
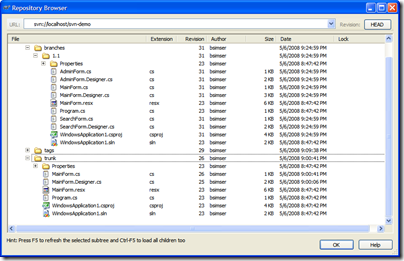
First we setup our subversion repository for the project. The typical setup is to create three folders in the repository; branches, tags, and trunk. Branches hold any branches you work on for new feature development; Tags contains named copies of revisions representing some point in time (perhaps a deployment); Trunk contains the main codebase and is always stable. These become vital to organizing your code and not clobbering other work going on as we'll see as go along.
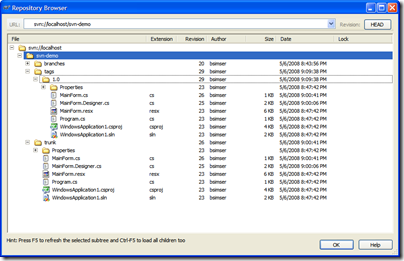
Here's our sample repository in TortoiseSVN:
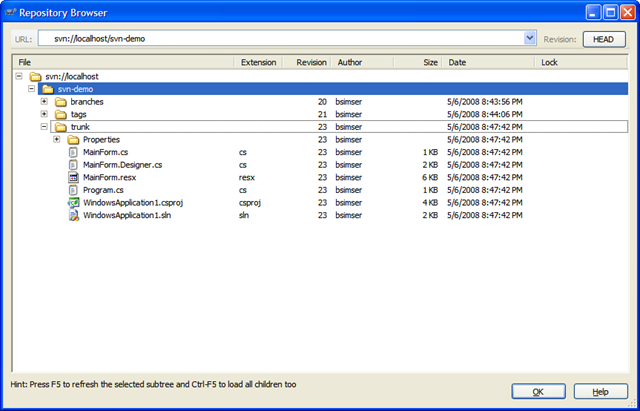
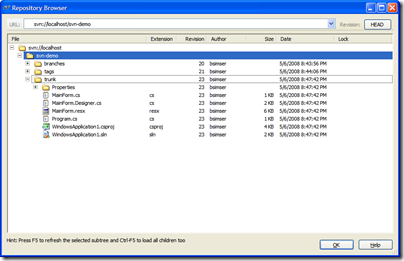
We'll start with revision 1, the basic application (the proverbial WinForms "Hello World!"). A single application with a single form. Check this in to Subversion into the trunk path. This gives us an updated repository:
Now your day to day work begins. The trunk revision is the most important (aka "The King"). Any other work being done will happen in branches and are known as servants. Servants are important but they take less priority than The King. The most important and highest priority work being done is the King (and there is only one king, viva Las Vegas baby!).
Fast forward to day 10 of our development cycle. We've been adding forms and code (all committed to the trunk by various people) and it's time to do a release. A release is cut (using whatever process you use here, the details are not important) and deployed. At that point we want to tag the release.
Tag and Deploy
Tagging is a way to identify a set of code, a snapshot, so you can retrieve it later. Once tagged, we can go back to the revision and all files from that point in time to rebuild the system. This is mainly a deployment thing. For example, you tag the release "1.0" and then continue on. At some point in the future you can check the code out using that tag, rebuild it, and it will be the same as the day you deployed it.
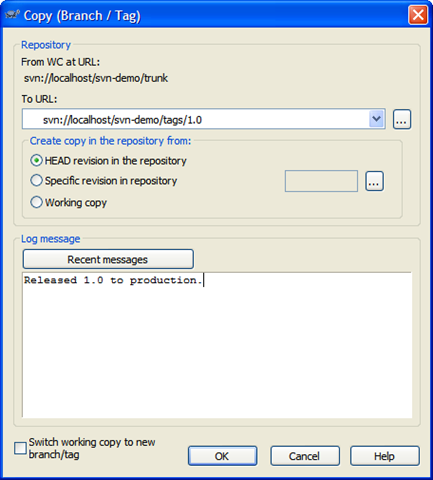
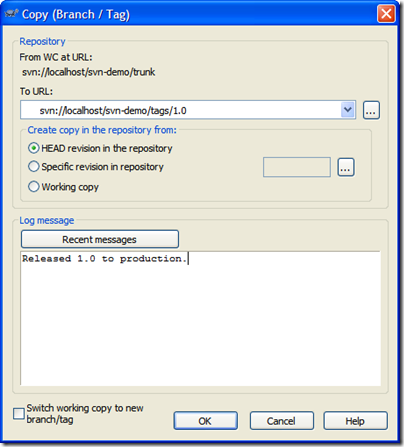
We'll tag our release as "1.0". This creates what looks like an entire copy of the code in the "tags" folder, but in reality it's all virtual. Unlike "other" source control systems, this doesn't actually make a copy and the magic of Subversion will let us pull this tag out and all the code associated with that later.
To tagging and creating branches is essentially the same act (it's the same dialog box) but will differ in where you put the tag. Subversion does not have special commands for branching or tagging, but uses so-called cheap copies instead. Cheap copies are similar to hard links in Unix, which means that instead of making a complete copy in the repository, an internal link is created, pointing to a specific tree/revision. As a result branches and tags are very quick to create, and take up almost no extra space in the repository.
So while the dialog box says "Copy" you're creating this cheap copy. Don't get miffed if you're project is huge, tagging takes next to nothing. Here's our tag ready to go:
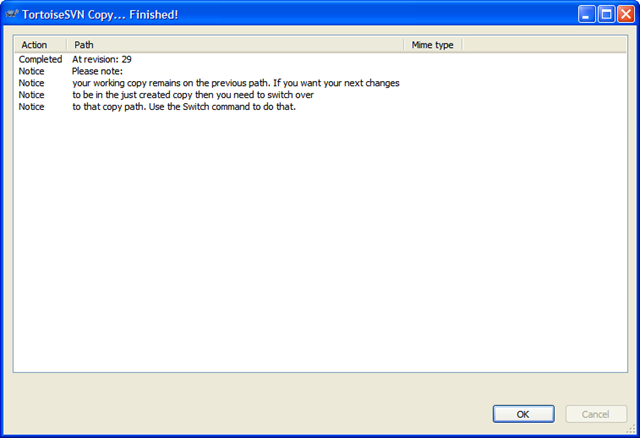
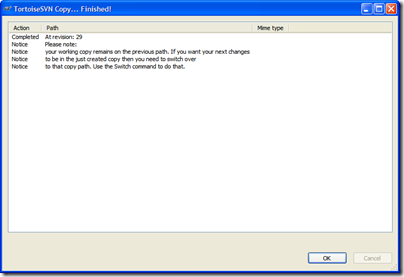
For tagging, you generally won't want to click on the "Switch working copy to new branch/tag" checkbox. Tags are just snapshots in time and you go along your merry way in the trunk. For branches we'll be doing something different. So after you create the tag, don't be alarmed when you see this message in TortoiseSVN:
And here's the repository tree after the tag. Note the tags folder has a new entry, "1.0" which contains an exact copy of what's in the "trunk", our King.
Now comes the fun. We've tagged the work and deployed. At any point in time we can go back and redeploy this version by pulling out the "1.0" tag and building/deploying from there. At this point is where we branch. We want to work in a new feature set. This is going to involve new dialogs and new code.
Branching New Features
Why do we branch? Isn't branching bad?
No. Branching, when used this way keeps your trunk clean. Remember, there can only be one King (trunk). Any other work is a servant and will eventually go into the trunk.
Why again do we branch? Imagine if we didn't branch. So right after you apply the "1.0" tag start modifying trunk. Sure, we can go back to "1.0" but how are we going to get any changes merged together when we're on a single line? We're also violating the "One King" rule. Who's the King now? Our new branch becomes a servant. The King still takes priority (for example to fix bugs) but work will continue on in the servant branch.
Walk with me on this, by the end you'll see what the branch is for and why we want it.
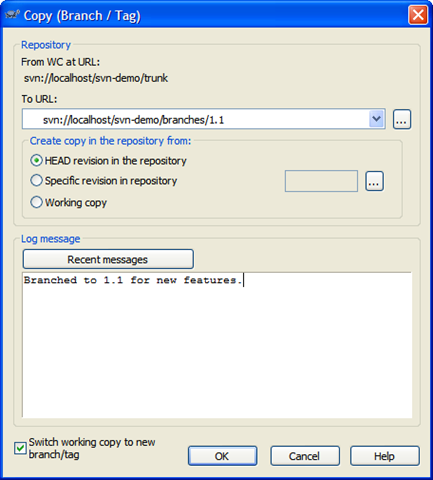
We'll create a new branch just like creating a tag. Call the branch "1.1" except in this case, we're going to switch to the branch as our working copy. Here's the branch dialog:
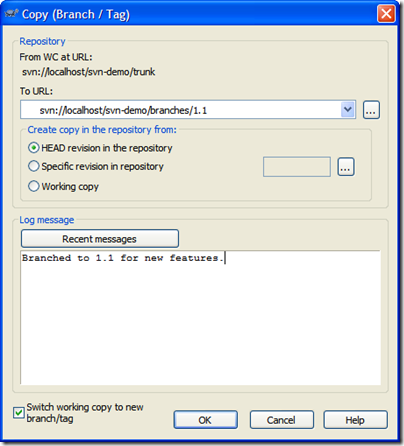
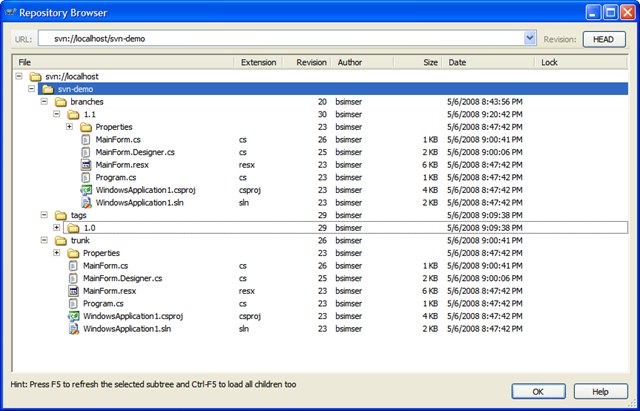
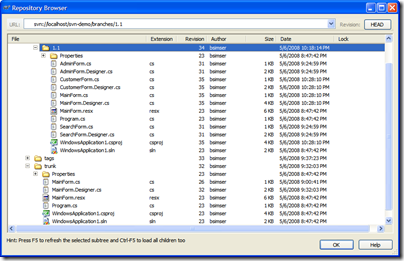
And here's the repository after the branch. Our work is now all going to be committed to the "svn-demo/branches/1.1" branch, keeping the trunk clean.
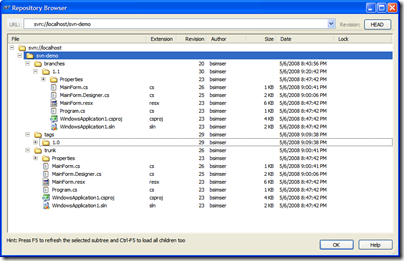
Work in the 1.1 branch is underway with new features being added. We've created a few new forms, modified the main form, and generally added new functionality. The 1.1 branch is quite different from the original trunk it came from now:
A couple of scenarios will arise out of this. For example, if there's a bug found in the 1.0 version we deployed what do you do? You don't want to dirty the 1.0 tag. That's why trunk is King (and there is only one King). "trunk" is still the most important thing being worked on (at this point its in testing or production or whatever). Until it's verified, everyone else is a servant. Any problems found in "trunk" can be resolved on trunk. So we'll explore that scenario.
Waiter, There's a Bug in my Trunk!
There's a problem with 1.0. The window title is wrong. It reads "Hello World!" but it should read "Hello World?".
Huge problem! Stop the presses. Halt the line. We need to fix this now!
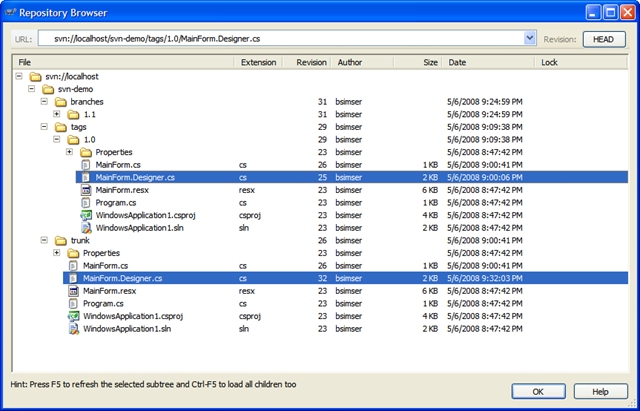
You may be tempted to create a branch, fix it, then merge the branch back into trunk. This might be normal, but our trunk is clean so we can just work with it directly. Check out a copy of trunk to a local directory and we'll do the fix. Then commit it back. Now here's the updated repository:
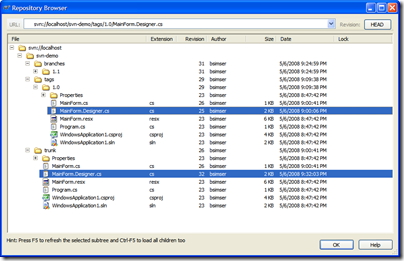
I've highlighted the file that changed in both versions. "/tags/1.0" is our deployed version (revision 25), "/trunk" is our bug fix update (revision 32). We can still, at any point, re-deploy "1.0" without any problems.
We'll do a deploy of our new trunk (which we'll call "1.0.1") and a series of exhaustive and intensive tests beings. Weeks pass testing our massive change and finally QA accepts the version and allows it be deployed to production. This will replace "1.0" in production with "1.0.1" and the updated title bar. Tag trunk as "1.0.1" like we did "1.0" above and we'll now have this in our repository:
The Graph is your Friend
TortoiseSVN has a wonderful feature called "Revision Graph" which gives you a visual tree of your branches and tags and revisions. You will live and die by this tool. Here's ours so far:

From this visual we can assess:
- A tag called "1.0" was created from the trunk at revision 28, creating revision 29
- A branch called "1.1" was created from the trunk at revision 29
- Work continues on the "1.1" branch with daily commits (so far at revision 31)
- A tag called "1.0.1" was created from the trunk (after a bug fix) at revision 32, creating revision 33
At this point I want to point out some major advantages with this approach:
- You can rebuild any deployed release easily (well, as long as you tagged it in the first place)
- Fixes can be done to the trunk and deployed quickly
- Work can continue on separate features without disturbing the main work
Day to Day Merges
So now we have a bit of a disconnect don't we? The trunk (revision 32) and the re-deployed tagged version (1.0.1, revision 33) contains the fix we need however we're working on Feature X in the 1.1 branch. We don't have that fix. If we were to merge our code back to the trunk (which we will have to do at some point) we might miss this fix, or worse yet clobber it.
To avoid this problem, anyone working in a branch follows one simple rule. Each day (say at the start of the day) you update your branch from the trunk. In other words, you pick up any changes that have been applied to the trunk into your little branched world. Doing this will avoid any merge issues when you commit your branch back to the trunk.
We do this with a merge. It's a simple merge but one that has to happen, and merges can get complicated and ugly. In your working directory where you're commits are happening on the branch, you won't see changes to trunk.
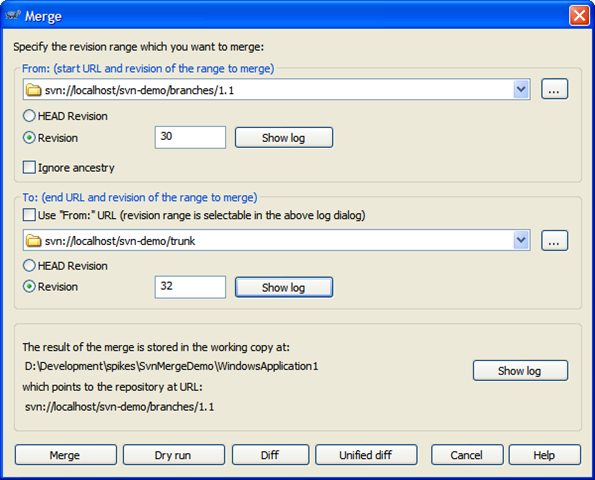
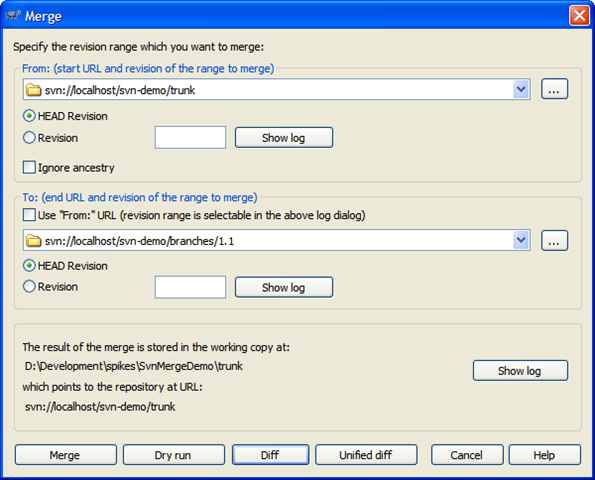
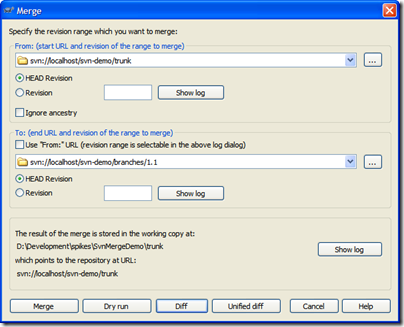
Here's the merge dialog that we perform on a daily basis. We'll merge changes from the trunk into the 1.1 branch:
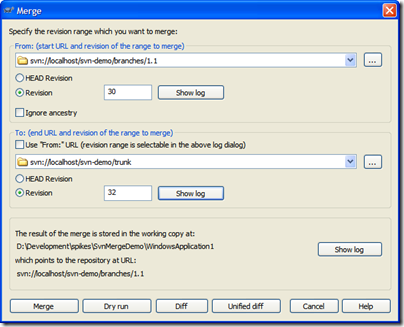
A few notes about this merge:
- We merge from the branch and specify the branch in the top section. This seems backwards but we're merging "from a point in time" which needs to be the last revision when the two trees (trunk and branch) were synchronized. Remember, we're looking for all the changes "from trunk to branch" since we branched. The revision graph is essential in determining this. In our case, this is our first sync and is when we created the branch (revision 30).
- By default the merge to uses the "From" value but we want to merge into our branch so uncheck this and pick the trunk in the "To" section. For the trunk we're going to pick the HEAD revision but this happens to be revision 32. Picking either HEAD or revision 32 here results in the same merge.
- Confirm the location and behaviour you expect in the bottom section. The working copy should be your current working folder, and it should end up pointing at your current branch
- Always (always) do a Dry run first and confirm the updates your going to do are correct.
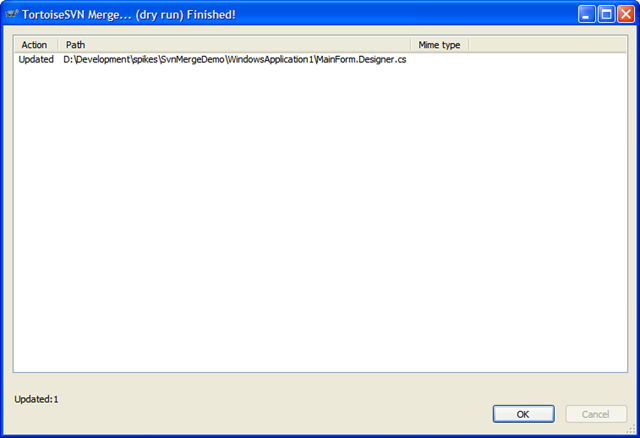
So in this merge we expect to get the changes to MainForm.Designer.cs (that title change bug). If we had selected the HEAD revision for our branch version rather than the time where the branch split off from trunk, we would be comparing all the changes. This would result in the dry run telling us we have new forms. This is incorrect because a) we only want the changes from trunk and b) trunk doesn't know (or need to know) about any new forms we created. We're only interested in the changes made on trunk that we don't have yet.
Here's the dry run dialog with the proper response (based on the last merge dialog):
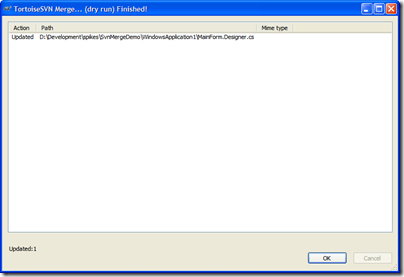
Perfect! We just want the changes to MainForm.Designer.cs (or whatever files changed since we last sync' d) and we got them. Execute this to get the new changes from trunk into your branch.
When you do a merge, you're merging those changes into your working copy but you're still one more step away. This will modify your working code but now you have to commit it back to the repository. If you check your updates you'll see that the MainForm.Designer.cs file has changed. Here's the unified diff of the changes:
Index: D:/Development/spikes/SvnMergeDemo/WindowsApplication1/MainForm.Designer.cs
===================================================================
--- D:/Development/spikes/SvnMergeDemo/WindowsApplication1/MainForm.Designer.cs (revision 31)
+++ D:/Development/spikes/SvnMergeDemo/WindowsApplication1/MainForm.Designer.cs (working copy)
@@ -61,7 +61,7 @@
this.Controls.Add(this.button1);
this.Name = "MainForm";
this.StartPosition = System.Windows.Forms.FormStartPosition.CenterScreen;
- this.Text = "Hello World!";
+ this.Text = "Hello World?";
this.Load += new System.EventHandler(this.MainForm_Load);
this.ResumeLayout(false);As you can see, the title bar change is here and replaces our old (buggy) version.
Commit this to the repository. Your branch now has the changes from trunk and you can continue on with your new feature work.
Remember, the key point of working in the branch is we don't pollute the trunk with our new dialogs or code, yet doing this daily merge (which will take all of 5 minutes on any codebase, trust me ;) keeps your branch up to date with any changes that may have happened.
Getting back to trunk
As we continue with our day to day work in the 1.1 branch, more changes might happen with trunk. More bug fixes, etc. However we don't introduce new features. We only add things on our branch. In the rare instance we're building a new feature while another feature is in play, we might create another branch with another team. I would however keep the number of active branches going on to a minimum. It'll just get ugly later in life.
In any case, we continue with our branch until we're ready to deploy. At this point we probably have a stable trunk (we should always have a stable trunk) with a number of tags. All changes in the trunk are in our branch and the team has decided it's time to deploy a new version to replace 1.0.1. This is our 1.1 branch and we need to merge all the new stuff in 1.1 back into trunk.
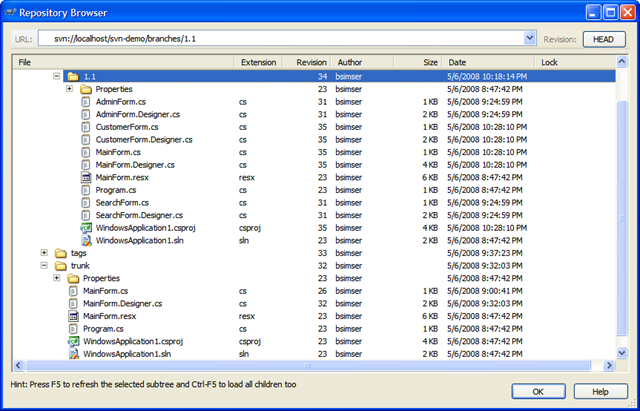
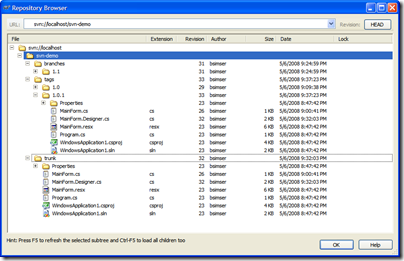
Here's our repository as it stands:
- The 1.1 branch contains all of our new work, 3 additional forms and some changes to the main form to invoke our new forms
- As a result of our daily "merge from trunk" routine, we have any bug fixes or changes that were done in trunk
- Our trunk is clean and the version that was deployed (with various tags in our tags folder)
To merge back into the trunk it's the opposite of what we do on a daily basis. Rather than merging into the branch, we reverse it and merge into trunk. Also, you'll need a working copy of trunk to merge into. Check out trunk into a folder and invoke the merge. Again, the key point here is to pick the right revision. For the branch it'll be the HEAD revision. For trunk, it's the last point of synchronization which in this case is revision 32. Here's the merge dialog to commit our 1.1. features to the trunk.
In this case, we're committing to a working folder with a copy of trunk checked out to it. Click on Diff to see what changes are going to be applied:
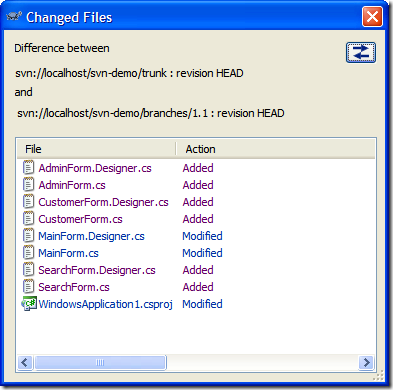
Here we've added our new forms and there's changes to the MainForm.cs and MainForm.Designer.cs (we've added buttons to invoke the new dialogs). Here's the unified diff of MainForm.Designer.cs (with some lines removed for brevity):
Index: MainForm.Designer.cs
===================================================================
--- MainForm.Designer.cs (.../trunk) (revision 35)
+++ MainForm.Designer.cs (.../branches/1.1) (revision 35)
@@ -28,13 +28,49 @@
/// </summary>
private void InitializeComponent()
{
+ this.button1 = new System.Windows.Forms.Button();
+ this.button2 = new System.Windows.Forms.Button();
+ this.button3 = new System.Windows.Forms.Button();
this.SuspendLayout();
//
+ // button1
+ //
+ this.button1.Location = new System.Drawing.Point(12, 12);
+ this.button1.Text = "Search";
+ //
+ // button2
+ //
+ this.button2.Location = new System.Drawing.Point(12, 41);
+ this.button2.Text = "Admin";
+ //
+ // button3
+ //
+ this.button3.Location = new System.Drawing.Point(12, 70);
+ this.button3.Text = "Customers";
+ //
// MainForm
//
+ this.Controls.Add(this.button3);
+ this.Controls.Add(this.button2);
+ this.Controls.Add(this.button1);
this.Name = "MainForm";
this.StartPosition = System.Windows.Forms.FormStartPosition.CenterScreen;
this.Text = "Hello World?";
@@ -44,6 +80,10 @@
}
#endregion
+
+ private System.Windows.Forms.Button button1;
+ private System.Windows.Forms.Button button2;
+ private System.Windows.Forms.Button button3;
}
}Note towards the bottom of this diff, this.Text = "Hello World?". This was the result of our daily merge so there's nothing to be applied back to trunk. We're in sync here. Only the changes/additions/deletions are applied which will bring "trunk" up to par with the 1.1 branch work. Again, do your dry run. You should see only the new work done in the branch as being applied to trunk. If not; stop, drop, and roll and recheck your revisions.
Again, the trunk now is merged together with the 1.1 branch. At this point you'll want to load the solution up, build it, run unit tests, etc. and do a sanity check that everything works as expected. You would probably do your deployment and tag the new trunk as "1.1".
You can just simply ditch the branch folder or leave it there in the repository. After all, it's just a symbolic link and doesn't take up much space (we have a new tag created in our repository on every CruiseControl.NET build so there are hundreds of tags, no big deal).
Lather, Rinse, Repeat
Now you're back on the trunk. Trunk is King, there is only one King, and your day to day work continues with whatever feature you're working on. You have the option to "always live in the branch" which might be an idea but this requires that daily merge from trunk and could cause problems. There's no problem "running on trunk" and building from it. The point at which you branch should be when you do a release and want to continue on with new (different) work, otherwise daily commits to trunk by the entire team is fine.
When a new feature comes along, branch, move part of the team (or the entire team) to that branch and keep trunk clean, doing any bug fixes as they come up. Then merge back from the feature branch back into trunk at the appropriate time. Keep doing this as often as necessary, until you run out of money or the team quits. Sit back, relax, and enjoy the simplicity of life.
Conclusion
It may seem complicated but it's really pretty basic when you boil it down. Just follow a few simple rules:
- On a daily basis, developers in branches merge changes from the trunk into their branch
- Merge branch features back into trunk when you're ready to deploy
- Bug fixes are performed on the trunk then tagged and re-deployed
Give it a shot, email me if you're stuck or lost, or let me know what your experiences are.
Enjoy!
-
Unit Test Projects or Not?
 It's funny how the world works. A butterfly flaps it's wings in Brazil, and a tornado forms in Texas 1,000 miles away. Phil Haack posted a poll about unit test project structure and asked the very question we've come to on our current project. Should unit tests belong in their own project or as part of the system? I was going to post a comment on Phil's entry, but figured I would drag my explanation and description out to a full post here.
In the past I've *always* created a separate test project. Tree Surgeon by default does this (and now I'm looking at adding an option to let you decide at code generation time) and most projects I know of work this way. You create your MyApp.Core project (containing your domain logic) and a MyApp.Test project with all the unit tests. More recently I've been creating MyApp.Specs project but that's just a different evolution.
In the next project we're working on, we're looking to shift this approach. A shift to include unit tests in our MyApp.Core project. Here's some reasons and thinking behind it.
With unit tests (or specifications) in a separate project you end up mimicking the structure of your domain and create a namespace hierarchy. By default .NET assemblies have a default namespace for your application and then the name of any folder in the project is appended to the default namespace. So if your assemblies default namespace is MyApp.Core (and the namespace defaults to the name of the assembly) and you create a folder called Customer, all classes in that folder will be in the MyApp.Core.Customer namespace. In your test project you have a similar thing and usually you'll have the default namespace to be MyApp.Test (the name of the assembly).
Since there is only one test assembly (assuming you don't break them up that is) then you don't necessarily want to create a folder called CustomerSpecs (or CustomerTests or even Customer) so you might create a folder called Domain. After all, you're unit testing the domain but then they'll be the UI, Presenters, Factories, Data Access, etc. Do you create a separate test assembly for all of these? Probably not.
Let's see, we have an assembly (MyApp.Core), a class (Customer) in a namespace (MyApp.Core.Customer). Now you've got a test assembly (MyApp.Test), a set of Customer tests (CustomerSpecs.cs or CustomerTests.cs or whatever) in a domain namespace (MyApp.Test.Domain). This is getting a little complicated, but no big deal from a resolution perspective. You'll just bring in the namespaces you need and bang (or BAM!).
However two things seem to arise out of this setup.
First (which might kick off it's own huge debate) you need access to your Customer class and potentially other classes, enumerations, etc. that it uses which are locked away in MyApp.Core.dll. That means you have two options. Either you make the Customer class public or you use the InternalsVisibleTo attribute to let MyApp.Test.dll see the stuff inside of MyApp.Core.dll. There's another option here, slam all the files into one assembly and don't worry about it from a testing perspective. That might alleviate the problem but that's a different blog entry.
The second thing that comes out of this is a fairly deep and wide namespace hierarchy in your test assembly. That might not be a big deal unto itself, but could be an inconvenience. In addition the deep impact this might cause, let's say you have 30 domain classes and the subsequent 30 or so fixtures (or more, or less, doesn't really matter). And these are scattered around in various folders. Each time you touch the fixture to write a test or look at the domain object and create some test, you're playing hunt and peck inside your test assembly to find the right spot to match the folder structure. Of course if you don't care and toss everything into a single folder you won't care, but I think that's a different type of maintenance you don't want to get into. Then, let's say you restructure your domain (which can happen a few times throughout a project) and now some of the classes relating to Customer move into some other place in the hierarchy in your domain. That's easy enough with ReSharper and a move like this is pretty low-maintenance. Except now your test folder structure doesn't match your logical domain structure (or folder structure for that matter).
Okay, that's the side of the conversation about issues that we've come to on using a separate test project. Now the positives on including your tests with the code you're testing.
- I don't need a separate Test project. There's a bit of debate in the blog-o-sphere around number of projects and what's right and what's too much so keeping things lean is good.
- I don't have to go hunting for a fixture in some hierarchy that may (or may not) be valid or the same as my domain. With ReSharper it's easy to find files/classes, but using a separate test project I have double maintenance to deal with. If I want to keep them in sync, it's more work.
- I don't have to expose my domain to my tests. As everything is in one project I can use OO principles and maintain encapsulation. When you create a new class, there's a damn good reason it's marked as internal and not public. If my entire domain is internal I can choose to expose what I need outside of the system/assembly as needed rather than "make it public so the test assembly can see it". True, there are tricks to expose MyApp.Core.dll to MyApp.Test.dll but they're hacks IMHO.
- I can leverage my unit testing framework in my runtime environment. This is probably the biggest advantage I see when I do something like create a Test folder under my Customer folder in my domain project. I can choose to ship my unit testing framework tools (MbUnit.Framework.dll or MbUnit.Gui.exe) with my system. This would be useful say in a QA or User Acceptance environment where I can run my tests against the real environment. This might not be something you want to do all the time, but I think it's good to have the option.
Here are some arguments I've heard for including your test code with production code that I'll address.
"If my tests are in my domain, I have a reliance on my unit test framework assemblies" - Yeah? So. If I wrap log4net I have a dependency on deploying log4net.dll as well. I'm not sure I see a disadvantage to this. There's been people saying they were "bitten" by this, but I'm sure what the bite is like or what the impact of that bite might be. Optionally, when we deploy we can decide to deploy our test code and it's dependencies as needed. Just because it's there doesn't mean it needs to go out the door. If we use our NAnt build scripts, we can not include the *Test* code and omit the MbUnit.Framework.dll files. Clean and lean.
"I want to see my tests and only my tests in one project and what I'm testing in another" - Again, not sure the advantage to this. If anything, keeping them together reduces the amount of "jumping" around you do in your IDE from this project to a test project, then back again. I'm not convinced or sure why you "want" to see tests in one project.
"Production code is production code and not test code!" - Not sure what this means, since I consider *all* code production code, tests, classes, etc. The ability to unit test my "production code" in a "production environment" rather than some simulation is a bonus for me.
All in all there's no clear cut answer here. What works for you works and I think the general mass keep tests in a separate project. I want to buck the norm here and for the next project we're going to try it out differently. I think there's advantages to it (and potentially disadvantages, like having to potentially clutter up my .Core assembly with a bunch of ObjectMother classes for example) but we'll see how it goes.
I don't like not trying something because "that's the way we always did it". Doesn't make it right. So give it a shot if you want, try it out, share your experience, or leave a comment that I'm a mad coder and putting my devs through unnecessary torture.
Like Phil said, this is not "a better way" or "the right" or "wrong" way to do things. I'm going with a Test folder under my aggregate classes in my domain and we'll how that goes. YMMV.
-
WPF or WinForms, choose wisely
 WPF is all the rage (at least that's what they tell me) and it's IMHO one of the best technologies to come out of Microsoft. Still, however, companies choose to stay the course with building on WinForms. Karl Shifflett has a great blog entry on choosing WPF over ASP.NET (and great entries on WPF in general so check his blog out here). To me it's a no-brainer choosing WPF over ASP.NET, unless you're really enamored with a browser app (or forced to build one due to some constraints) and with Silverlight and XBAP (and the new features coming out shortly in Silverlight 2) building a rich interface for the web gets better and better. AJAX just doesn't cut it and is a hack IMHO.
Making the decision between WPF and WinForms however is a different story. Sure, WPF is the new hotness and WinForms is old and busted but is it the right choice? Obviously "it depends" on the situation and Microsoft is continuing to deliver and support WinForms so it won't be going away anytime soon. So what are the compelling factors to choose WPF over WinForms? Karl hints at choices of WPF over WinForms in his WPF Business Application series, but the reasons might be subtle for some.
If you're struggling here are some reasons for choosing WPF over WinForms, and let's play devils advocate as you might have to fight for some of these.
Latest Technology
Why start new development on old technologies? There's bleeding edge (Silverlight 2 perhaps) and then there's cutting edge (WPF?) and we can probably start to talk about WinForms as legacy. Start, not come to that conclusion. WinForms development can be painful (much like moose bites) but the latest technology debate is a tough one. One on hand it's lickety-split to create WPF using the tools available today (see below) and from a development perspective WPF shines because everything is an object. The crazy hoops you have to jump through just to get an image on a button or menu are all but gone when you try embedding an object onto another one in XAML. On the flipside though, most of the large UI suites (DevExpress, Infragistics, Component One, Telerik) haven't fully completed their WPF implementations and the maturity lies in their WinForm incantations. Still, starting a new project today that might be delivered say 6-12 months from now doesn't make a lot of sense building on what some might consider legacy but as usual, you have to pick the right tool for the right job.
Mature Product
While WPF is pretty young in the eyes of consumers, Microsoft has invested 5+ years of development in it. WinForms arguably has the edge on maturity here (existing since the .NET 1.0 days) but don't knock WPF as a babe in the woods. It popped up on the R&D radar back in shortly after .NET 1.1 and Visual Studio 2003 came out and has been gestating ever since. This is a plus point if you're in a boardroom or meeting with some stuffies who think it's new and shiny but with no meat behind it. Combined with its own set of unique features, try something like UI automation and WinForms and we'll talk maturity. 10 years after WinForms was born and we're still struggling with UI automation. WPF solves this in one fell swoop, and does a nice job of it to boot.
Silverlight
WPF is based on XAML for it's definitions (both application code and UI design). Silverlight is the same because after all crunching down and serializing XML is dead simple these days. While Silverlight uses a subset of WPF for it's rendering, you can re-use a lot of what you might create in WPF and your application. This makes for building multiple UIs a happy-happy-joy-joy scenario. Too many times I've been faced with the problem of building a system for web users *and* desktop users. Too many times we've had to dumb down the web because it couldn't handle the rich experience the desktop provides, or be faced with 100k of JavaScript (yeah, try debugging that mess after a few sleepless nights) so anything has to be better than this. Silverlight lets you leverage a lot of your XAML investment you make in a WPF app and with technologies like BAML you can push the envelope even further. It's a win-win scenario for everyone and lays the smack down on Flash or Java anyday.
Tools
While we live in a domain driven design world (at least some of us do, you have come out of your cave right?) with objects and collections and tests oh my, there is still the UI to design. I'm not a huge fan of the move to CSS validated Expression Web, but I understand (and agree with) the choices Microsoft made with the model. Kicking it up a notch and delivering Expression Blend with it's integration into Visual Studio makes building WPF apps a breeze. In fact, I strongly advocate and support handing the UI design off to someone better suited to it. Let's face it, developers suck the big one at building UIs (unless it's "Hello World" with a big button and an image of Scott Hanselmans face on it) so let's let the UI designers design. Blend lets you do this by just letting the designers "go wild" as it were, without having to worry about "how in the heck am I going to hook this up later". Giving a designer a copy of Visual Studio to design a WinForm app is just plain crazy, and don't even try to convert their JPG mockups that have been signed off on into a Windows Form (been there, more t-shirts, I have a lot of them) but getting a XAML file from them just plugs right into our development environment and is dead simple to wire up to whatever back-end you have going at the time.
UI Resolution
How many bugs do you have logged on your current project that say something like "cannot see button x when my screen resolution is 800x600"? As a developer, we generally work at crazy resolutions that no sane person would run at (my current desktop runs at 1680x1050) so building forms on this just plain doesn't translate well (read: at all) to a users desktop of 800x600 or 1024x768. Buttons vanish, menu options disappear, and that oh so beautiful grid that is the lynchpin of your appplication is missing the bottom 20 rows and last 10 columns. Sure, WinForm containers and whatnot help but far too many times we forget about this and end up building things off in unseen areas of the screen. WPF doesn't solve this problem, but really helps. Not only that, we're not asking users to change the resolution or font size on their screen to see things clearly. In this day and age, users need to be able to dynamically change the system at will when they're working. I've seen users running with the extra large font theme as their eyes give out on them but apps just plain don't work well when your system font is 36pt Verdana. Look at the iPhone as an example of clever UI integration. It dynamically zooms in and out as you choose to make things readable. We need more of this on the desktop applications we build to suite the needs of users who want "to see it all" at once. WPF let's us do this with less pain than WinForms.
Databinding
WPF allows for much easier data binding through its model and this can result in faster development time. Now Unka Bil isn't telling you to go out and bind your WPF creations directly to ADO.NET models. I still live and die by Domain Driven Design so binding happens on objects (probably best through a Binding<T> adapter of your domain classes) but WPF does make it easier to do this if that's your thang.
So overall it's a better experience, both from the development side and consumer side. Again, you might have some battles to fight with Corporate to jump onto the technology band-wagon, but this is might be a battle worth fighting for. WPF is no silver bullet (as I always harp, the is no silver bullet unless you're fighting werewolves) but hopefully this will help you make a more informed choice. The choice is yours, but choose wisely.
-
Fun and Adventures with VMware
 My most favorite feature of VMware Workstation today. The ability to right-click on a .vmdk file (VMware virtual disk file) and create a mapping to the inside of the disk contents to a new drive letter in your system. Pure goodness for pulling out files from an image when the image might not boot or you don't want to start it up.
My least favorite feature of VMware Workstation today. Resizing a parent disk when you have linked clones causes all of the linked clones to be invalidated. I needed more space in my guest OS (apparently 8Gb just doesn't cut it anymore with VS2008 and Windows Server 2008) so I used the vmware-vdiskmanager.exe console tool to expand the disk. Then found out all my linked clones were now invalid. Guess how many VMs I'm recreating this weekend?
Sometimes I feel like a nut...
-
Pex - A Tool in Search of an Identity
 A cohort turned my attention to something from Microsoft Research called "Pex: Dynamic Analysis and Test Generation for .NET".
I only took a quick glance at it (there doesn't seem to be any downloads available, just whitepapers and a screencast), but from what I see I already don’t like it.
First off, I have an issue with a statement almost right off the bat “By automatically generating unit tests, it helps to find bugs early”. First, I don’t believe “automatically generating unit tests” is of very much value. TDD (and more recently BDD) is about building a system that meets a business need with a solution and driving that solution out with executable specifications that can be understood by anyone. With the release of VS2005 Microsoft gave us “automatically generated unit tests” by pointing it at code and creating a bunch of crap tests that more or less really only tested the .NET framework (make sure string x is n long, lather, rinse, repeat). Also I'm not sure how automatically generating unit tests can find bugs early (which is what Pex claims). That seems to be a mystical conjuration I missed out on.
Pex claims to be taking test driven development to the next level. I don't think it even knows what level it itself is at yet.
Pex feels to me like it's trying to be like an automated FxCop (and we all know what that might be like). Looking at the walkthrough you still write a test (now called a "Parameterized Unit Test"). This smells to me like a RowTest in MbUnit terms but doesn't look like one and is used to generate more tests (it seems as partial classes to your own test class). Then you run Pex against it from inside the IDE. Here's where it gets a little fuzzy. Pex generates test cases and reports from them, with suggestions as to how to fix the failing code. For example in the walkthrough the test case suggestion is to validate the length of a string before trying to extract a substring. What is a little obscure is what exactly that suggested snippet is for, the test case or the code you're testing?
"High Code Coverage". The test cases generated by Pex "give high code coverage". Again a monkey's paw here. High code coverage means very little in the real world. Just because you have some automated "thing" hitting your code, doesn't mean it's right. Or that your code is really doing what you intended it to. I can have 100% code coverage on a lot of crap code and still have a buggy system. At best you'll catch stupid programmer errors like bounds checking and null object references. While this is a good thing, just writing a little code you can accomplish the same task a lot quicker than writing a specific unit test to generate other tests for you. Maybe it's grunt work and silly unit test code to write and maybe that's the benefit of Pex.
"Integrates with Unit Testing Frameworks". This is another red herring. What it really means is "Integrates with VSTS Unit Testing Framework". Nowhere in the documentation or site can I see it integration with MbUnit or NUnit. It does however mention it can run with MbUnit or NUnit so I assume something can be done here (maybe through template generation), but little substance is available right now.
Then there's the mock objects, [PexMock]. Again, no meat here as these are early looks but Pex supports mocking interfaces and virtual methods. Yes, in addition to building it's own NUnit clone (MSTest), NDoc clone (SandCastle), Castle.Windsor (DIAB), and NAnt (MSBuild), you can now get your very own Rhino clone in the form of PexMock! It looks a little more complex to setup and use than Rhino, but then who says Microsoft tools are simple. If it's simple to use, it can't be powerful can it?
I watched the screencast which walks through the chunker demo (apparently the only demo code they have as everything is based around it). It starts innocently enough with someone writing a test, decorated with the [PexTest] attribute. Once enough code is written to make it compile (red) you "Pex It" from the context menu. This generates some unit tests, somehow giving 73% coverage and failing (because at this point the Chunker class returns null). Pex suggests how to fix your business code along with suggestions for modifying the test.
From the error list you can jump to the generated test code (there's also an option to "Fix it" which we'll get to in a sec). The developer then implements the logic code to try to fix the test. By selecting the "Fix it" option, Pex finds the place where the null reference might occur (in the constructor) and injects code into your logic (by surrounding it with "// [Pex]" tags, ugh, horror flashbacks of Rational Rose come to my mind).
The problem with the tool is that generated tests come out like "DomainObjectValueTypeOperation_70306_211024_0_01" and "DomainObjectValueTypeOperation_70306_211024_0_02". One of the values of TDD and unit tests is for someone to look at a set of unit tests and know how the domain is supposed to behave. I know for example exactly what a spec or test called "Should_update_customer_balance_when_adding_a_new_item_to_an_existing_order" does. I don't have to crack open my Customer.cs, Order.cs and CustomerOrder.cs files to see what's going on. "CustomerStringInt32_1234_102965_0_01" means nothing to me. Okay, these are generated tests so why should I care?
This probably gets to the crux of what Pex is doing. It's generating tests for code coverage. Nothing more. I can't tell what my Pex system does from test names or maybe even looking at the tests themselves. Maybe there's an option in Pex to template the naming but even that's just going to make it a little more readable, but far from soluble to a new developer coming onto the project. Maybe I'm wrong, but if all Pex is doing is covering my butt for having bad developers, then I would rather train my developers better (like checking null references) than to have them rely on a tool to do their job for them.
A lot of smart dudes (much smarter than me) have worked on this and obviously Microsoft is putting a lot of effort into it. So who am I to say this is good, bad, or ugly. I suppose time will tell as it gets released and we see what we can really do with it. These are casual observations from a casual developer who really doesn't have any clout in the grand scheme of things. For me, I'm going to continue to write executable specs in a more readable BDD form that helps me understand the problems I'm trying to solve and not focus on how much code coverage I get from string checking, but YMMV.
-
To Release an Unbuildable TreeSurgeon?
I mentioned we were getting a release of TreeSurgeon out that included 2005 and now 2008 support. The code is all checked in so if you're interested in getting it, go for it. The "official" release hasn't been put together yet for due to problems with the third party libraries and tools TS includes when creating a new project.
The problem stems from the fact that TreeSurgeon uses old(er) and public releases of things like NCover in the build file it generates. These files are kept in a skeleton tree (where TreeSurgeon is installed to) and copied to the new tree you create when starting a new project. Trouble is Internet time has marched on and some of these tools no longer work for 2008.
When we updated the code/project generation for 2005/2008 support, it was a pretty simple matter of cleaning up the templates and generating new ones. The trouble comes from the tools that don't work with the 2008 compilers or .NET 3.5 framework. This is compounded by the fact that NCover is now commercial. The last (free) version is 1.5.8 but won't work against 3.5 assemblies and the new version (2.0) requires a trial key.
So it's a bit of a pickle when it comes to what version of a tool do we include with the latest version of TreeSurgeon that works for the new compilers? I didn't want to put together a released version of TS with a build that breaks (without developer intervention). There doesn't seem to be any other free coverage tool that I can find that will work here so I'm feeling a little stuck and looking for options.
Anyways, that's the cause for the delay in the official release. As I said, you can still grab the change set which will generate a 2005 or 2008 project however you'll need to manually upgrade the version of NCover and perhaps some other tools in the generated solution in order to get it to compile and pass all the tests. Need to take a look at the latest version of CI Factory to see what they're doing and maybe see if anyone else has some ideas. Feel free to chime in with your thoughts either in the comments here on the blog or the discussion forums here.
-
Appending nodes in XML files with xmlpeek and xmlpoke using NAnt
First post of the year and hopefully this is something useful. I think it is.
I'm currently doing a major automation-overhaul to our projects, trying to streamline everything. Part of this involves doing automated deployments of the projects to a location (say a file or web server) where a QA person can come along later and with the click of a button they can just launch an installer for any build of an application. This is very much structured like the JetBrains Nightly Build page you see here, but 100% automated for all projects using NAnt.
A lofty goal? Perhaps.
Anywho, the time to update the builds and page has come and I went hunting to see how I could do it (without having to write a silly little console app or something). To start with (and I'm not done here, but this works and is a model anyone can use) we have a basic XML file:
<?xml version="1.0" encoding="utf-8"?>
<builds>
<build>
<date>01/03/2008 15:03:41</date>
<build>0</build>
</build>
</builds>
This contains build information for the project and will be transformed using XSLT into something pretty (and useful once I add more attributes).
The challenge is that we want to append an XML node to this file during the deployment process, which is kicked off by CruiseControl.NET. Sounds easy huh. There are a few ways to do this. First, I could write that console app or something and have it update some file. Or maybe it would even write to a database. Or... no, that's getting too complicated. The next thought was to use the ability to write C# code in NAnt scripts, but then that started to get ugly real fast and more maintenance than I wanted.
Then I turned to xmlpoke. This little NAnt task let's you replace a node (or nodes) in an XML file. Trouble is that's what it's designed to do. Replace a node or property. Not append one. After about 15 minutes of Googling (my patience is pretty thin for finding an answer on the 3rd page of Google) I realized xmlpoke wasn't going to be good enough for this. Someone had come up with xmlpoke2 which did exactly what I wanted (appended data to an XML file), but to date it hasn't made it into the core or even NAntContrib.
After looking at the XML file I realized I might be able to use xmlpeek (read some XML from a file) and combine it with xmlpoke (modifying it on the way out) and write it back to the file. Maybe not the most elegant solution, but I think it's pretty nifty and it gets the job done.
First we have our XML file (above) so I created a target in NAnt to handle the update to the XML file:
<target name="publish-report" description="add the version deployed to an existing xml file">
</target>
Step 1 - Use xmlpeek to read in the entire XML node tree containing the current builds:
<!-- read in all the builds for rewriting -->
<property name="xmlnodes" value=""/>
<xmlpeek xpath="//builds" file="c:\autobuild.xml" property="xmlnodes"></xmlpeek>
Step 2 - Modify it by appending a new node with the new build info and saving it into a new property:
<!-- modify the node by adding a new one to it -->
<property name="newnode" value="<build><date>${datetime::now()}</date><build>${CCNetLabel}</build></build>" />
<property name="xmlnodes" value="${xmlnodes}${newnode}" />
Step 3 - Write it back out to the original XML file replacing the entire XML tree using xmlpoke:
<!-- rewrite it back out to the xml file using xmlpeek -->
<xmlpoke file="c:\autobuild.xml" xpath="//builds" value="${xmlnodes}" />
The result. Here's the updated XML file after running NAnt with our target task (and faking out the CCNetLabel that would usually get set by CruiseControl via a command line definition):
tools\nant\nant.exe publish-report -D:CCNetLabel=1
NAnt 0.85 (Build 0.85.2478.0; release; 14/10/2006)
Copyright (C) 2001-2006 Gerry Shaw
http://nant.sourceforge.net
Buildfile: file:///C:/development/common/Library/Common/Common.build
Target framework: Microsoft .NET Framework 2.0
Target(s) specified: publish-report
publish-report:
[xmlpeek] Peeking at 'c:\autobuild.xml' with XPath expression '//builds'.
[xmlpeek] Found '1' nodes with the XPath expression '//builds'.
[xmlpoke] Found '1' nodes matching XPath expression '//builds'.
BUILD SUCCEEDED
Total time: 0.2 seconds.
<?xml version="1.0" encoding="utf-8"?>
<builds>
<build>
<date>01/03/2008 15:03:41</date>
<build>0</build>
</build>
<build>
<date>01/03/2008 15:30:07</date>
<build>1</build>
</build>
</builds>
Now I have a continuously growing XML file with all my build numbers in them. Of course there's more info to add here like where to get the file and such but the concept works and I think it's a half decent compromise (to having to write my own task or more script). The cool thing is that you can even use it against a file like this:
<?xml version="1.0" encoding="utf-8"?>
<builds>
</builds>
This lets you start from scratch for new projects and start with build 1 (which will come from CruiseControl.NET). If the file didn't exist at all, you could even use the echo task or something like it to create the file, then update it with the task info above. Is it bullet proof? Hardly. It should work though and gives me the automation I want.
Well, I'm done for the day. That was a worthwhile hour to build this. Now I just have to go off and add in all the extra goop and hook it up to our builds.
Enjoy!
-
Two things...
Two things I learned this morning and it's not even 7AM yet.
-
You can open up an image in Paint.NET in the File Open dialog by specifying a URL to an image on the internet. I'm assuming this is nothing new and maybe any File Open dialog can do this (not sure) but it works in Paint.NET. I was opening a file that I though I had copied the local path name in the clipboard. Instead I had the URL to it on a website. So I let it go and do it's thing and lo and behold it had brought the image down and opened it up for me in Paint.NET. Cool.
-
Visual Studio (2005) holds a reference to your solution files even if you select File | Close Solution. This has bugged me for awhile but I was re-syncing my local folder with what was in TFS and needed to blow away my local directory. I selected File | Close Solution and waited a bit, then proceeded to delete the files. Up until recently, I just installed SysInternals file locker unlocker tool and up it popped telling me that msdev.exe had a hold on the files. No matter what I did I couldn't tell Visual Studio to let my files go (even opening another solution). So the only way to delete a directory of a project you've opened is to shut Visual Studio down. Very annoying to say the least.
Wonder what the rest of the day holds?
-
-
What would you rather have...
A system with no source control, or a system with no tests?
Personally I would rather have a system with no tests. At least with tests I can write them. With no source control, well, welcome to my Monday morning.
It's going to be a long week.
-
Dopewars for the BlackBerry
Huh? Dopewars? BlackBerry? That's not SharePoint. That's not Agile. Am I reading the right blog? Yup. You are. Really.
It's been awhile since I blogged here as I've been wrapped up in Baby 1.0 and a slight vacation off the grid in British Columbia (with 300 photos to pull off the camera and sift through). However I thought I would post this here as it is development related, just not my normal train of incoherent thoughts and creations.
A couple of months ago I got a new cell phone and decided on the BlackBerry Curve for a variety of reasons. Constant connection, compact, cheaper than the iPhone, etc. It was a toss up between the BlackBerry and an HTC Windows Mobile phone. Of course the Windows Mobile would be nice since I'm a bit of a Microsoft guy, but the BlackBerry won out in features and reliability. Of course, what's the first thing you do when you get a SmartPhone? Why, hunt for games silly rabbit.
There I was combing the BlackBerry archives looking for something good and came across DopeWars by Mark Sohm. I installed it and was immediately taken back to my BBS days when I ranked high in the echelons of the digital drug dealer world. The game was fun and would let me kill the hour ride on the train to work. The game was well done, easy to play, and adhered fairly true to the original although with it's own conversion to the UI constraints imposed by the BlackBerry. Still, it's fun and IMHO a good app.
Anyway, the development bug got to me and I discovered that BlackBerry apps were Java based. Not a horrible language (beats the heck out of C and the PalmOS that I played with years ago) so I set out to create my development environment and try my hand at building BlackBerry apps (still trying to build a CCTray for the BlackBerry). The SDK documentation was pretty good and contained a wealth of examples but for me, I really need a good example to pull all the bits together.
That was a bigger challenge, as anything out there in the open source land was pretty sad (from the Java/BlackBerry perspective). Lots of samples, but nothing that either a) worked or b) was a good example to understand how to glue things together. Most samples were sparse and the ones that were quite involved were so convoluted they looked like a poor mans attempt at converting Visual Basic code to C to Java (or some such silly thing).
Then I thought about DopeWars. Maybe it was another fish in a sea of crap code, but then again maybe not. I hunted down the files but couldn't find the source anywhere. So a little Internet detective work and I tracked down the author, Mark Sohm, who just happened to work for Research In Motion (the makers of the BlackBerry). Someone who works for the company writing a game? Why not. Mark had put the app together in his spare time and after a few emails I nudged him into releasing the source code as an example of writing a Java game for the BlackBerry.
A few weeks later and yet another new SourceForge site is born. You can download the binaries for DopeWars for your BlackBerry Curve (well, any Java enabled BlackBerry with colour capabilities) from here. The source code is up there and available via anonymous SVN access (instructions here). I will be putting together a source code zip file for those that don't have (or don't want to) install a Subversion client. Note that there was already a "DopeWars for BlackBerry" site on SourceForge but it consisted of C++ code that doesn't seem to compile and doesn't have a binary release so I considered it abandoned and just made another one.
I won't be doing too much development on the project (I barely have time for my current projects), but being open source (released under the MIT license) anyone can contribute to it. Feel free to fix bugs or add enhancements. Via SourceForge you can post suggestions in the forums or use the tracker (bugs, suggestions, etc.) or email me if you would like developer access to the project (just include a note about what your plans are for the code). There is one bug that bugs me and that's when you finish the game. You end up finishing when the day turns 31 rather than at the end of the 31st day. Personally I think it should let you finish any transaction on the 31st day then end. Otherwise, it's quite stable code and well separated (for a BlackBerry Java app) in terms of responsibility and separation of concerns.
So give it a look see if you have a BlackBerry, are interested in what a BB app might look like, or just want to poke around. Who knows, you might like it.